Codex: Demonology spec

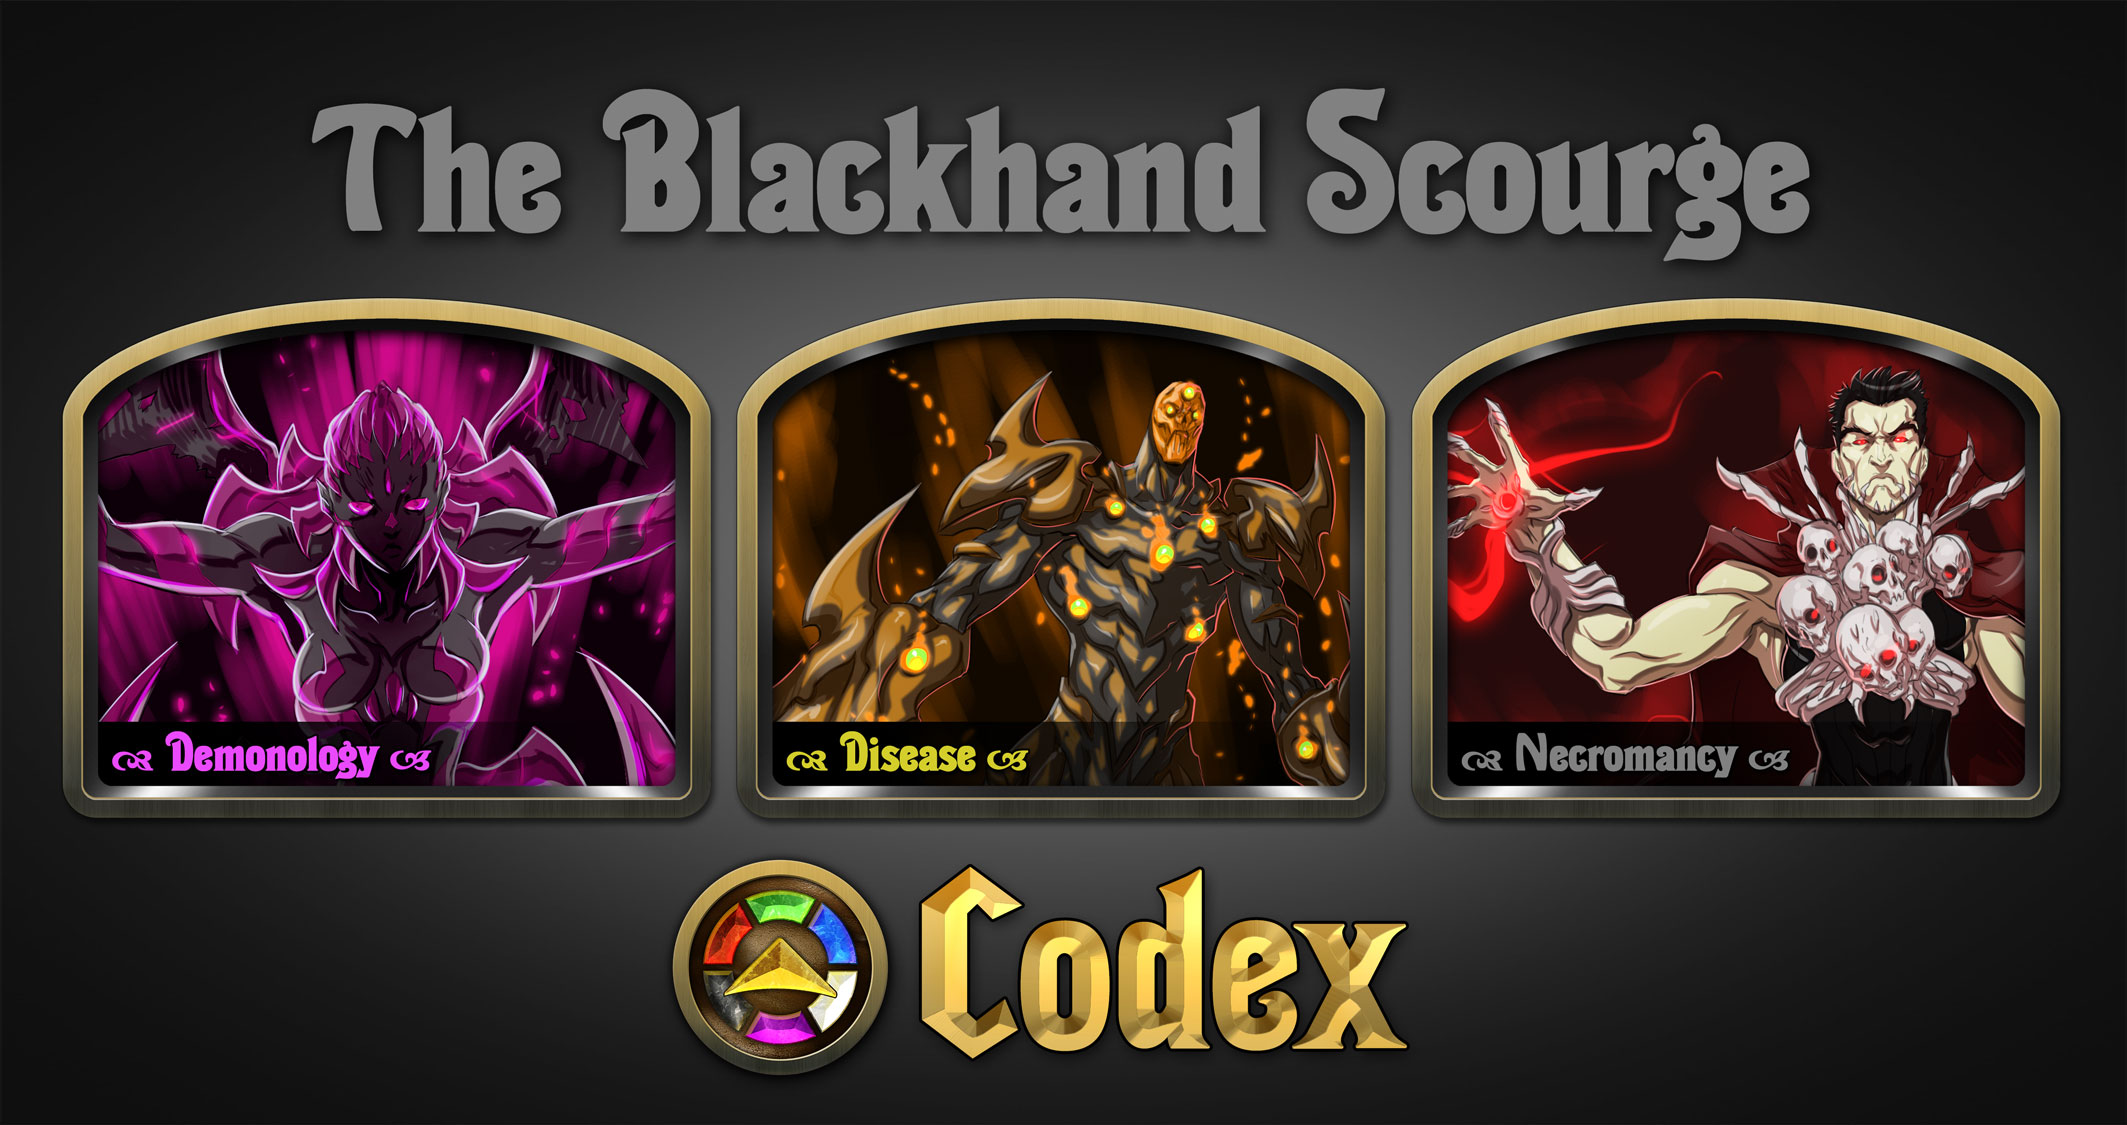
North of the realm, a shadowy presence has festered and spread across the Dreadlands. The Blackhand Scourge proliferates plague and death wherever they go. They raise the bones of the dead to serve them. Their power has increased tenfold since their leader Vandy Anadrose—now known as The Queen of Demons—made a pact with nefarious, otherworldly beings who seem to serve her for the moment. These demons wield terrifying power, but it comes at a price.

Meet the Blackhand Scourge:

“Vandy” isn’t really a scary name, but then Vandy didn’t really start out as a scary person either. Her link to Demons has made her potentially the most dangerous person in the realm. People are now afraid to even speak her name, or the names of any Demons. Some are even hesitant to say the word “Demon,” which lead some to refer to Vandy Anadrose as simply, “The Queen of Ds.” Here’s her hero card:


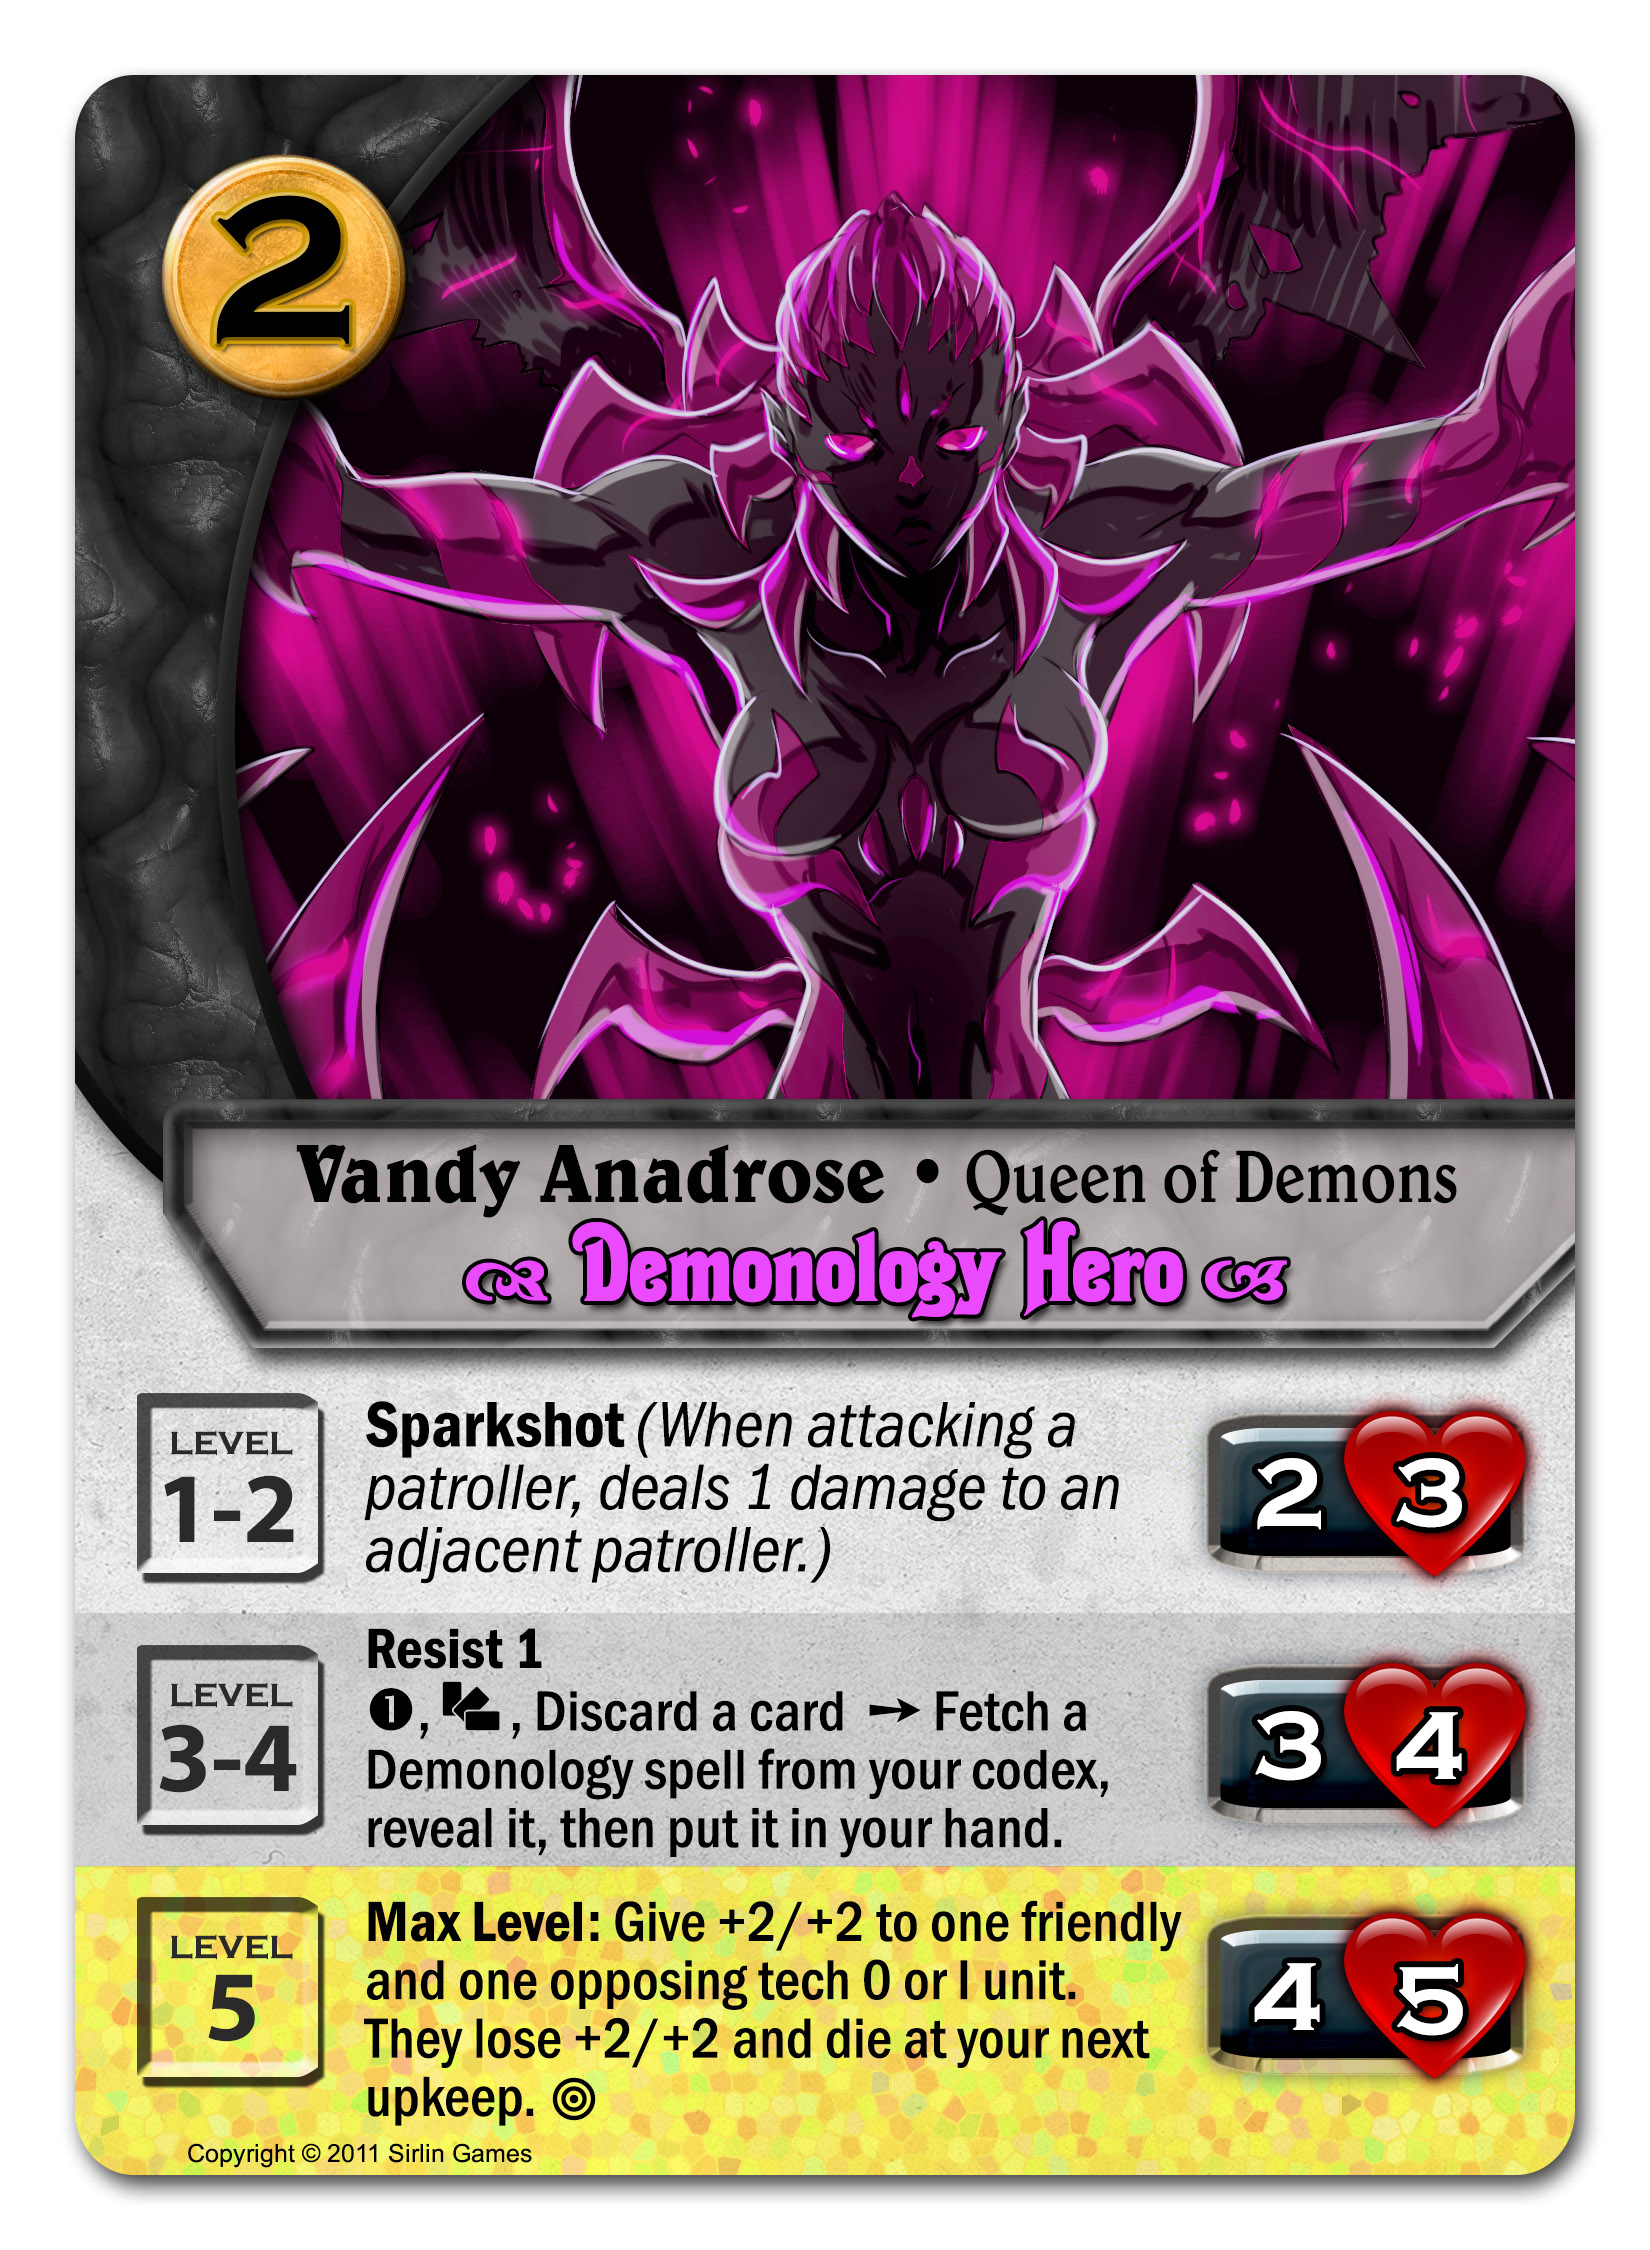
Her middle ability is important, but let’s come back to that after we’ve seen some Demonology cards. Her max level ability is pretty unusual. She can give a one-time buff to one friendly unit and one enemy unit, but then they both die in a turn. If you play your cards right and get in a good attack with your buffed unit, it sort of adds up to killing two enemy units at the price of one of yours. There’s always a catch to these Demonology abilities!

Having a black hero on your team lets you have the black starting deck. You don't need the Demonology hero herself to use the black starting deck, but there’s one particular unit that feels right at home with the rest of Demonology:


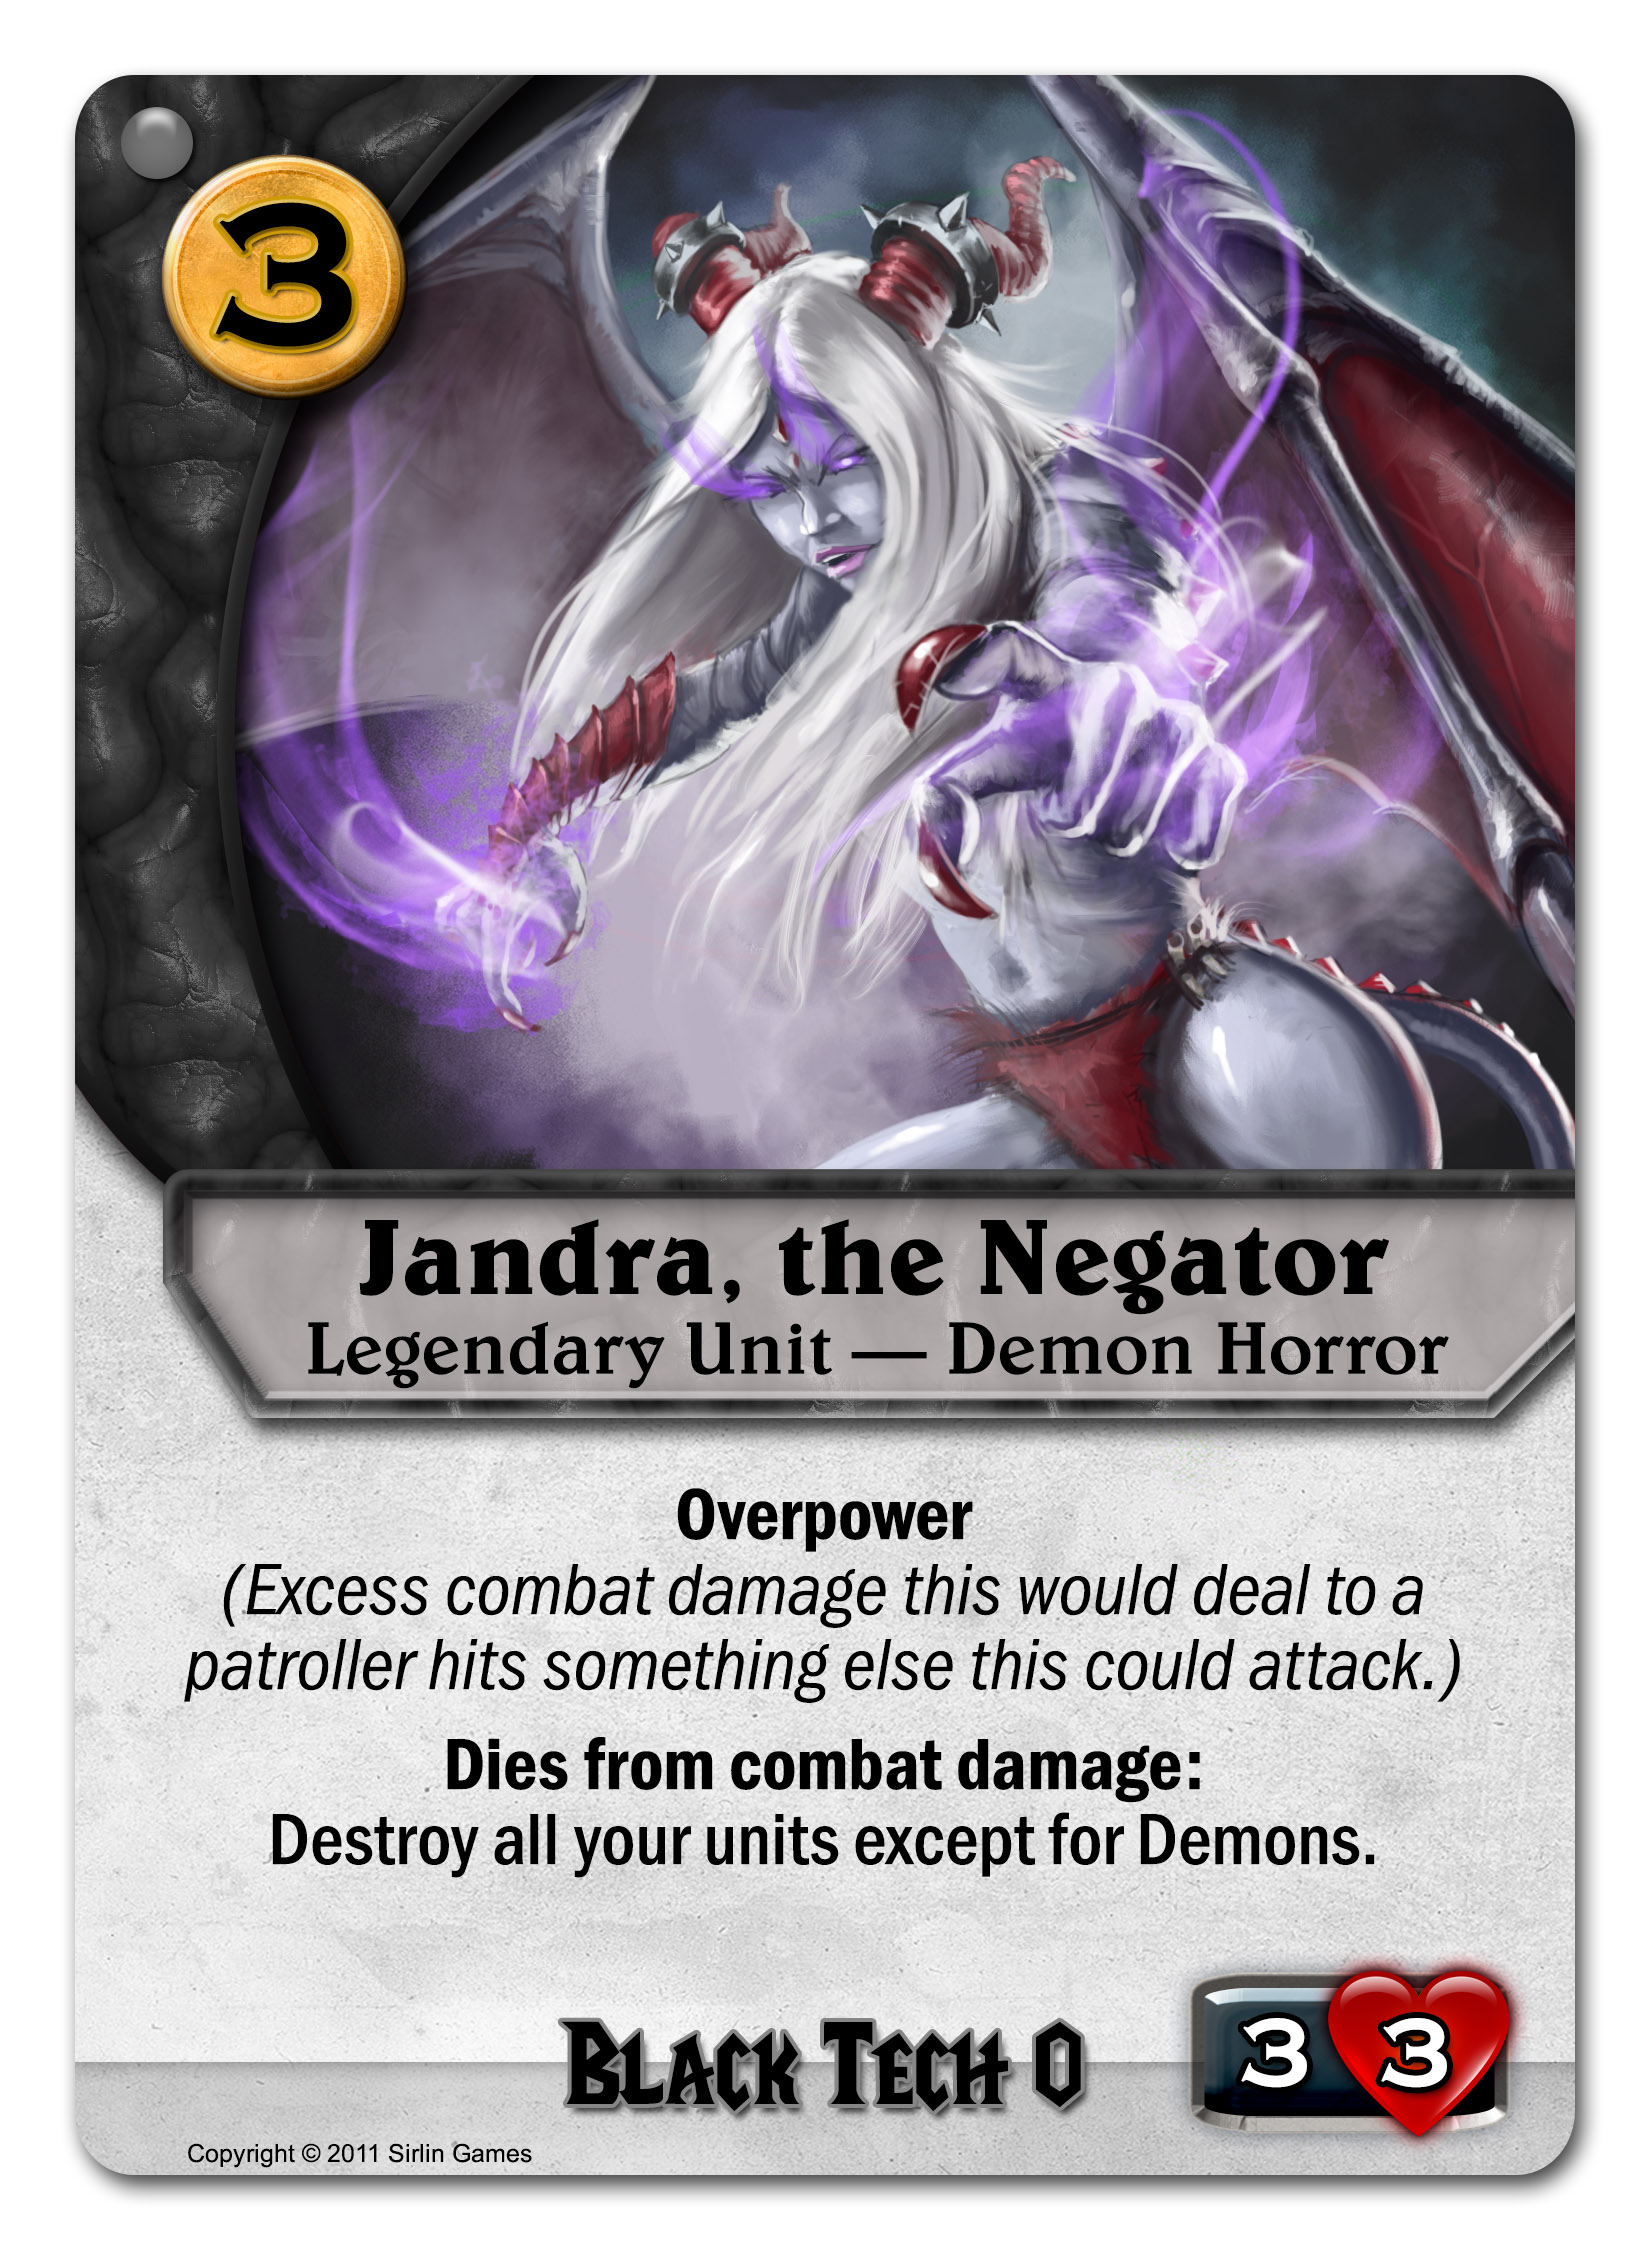
Jandra is a scary unit for a starting deck. When other players are scraping together blank 2/2s and feeling good about it, you have a 3/3. That's the biggest starting deck unit in the game. The cost of 3 gold is high for an early game card, and that’s significant, but a 3/3 in the early game shouldn't be underestimated. Keep in mind you have a 100% chance to draw this either on turn 1 or turn 2 every single game. This level of beatdown would be crushing were it not for the drawback that if Jandra dies, so do your non-Demon units. That forces you into certain lines of play that are a bit more predictable. Jandra doesn’t kill your heroes though, so you can have Vandy Anadrose fight right alongside her, no problem.

The Demonology spells are a toolbox of great effects. Do you need to protect something? Or kill something?

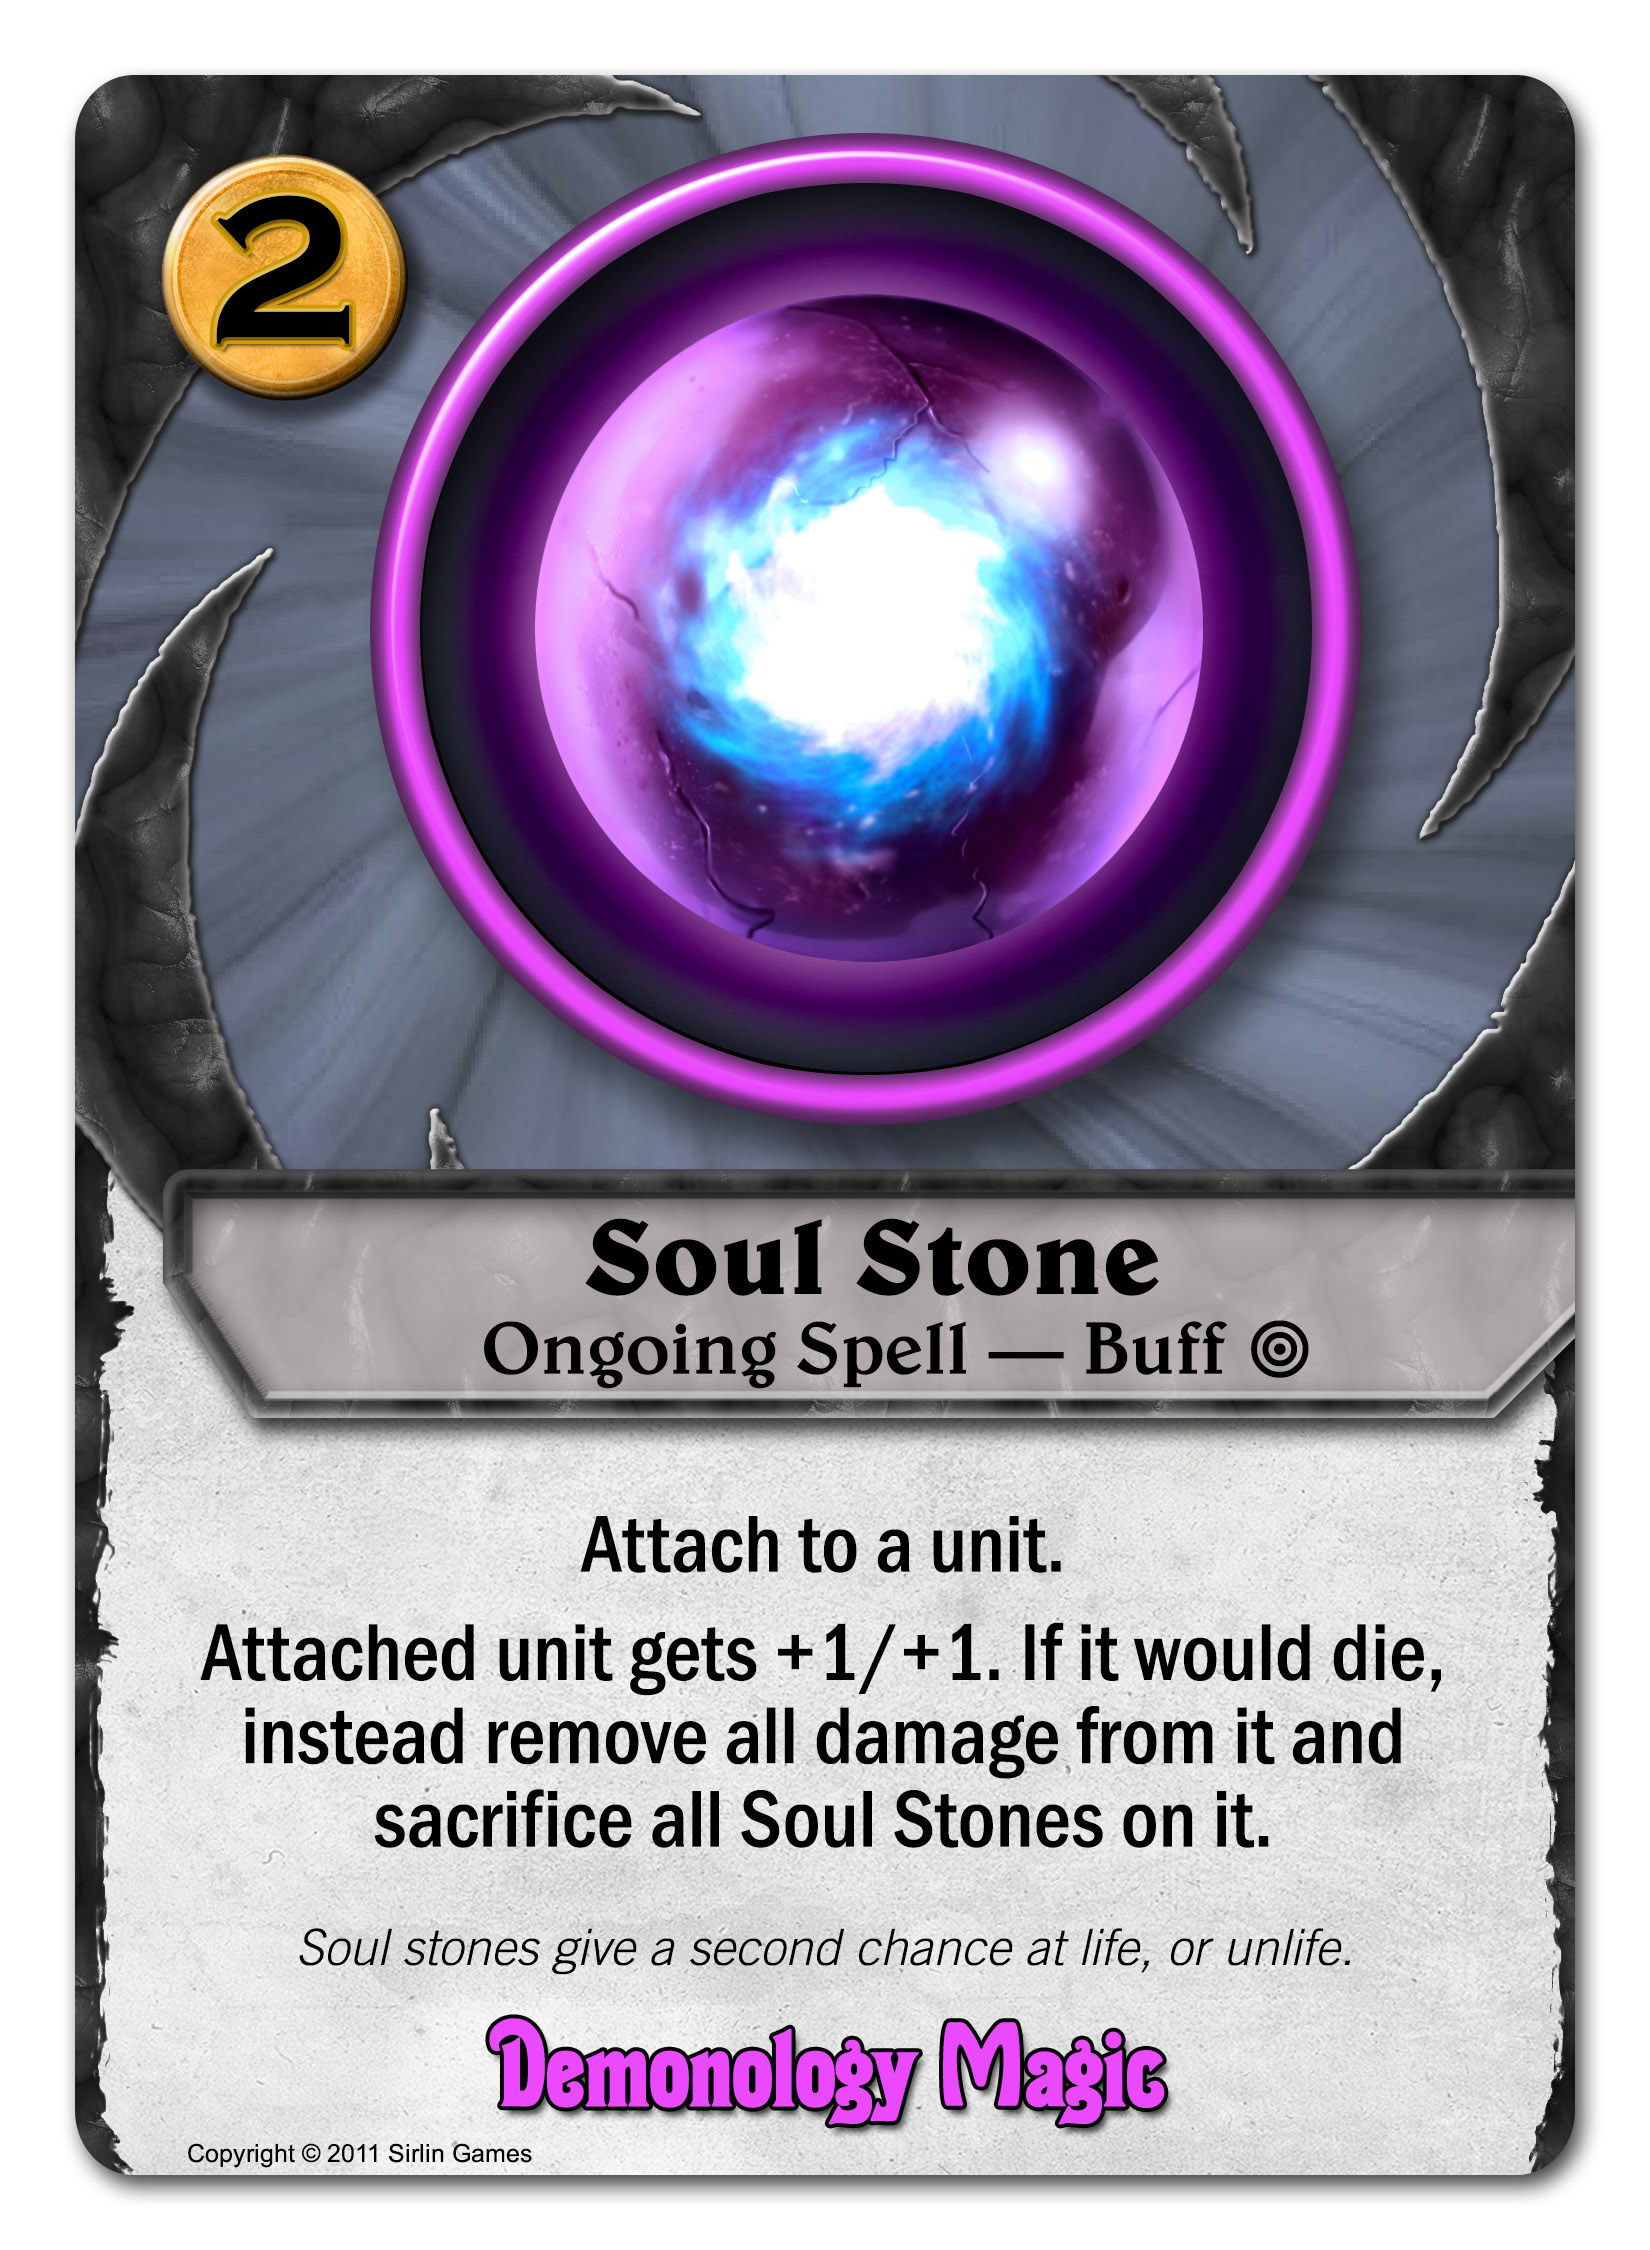
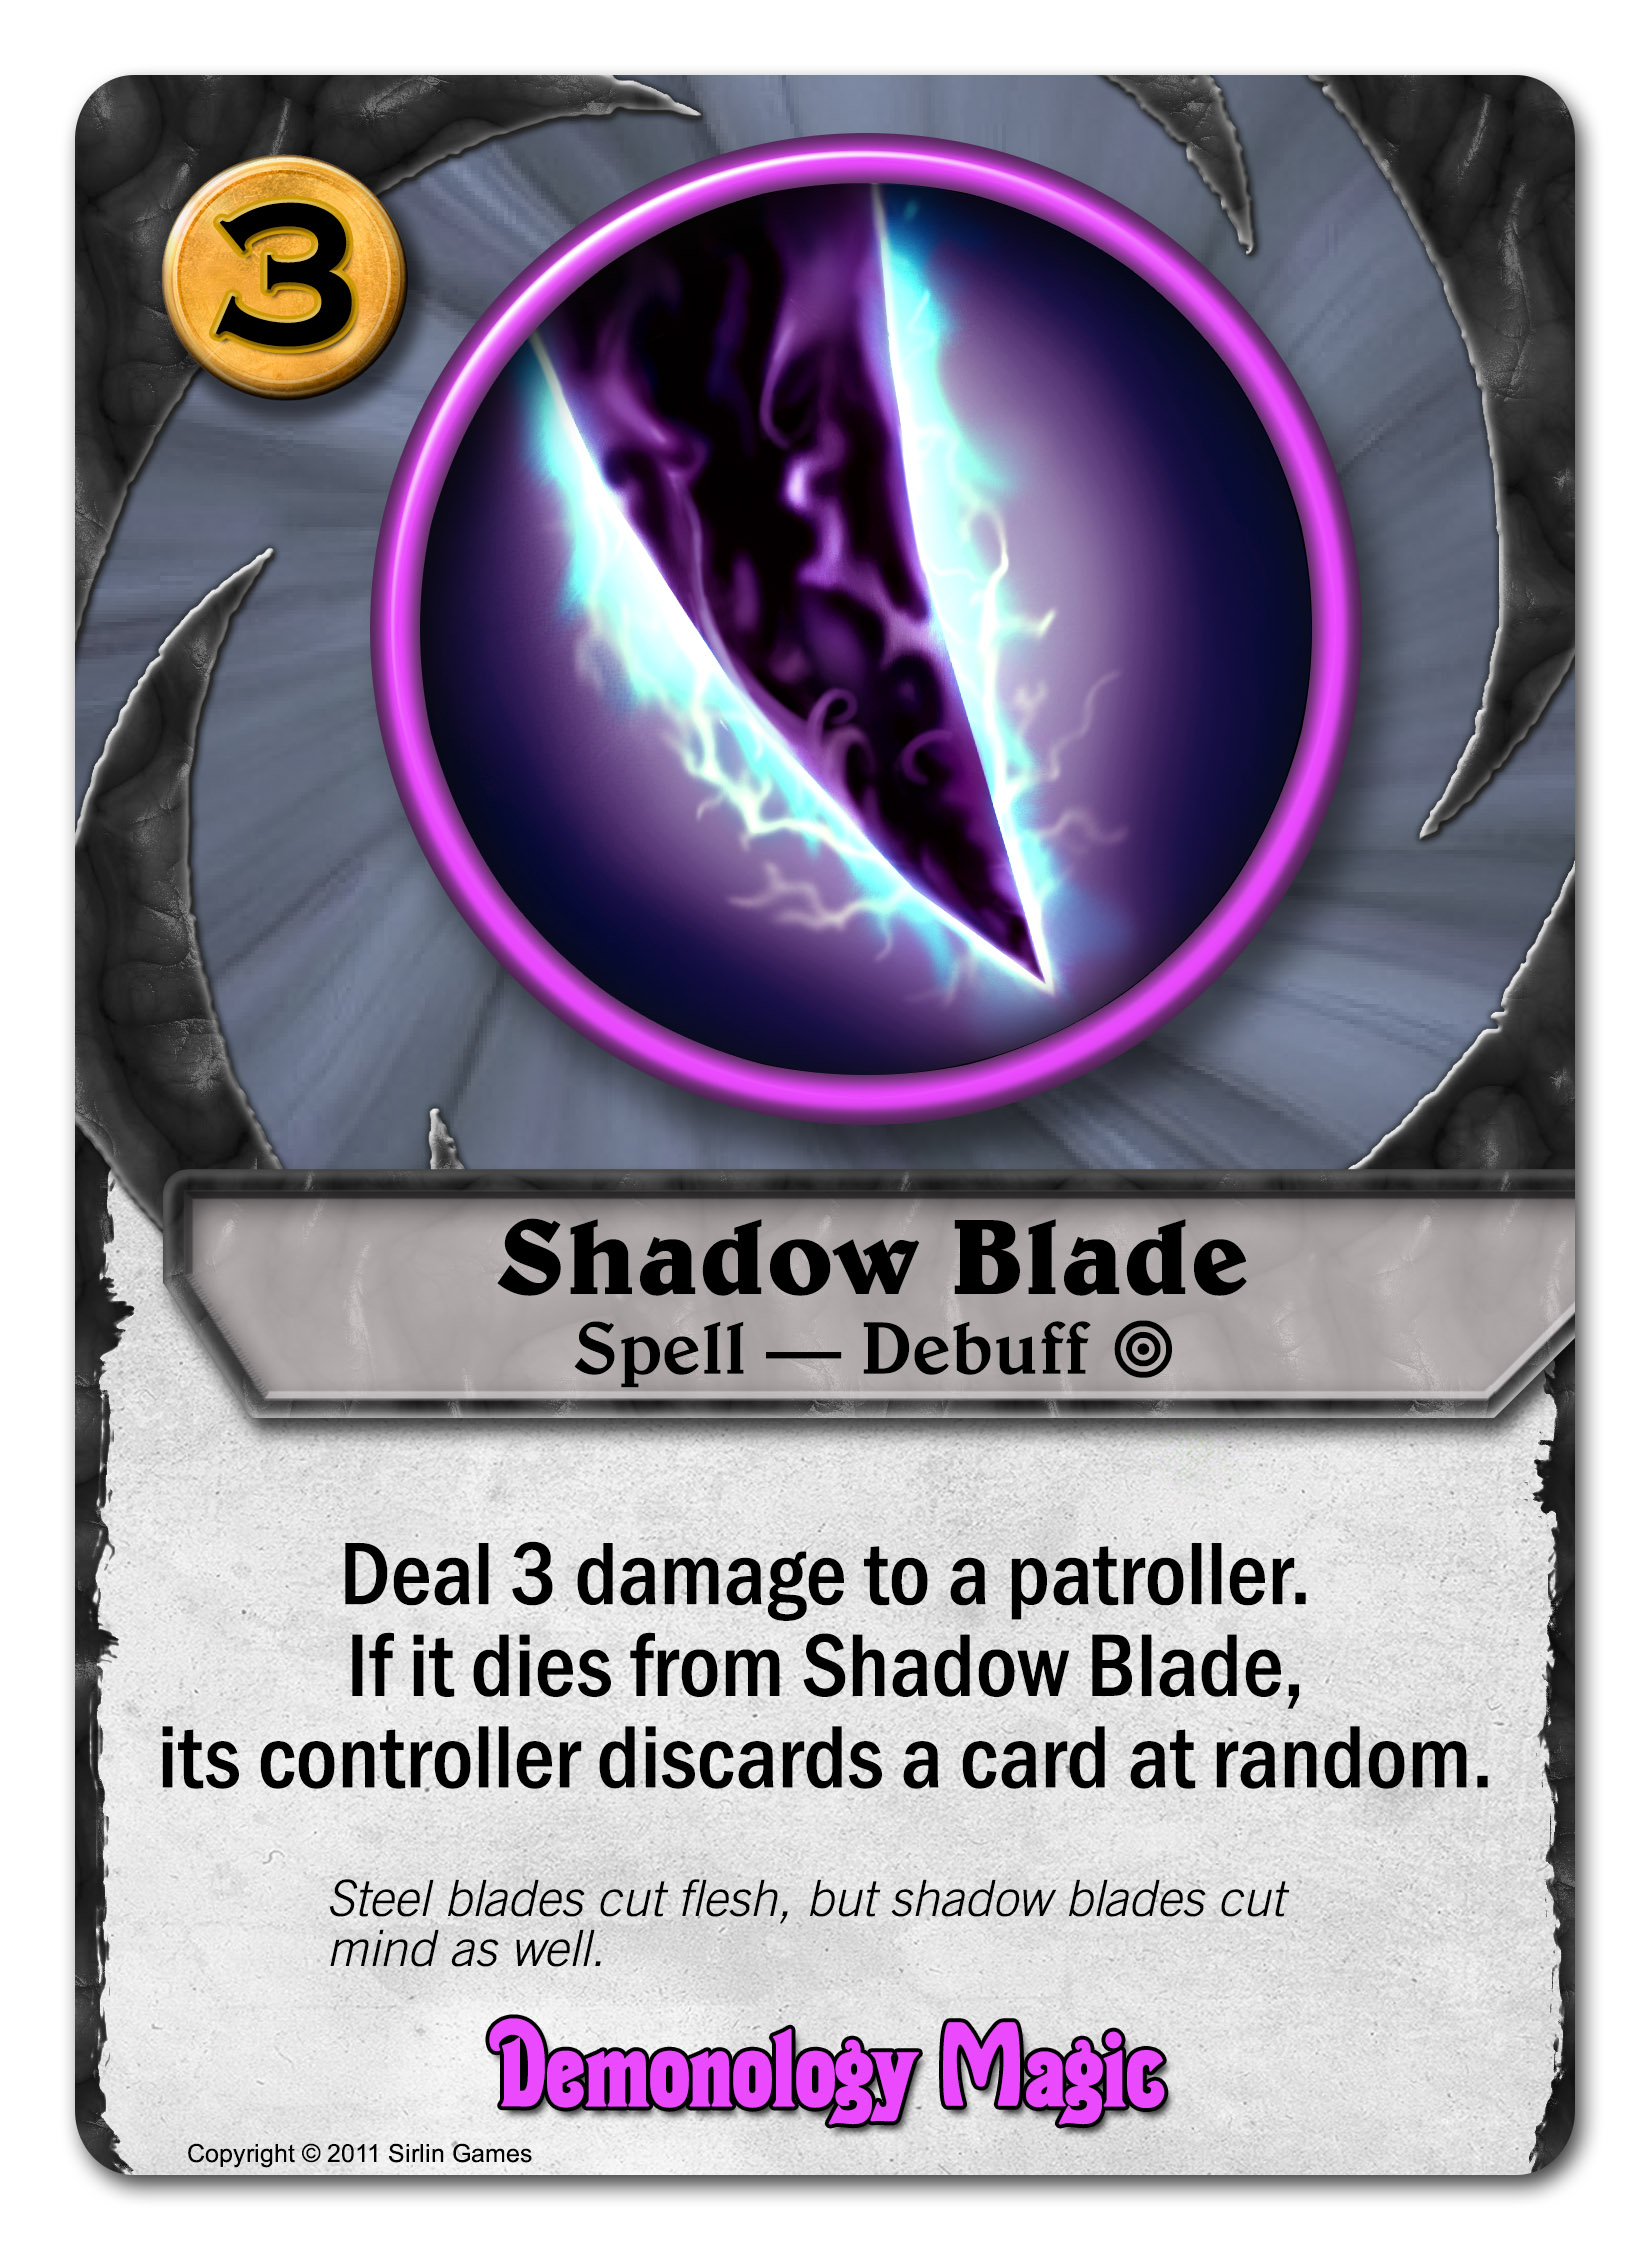
Either way, you have a spell for it. Soul Stone can make your best unit a real hassle to kill because not only does it get bigger, but your opponent has to kill it twice to actually get rid of it. (Notably, this is great against Law's Judgment Day ultimate spell.) Meanwhile, Shadow Blade can usually kill a unit, and sometimes you can even pull off its discard effect, which overall makes the opponent lose two cards (the dead unit and the discarded card from hand) to your one (Shadow Blade itself).


Even though you know it’s dangerous to make deals with Demons, it’s pretty hard to turn down paying 0 to draw 2 cards. You’re usually quite willing to take 2 damage for that effect, but once you reach the end game you can turn that Pact around and point it at the opponent. Then it becomes 0 gold to deal 2 damage to your opponent’s base.

You can even use Vandy Anadrose’s ultimate spell as a killing blow:


Sacrificing all your units is quite a drawback, but you should be used to how these Demon-deals work by now. In exchange, you get to buff ALL your heroes so this is most powerful if you have all 3 of your heroes in play (you have to have a tech III building to be allowed to do that). Your heroes become max level, which by itself is great, and can trigger any “max level” effects they might have if they weren’t maxed already. And they get +2/+2, readiness, and become invisible. Basically, they become a huge source of damage that might win you the game outright.

Now that you’ve seen the wide variety of Demonology spells, look back at the hero’s middle ability. You can fetch one of those cards without even going through the normal process of teching for it (moving it from your codex to your discard pile, then waiting to draw it). On-demand Shadow Blade? No problem. And it’s almost like the opponent’s base starts with 18 life instead of 20 because you can finish them off with Dark Pact anytime.

Even Demonology’s tech I units are surprisingly powerful.


Gargoyle is a weird unit, but a dangerous one if used right. Think of him this way: he starts out indestructible, so you’ll definitely be able to attack with him the following turn—he can’t die! From then on, you can deal 3 damage to pretty much anything you want, as long as you pay 1 gold per turn to keep him active. That’s expensive for the early game, but the effect is very powerful. The turn after you activate him, he ISN’T indestructible anymore, but he’s still flying so he’s pretty hard to kill. That said, he can’t protect you from non-flying attackers.

Want something simpler? How about the best tech I beatdown unit in the game:


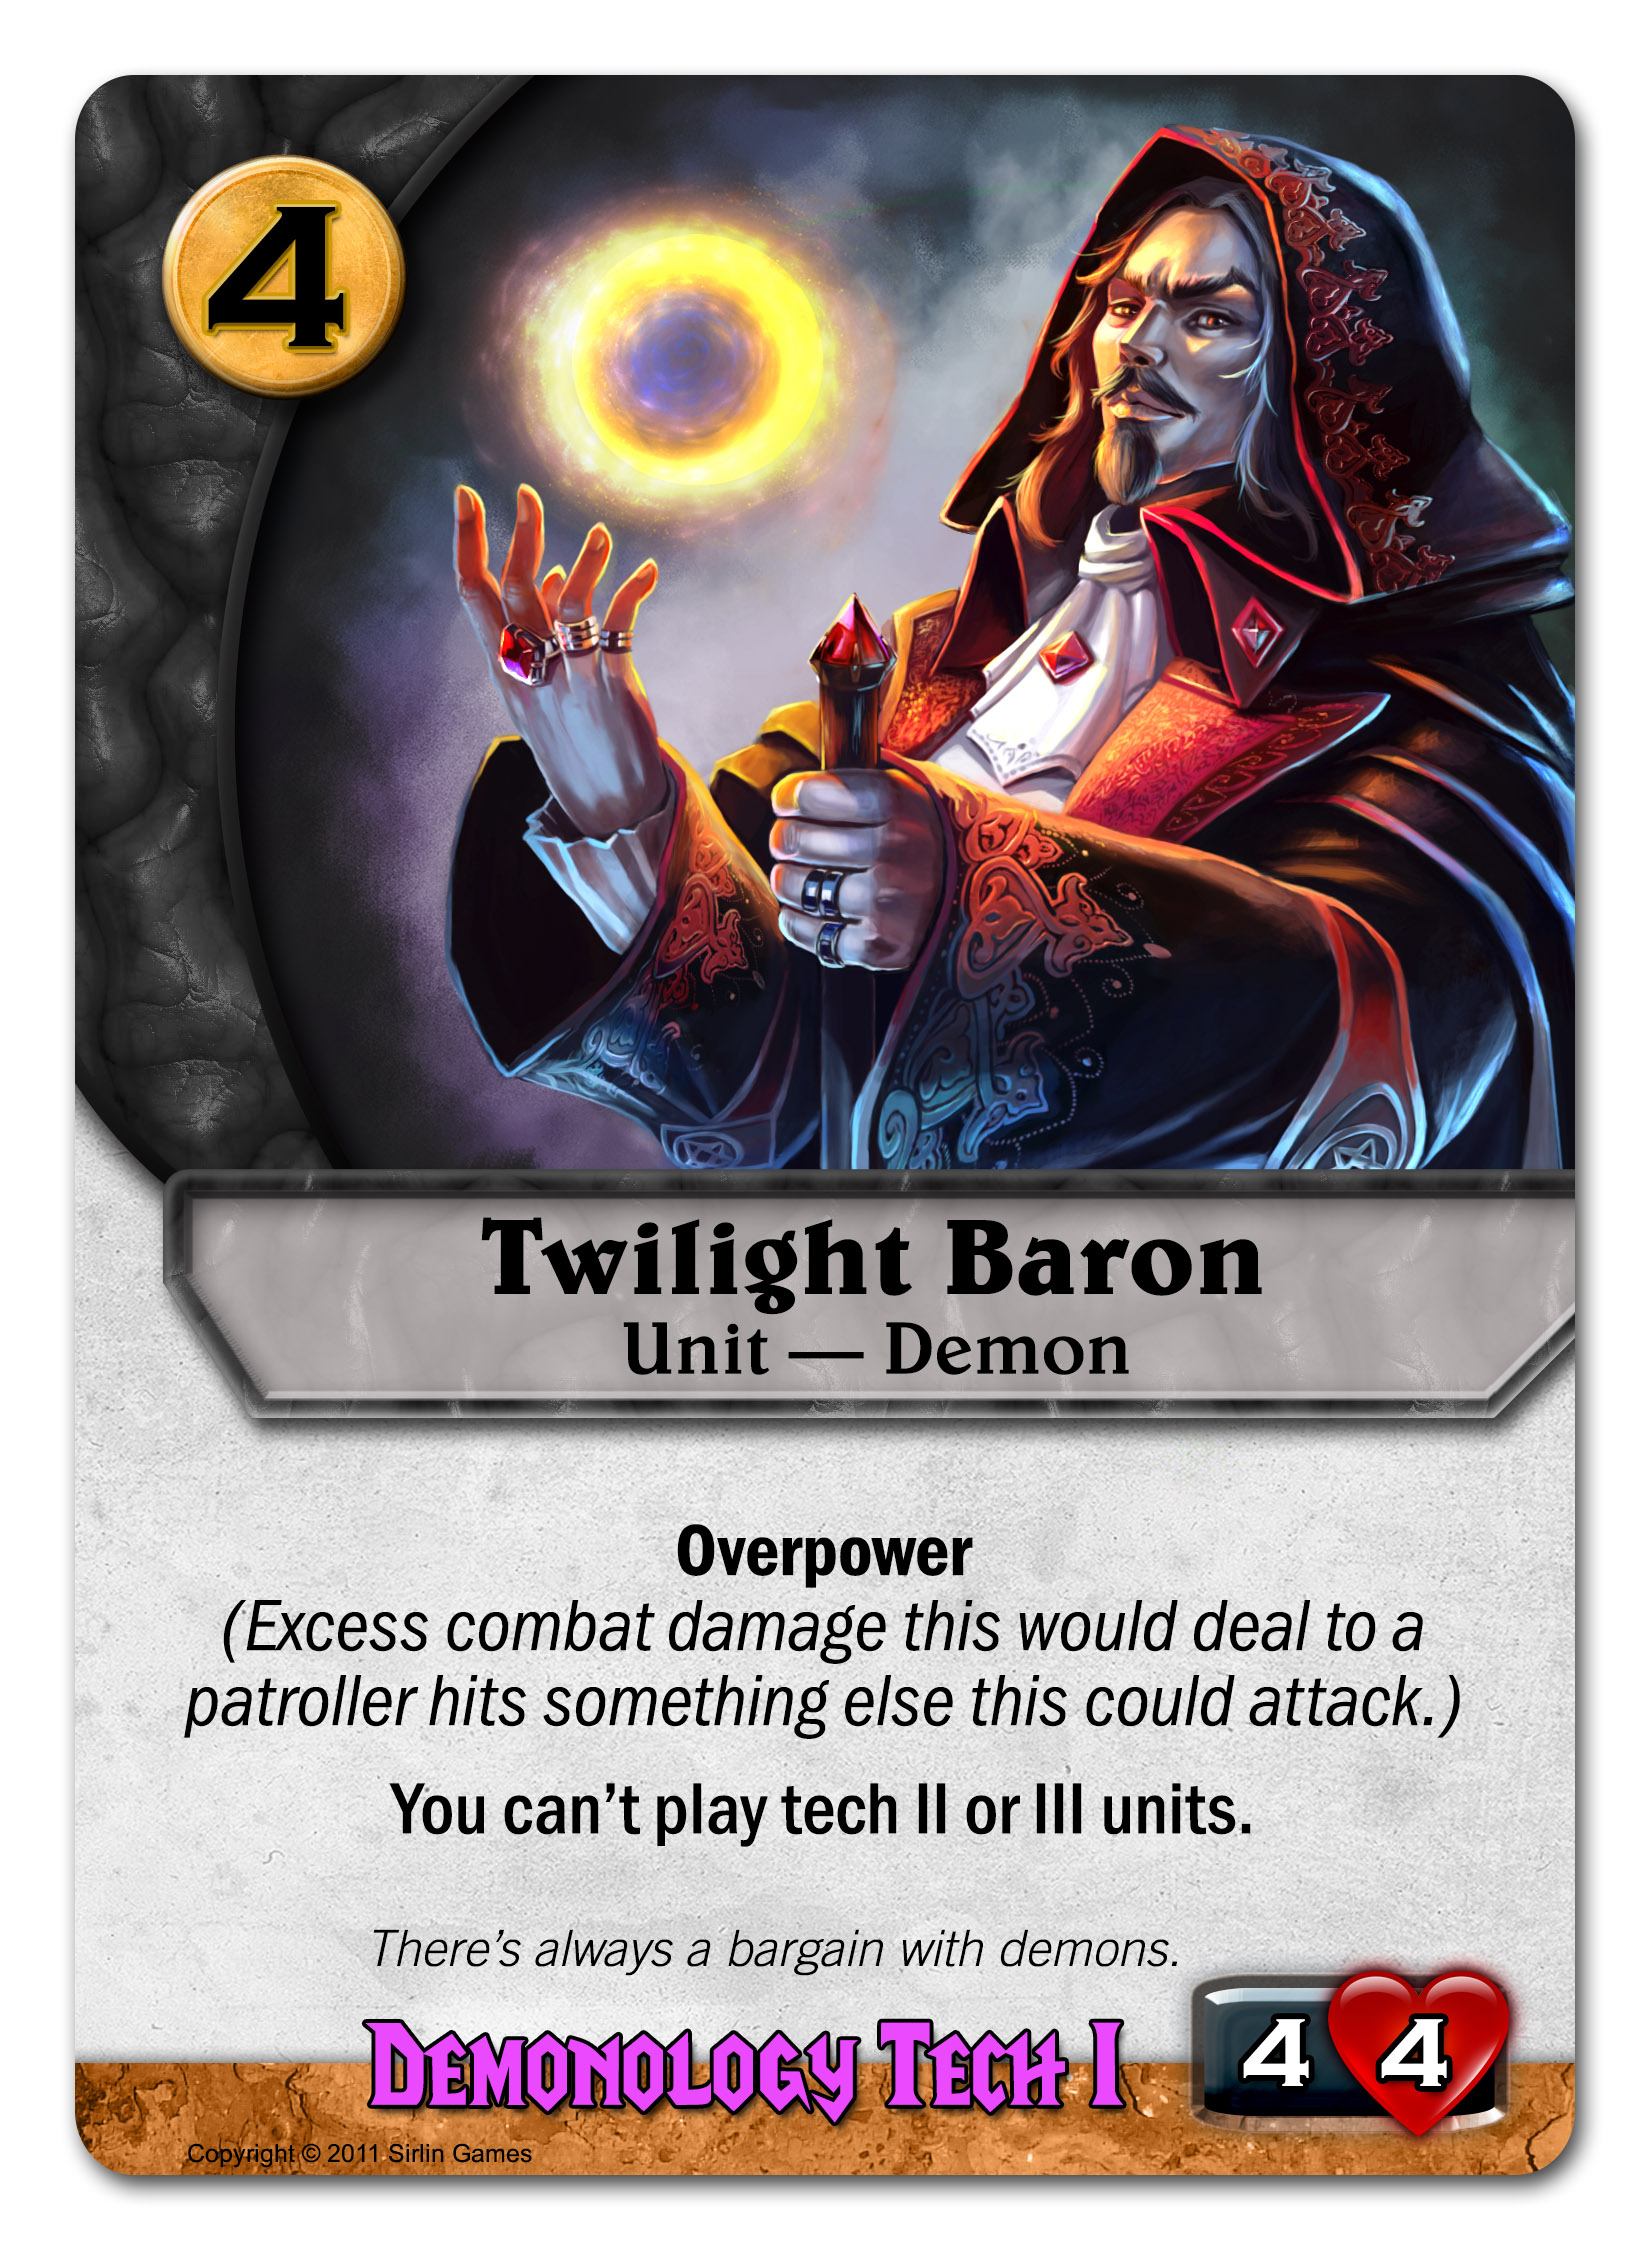
Twilight Baron is truly ahead of his time, or ahead of the power curve at least. He’s one of only two 4/4 tech I units in the game. He’s also unusually expensive for a tech I, but you’re pretty happy to pay that price because the ability to trump any other tech I unit is amazing. The catch—of course there’s a catch!—is that you can’t play any tech II or tech III units while he’s in play. Twilight Baron tempts you to go all in on rushdown and get so far ahead early that the drawback doesn’t matter. You can lean on using a hero and spells with Twilight Baron as backup, rather than going for tech II right away.

Once you do get to tech II though, you get some ridiculous units. How about a 7/6 with overpower for 4?


This guy is a keeper. Wait, I mean he's not a keeper. After he does your deeds, you'll have to get rid of him somehow to be allowed to win the game.


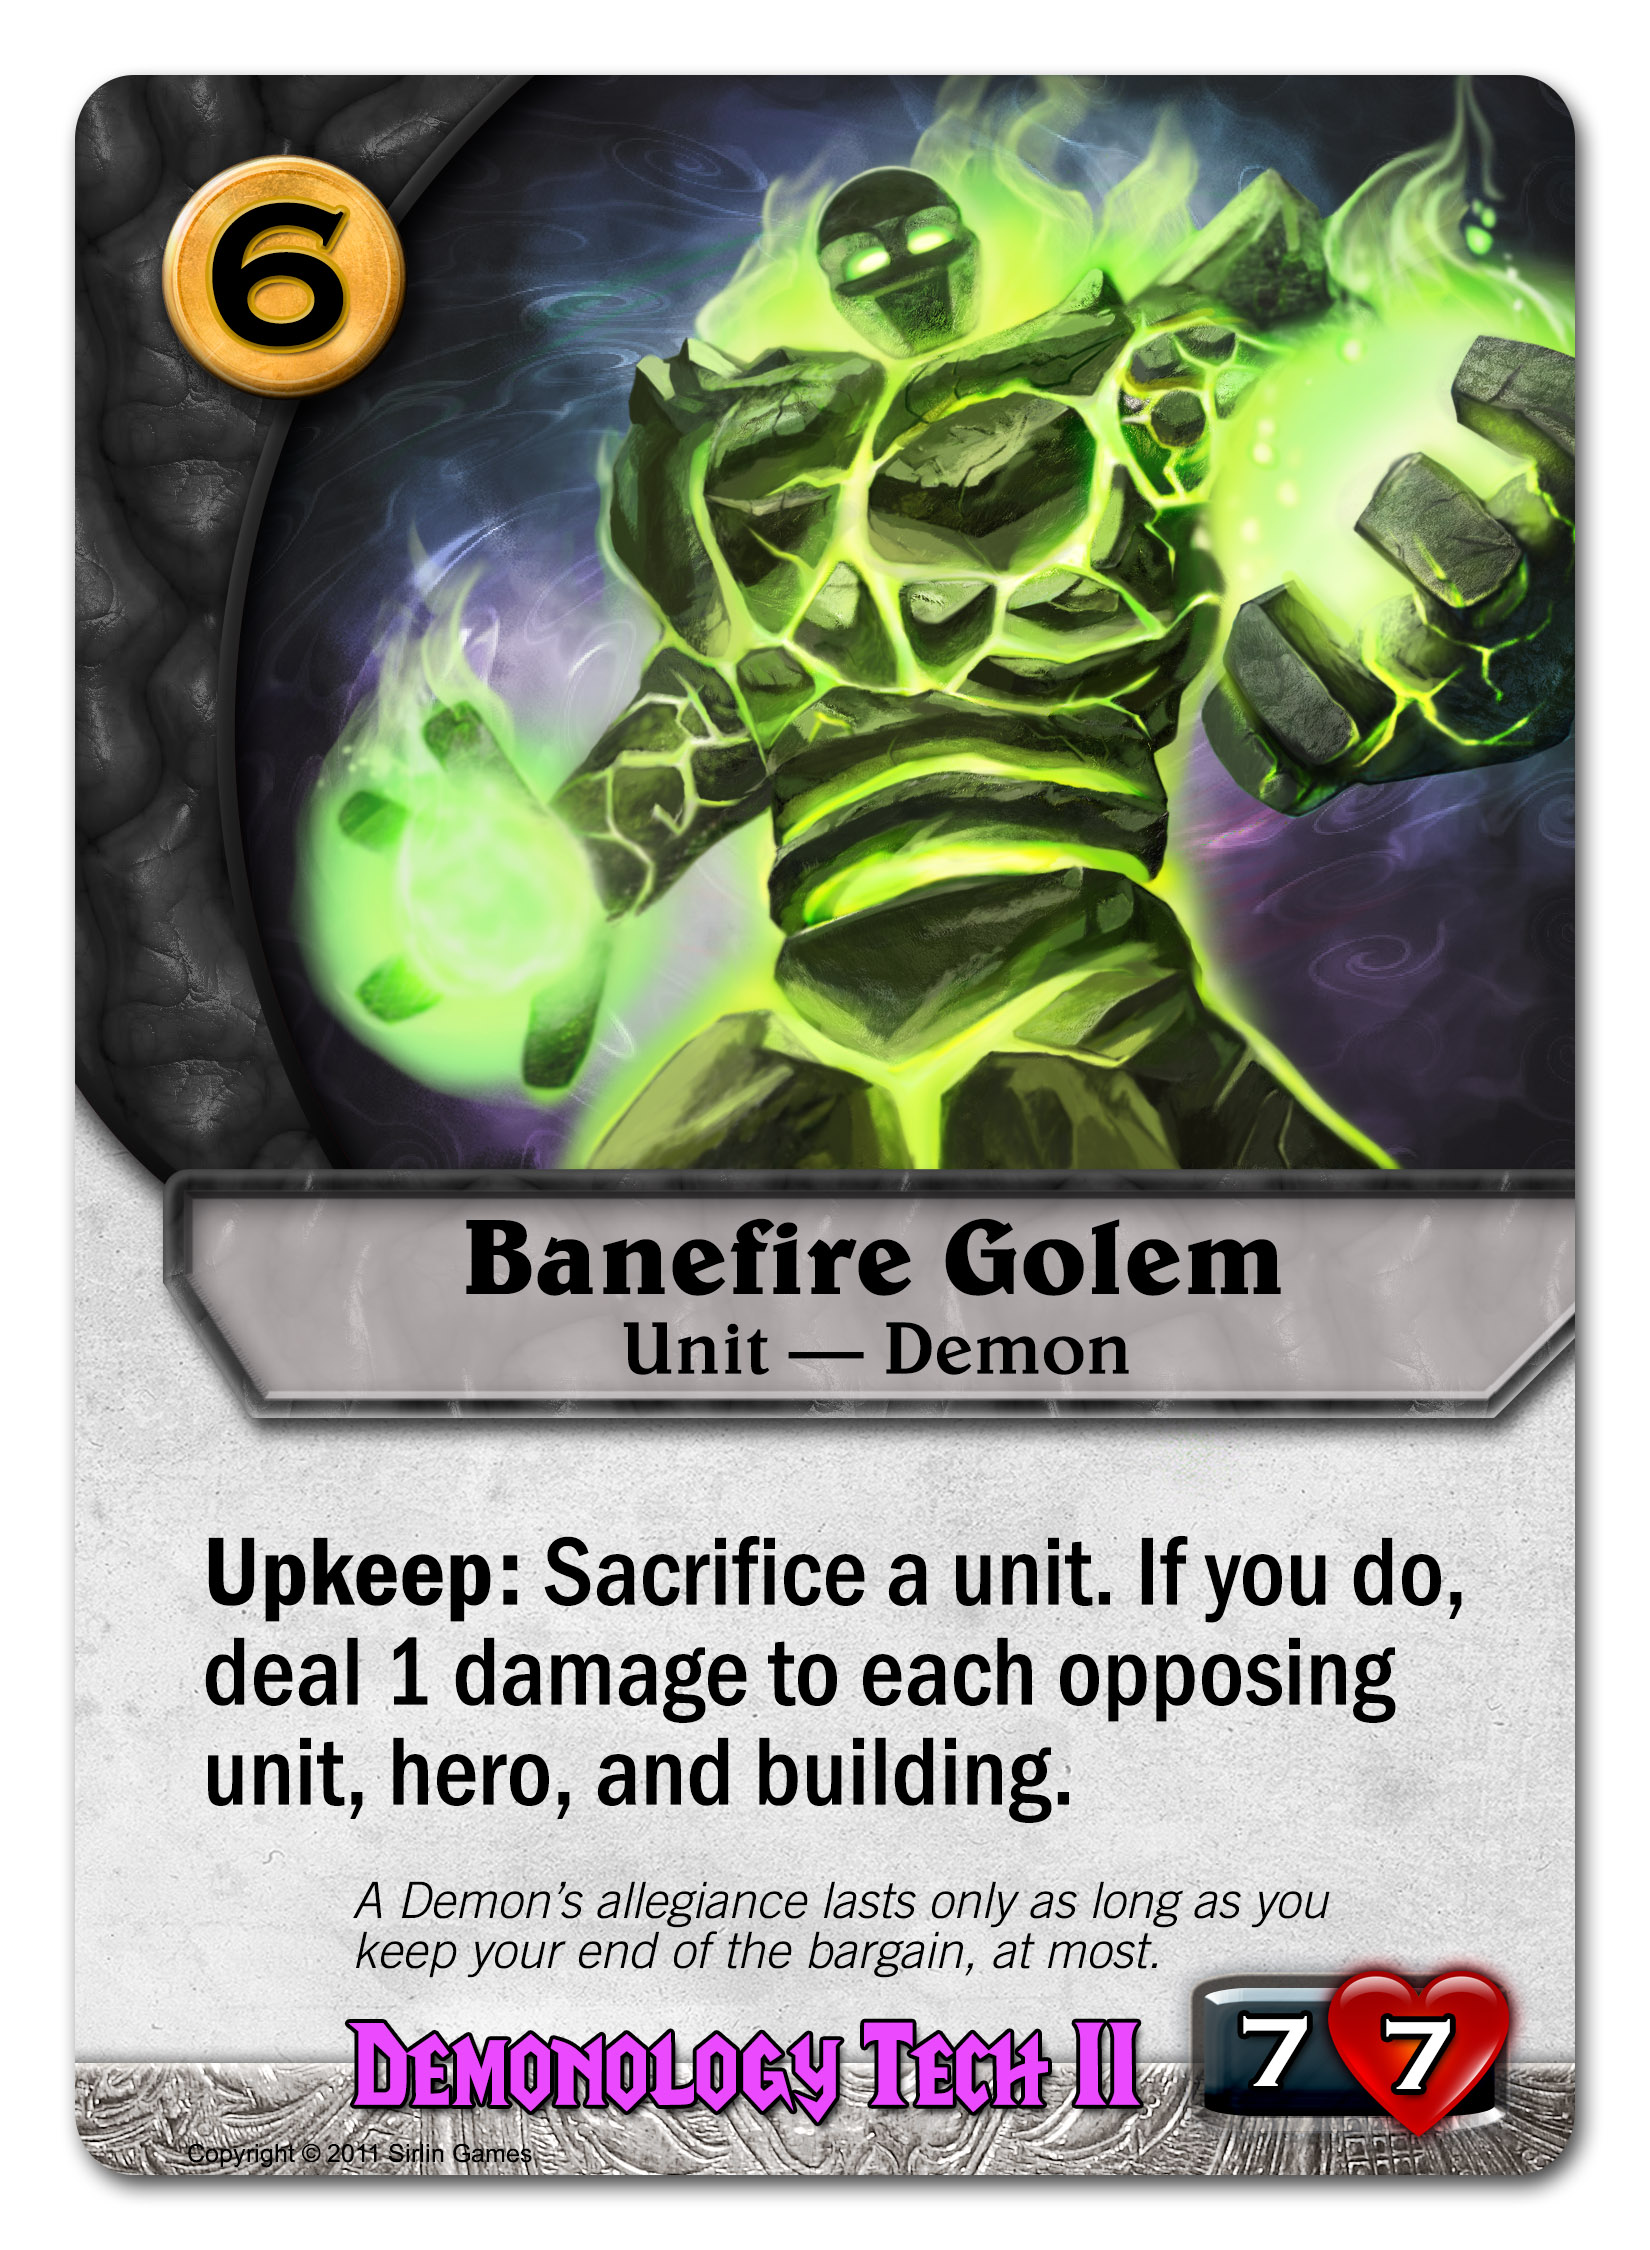
At 7/7, Banefire Golem is just huge. He demands you sacrifice a unit each turn, but you probably have some weak fodder you can afford to lose anyway. Now you’re thinking like a Demon. Losing a few lives here and there is a small price to pay to deal 1 damage per turn to EVERYTHING. That said, if your last unit is Banefire Golem himself, he will no longer serve you.

Ok combo-maniacs, get ready for this one.


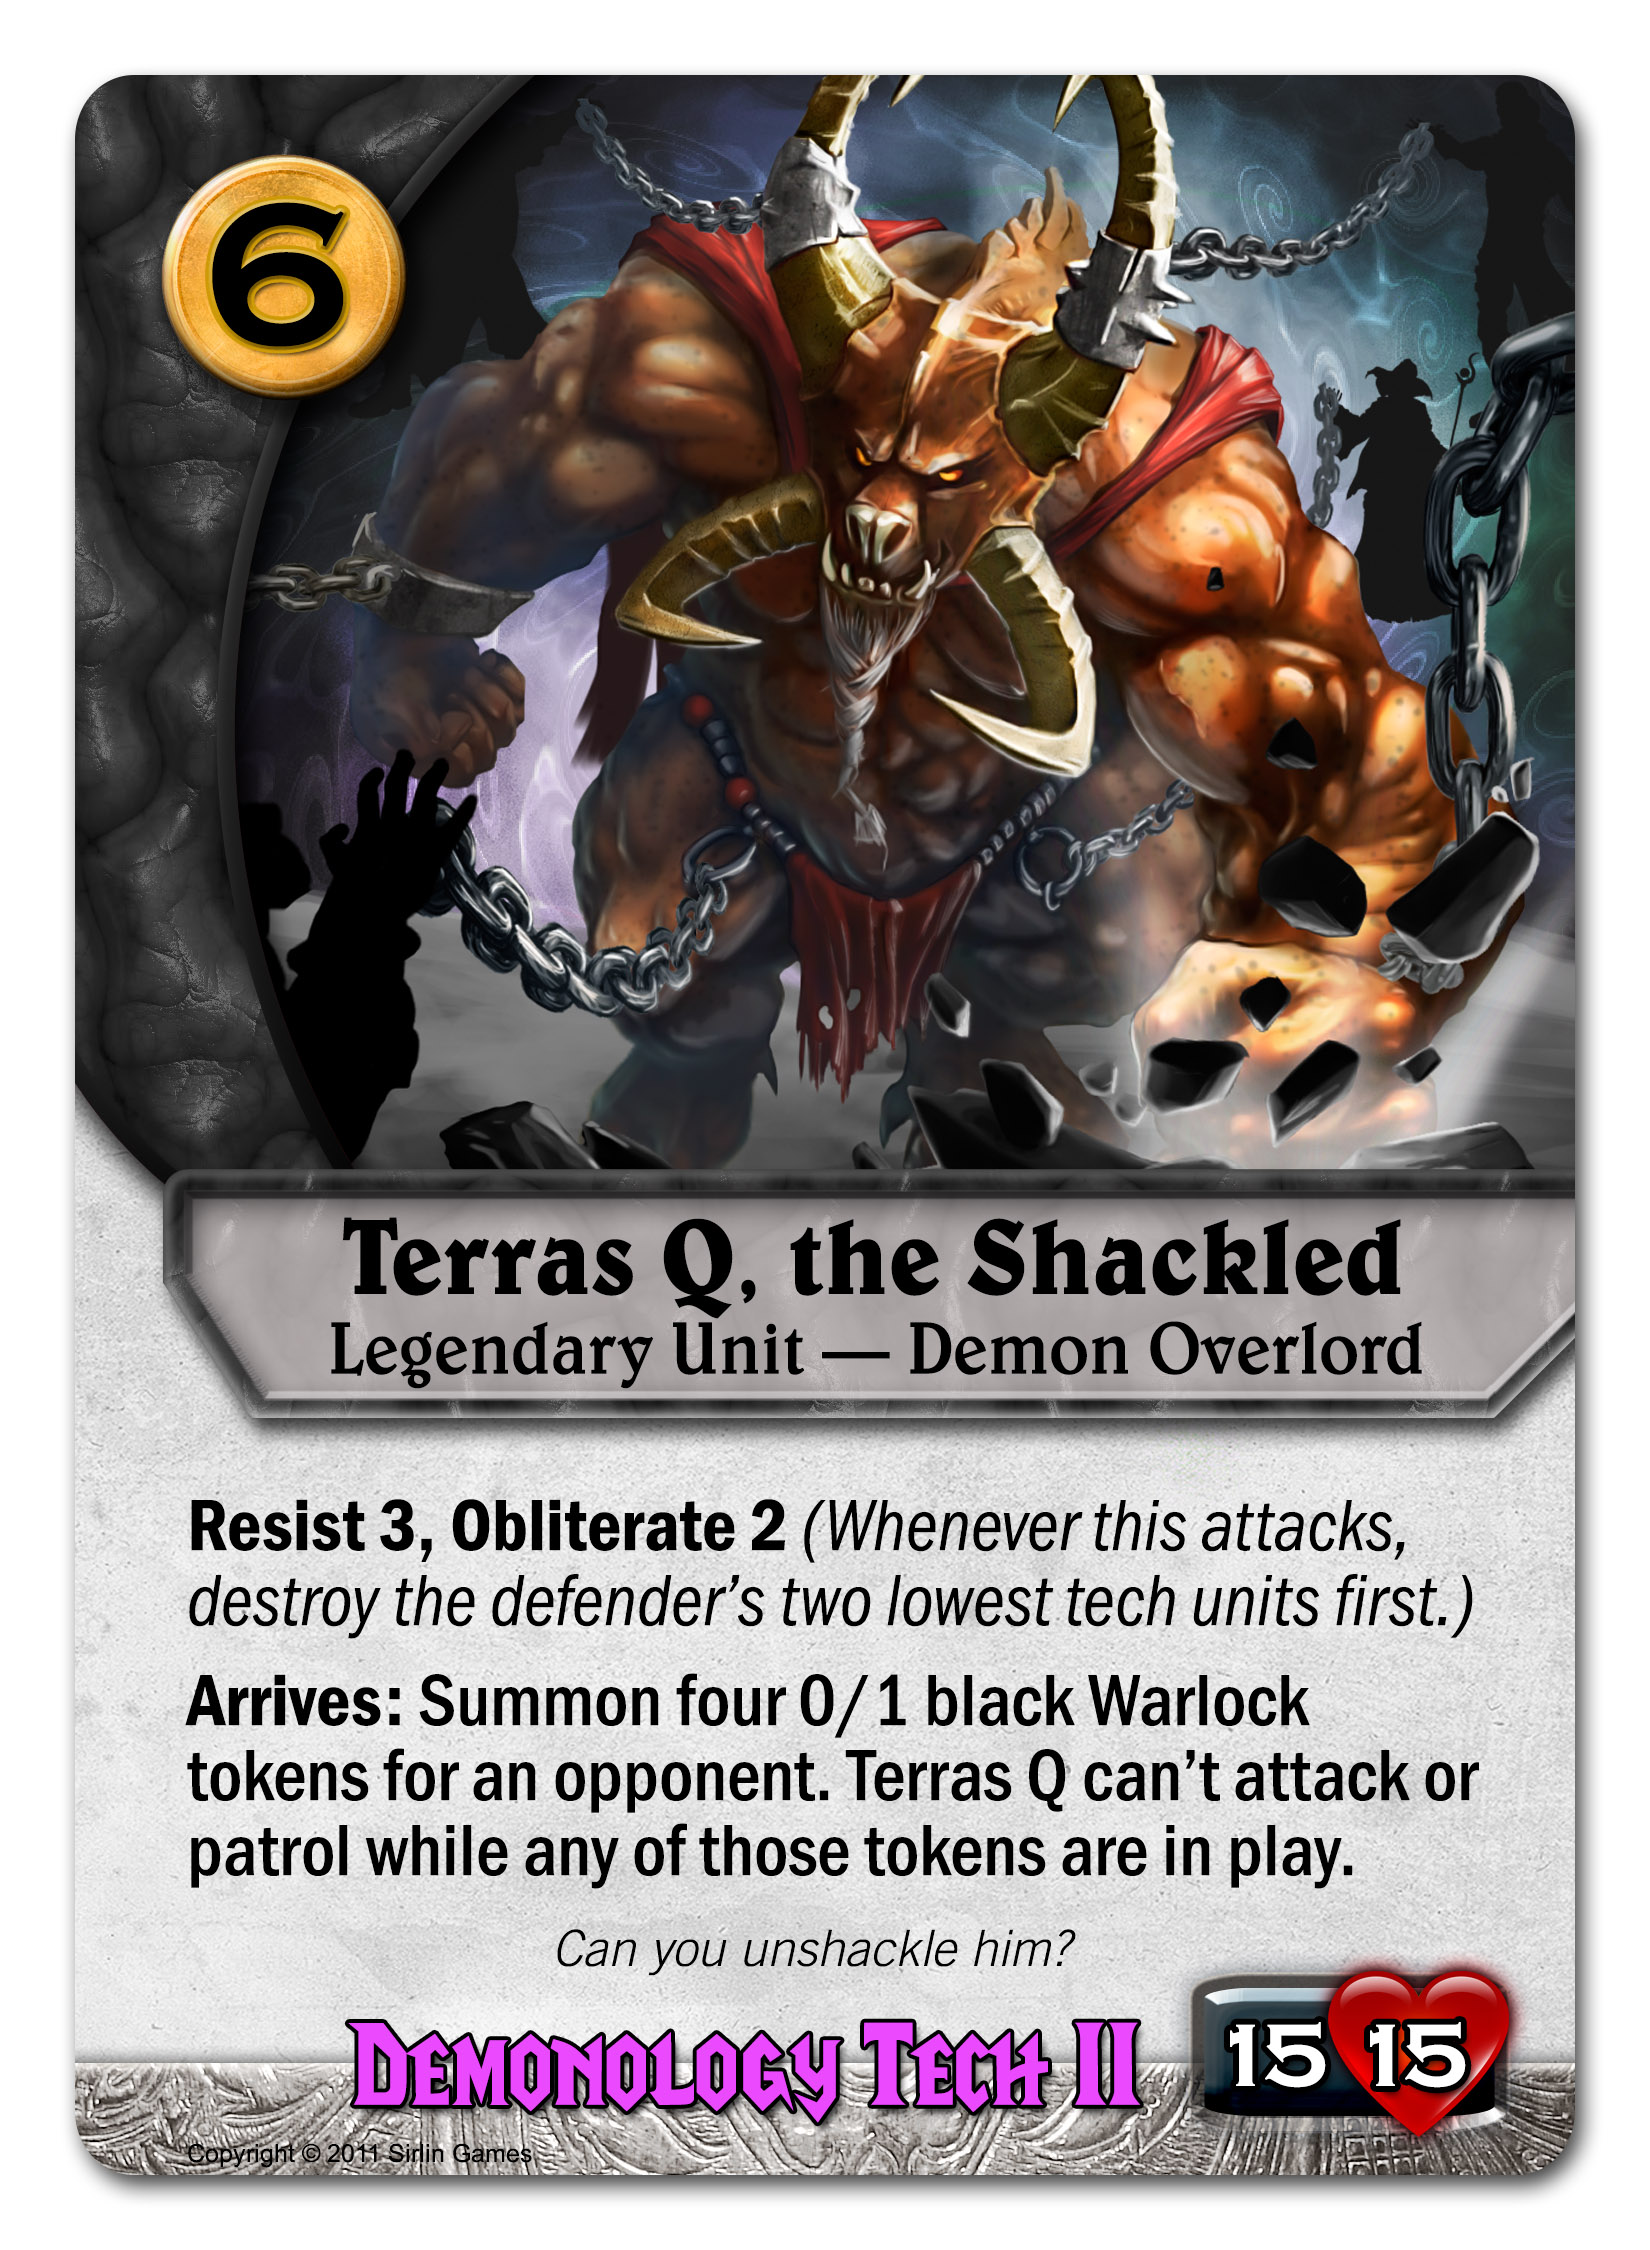
A 15/15! Yes really! Also he obliterates two enemy units per turn if you can attack with him. That’s the trick though, he starts out shackled by 4 Warlocks. Can you figure out a way to get rid of those Warlocks so the mighty Terras Q can shine? (You can’t sacrifice the Warlocks because your opponent is the one who gets them.) I, for one, welcome our Demon Overlord.

Demonology also has something different to offer: card draw.


The knowledge it contains is dangerous enough that it will eventually destroy you, but in the meantime you’ll be swimming in cards. Just to decode what it means, you usually have 5 cards in hand if things are going well. You’ll usually play 1 worker and 1 other thing from your hand because that lets you draw back up to your max hand size of 5 at the end of the turn. With the Shrine in play, you’ll have 6 cards in hand. You’ll be able to play a worker and *2* more cards and still go back up to 6 cards at the end of the turn. Oh, and by the way, your Demons can ignore enemy patrollers and smash whatever they want.

For ultimate power, summon the tech III Demon:


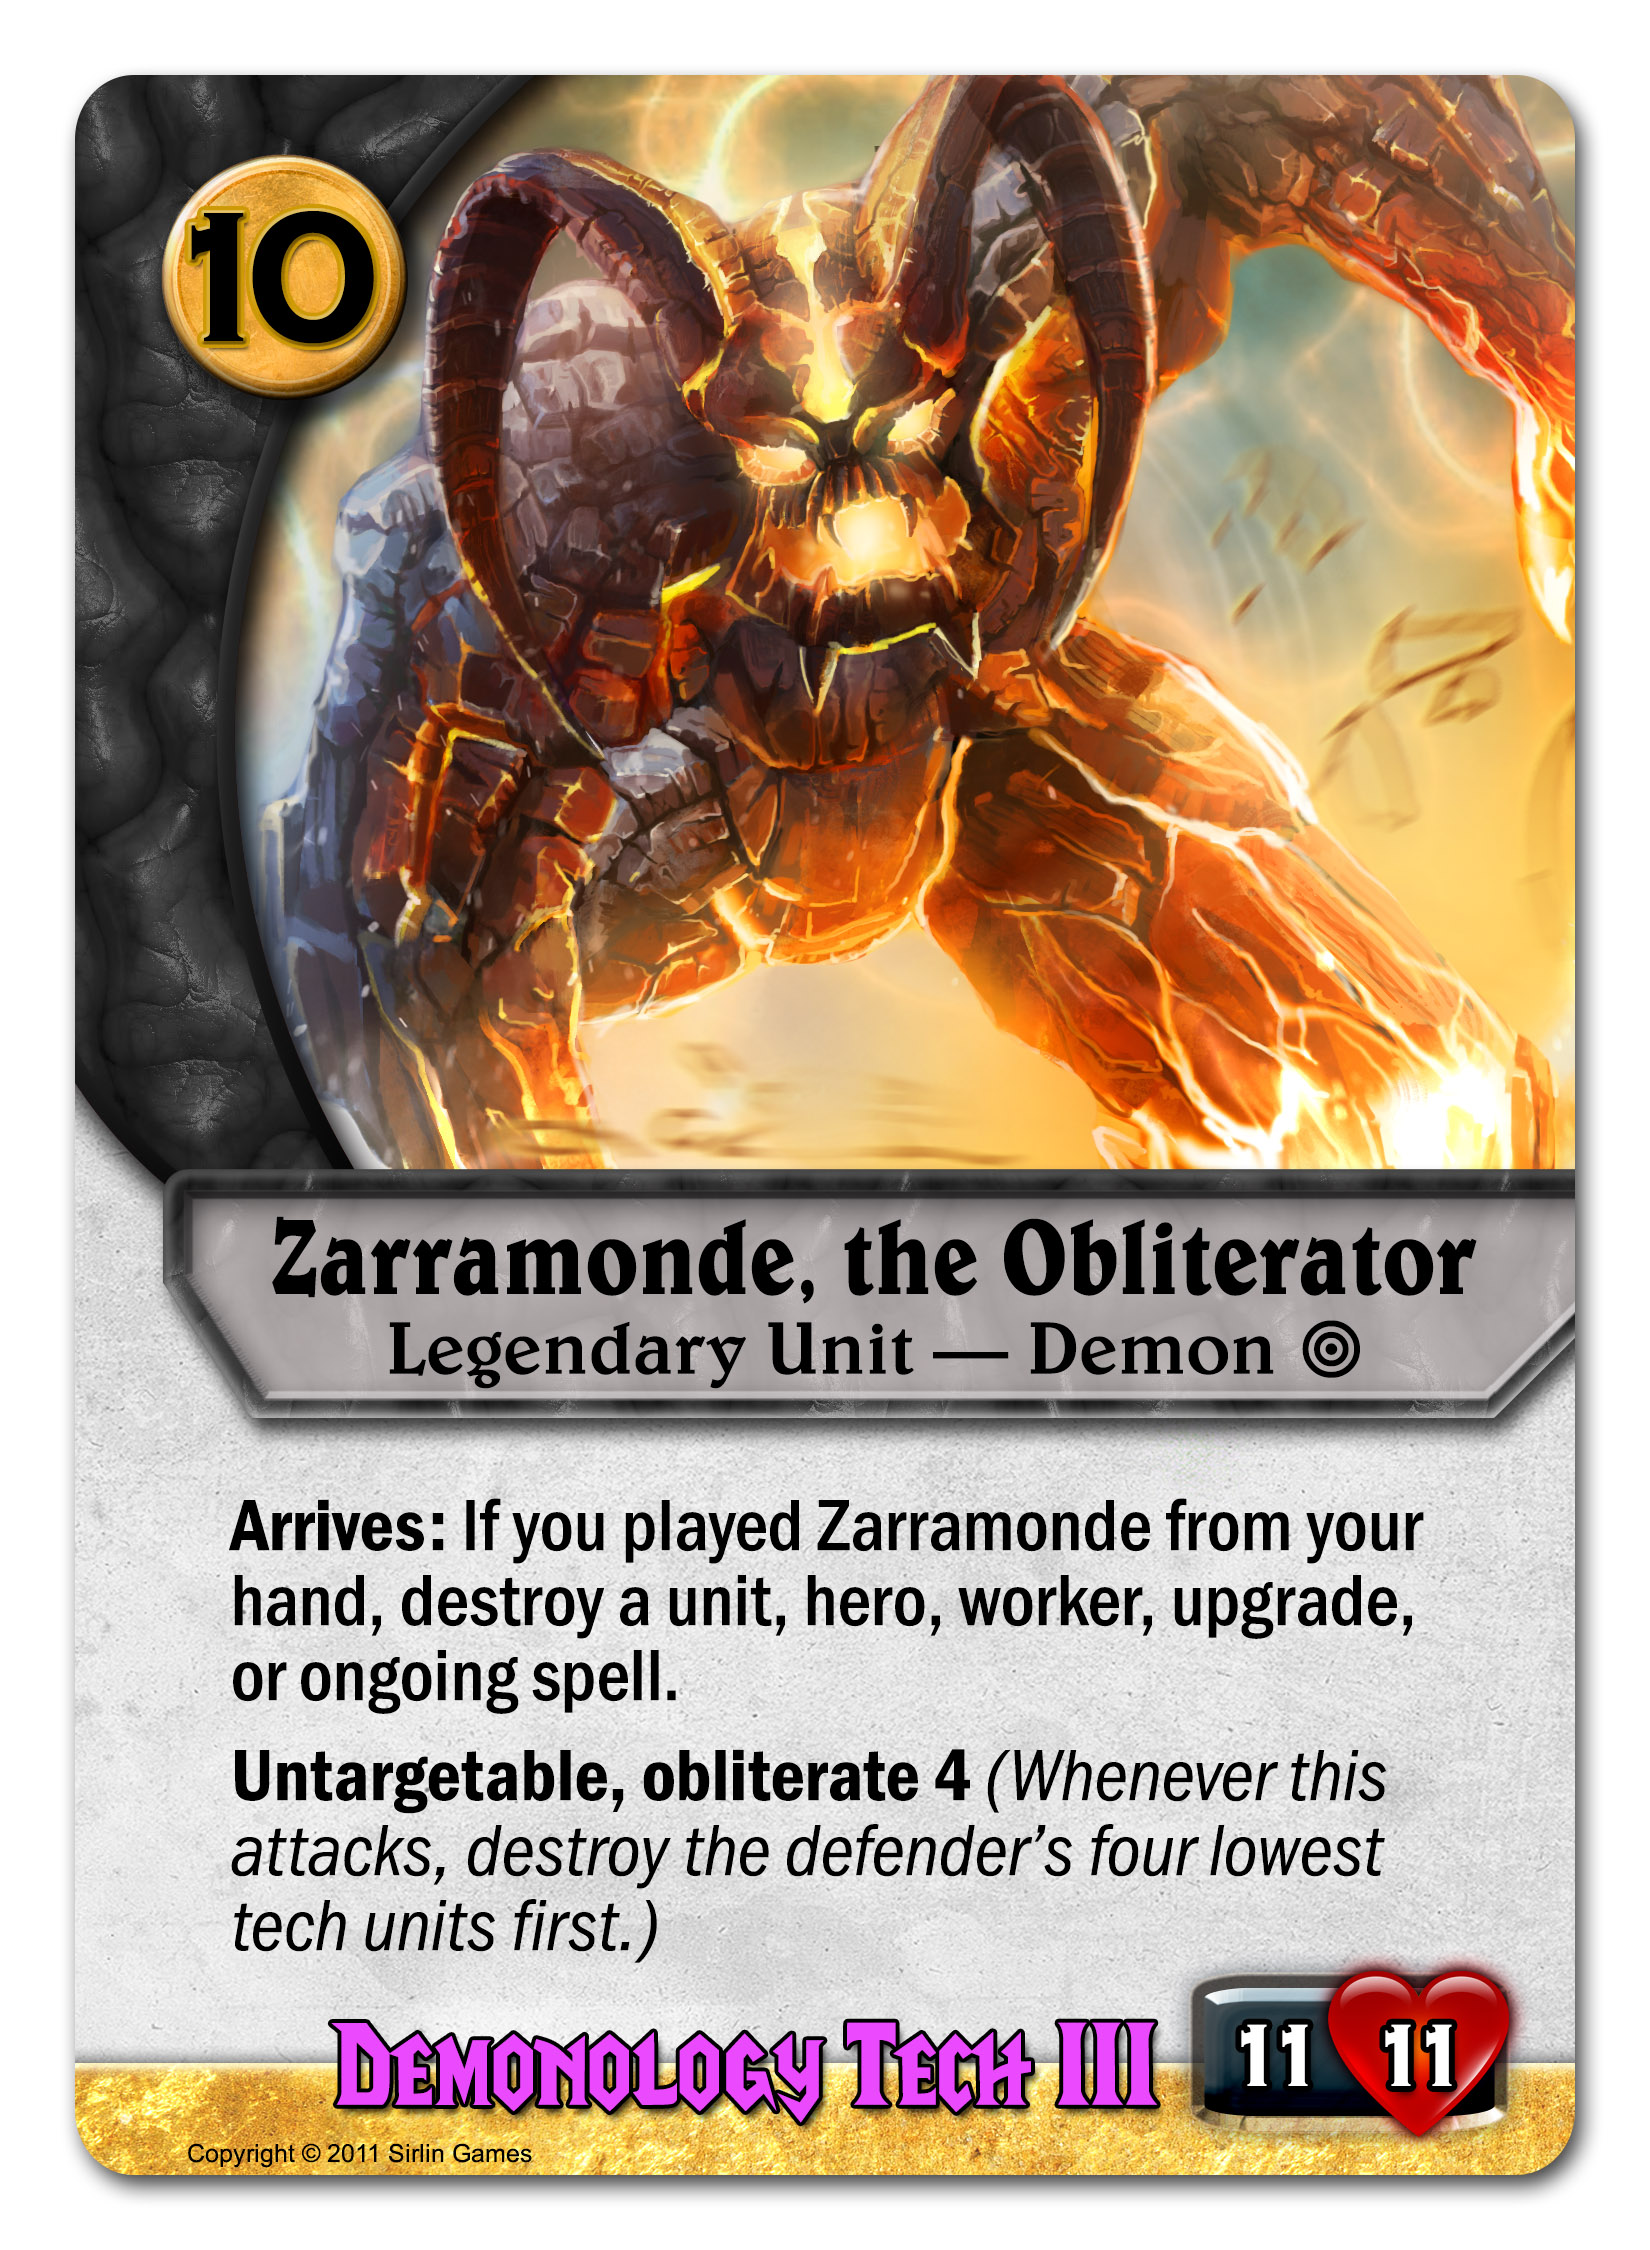
Zarramonde the Obliterator is a legendary unit, so you can only have one of him. But come on, did you really need another 10 cost 11/11 anyway? When he arrives, he can just straight up kill whatever you want. He can even kill other tech III units because he’s just that much of a boss. Meanwhile, he’s untargetable and enormous and he obliterates FOUR enemy units whenever he attacks. The drawback? None. It looks like you finally made a fair deal with a Demon.

Or did you?

Codex: Truth spec

Sirus Quince is the Chief Magistrate of Flagstone. They say he speaks the truth and is loved by all. He’s a popular and successful politician, though all of his power is actually from lies and illusion. In his younger years, he was a lawyer who faced DeGrey in court. Now the court is in his pocket and he's taken the highest office in the land. Here is the Truth hero:


Quince has a lot going on. He comes with a 0/1 Mirror Illusion token, so you can use that as a patroller for some extra defense if you need, but ideally you’ll save your mirror. It’s fragile though because it’s an Illusion. All Illusions in Codex die immediately if you target them with a spell or ability.

The reason you want to keep your Mirror Illusion around is that once you reach level 3, you can have your Mirror copy another unit in play. You’ll lose it at the end of the turn, but you can potentially get some great value out if it. Your opponent will be hesitant to even play really powerful units, such as a Rampaging Elephant or something, knowing that you could make a mirror image of it at any time. This is a form of control in that it's making the opponent afraid to play strategies involving just a few, powerful units.

At max level, Quince gets even more Mirror Illusion tricks. At that point, you don’t even have to pay any gold to make your Mirror into a copy of a unit you just played. This ability can even create Illusion copies of tech III units!

Speaking of copying units, you can also do that with this spell from the blue starter deck:


Manufactured Truth is part of how you can survive the early game with blue. The opponent might have more powerful units than you, but you can COPY theirs and go for a trade.

Quince’s spells offer even more tricks with Illusions. Do you see what this spell is for?


On its own, it doesn’t really do much to turn something into an Illusion. You really need to combo that with something else that targets the thing (look for the target icon to know what targets). If you can turn something into an Illusion, *then* target it then it will die. One combo here is Hallucination as combo with another copy of itself. For 4 gold and 2 cards, that lets you kill any two (non-tech III) units. Not bad, but kind of difficult to line up your draws to make that work. This can help:


Dreamscape stays in play as long as Quince lives, so any later time that you draw Hallucination lets you kill two things. You can also combo either of these two cards with any card at all that targets things. A really good example is Drill Sergeant, even though he’s from a different blue spec. Remember that you can easily use a hero of one spec and a tech II building of another, so this combo is actually very reasonable.


Whenever you play a unit, you’re getting a rune on Drill Sergeant that can potentially be used to kill any Illusion! Quince speaks the Truth, after all, so of course it pierces Illusions. And remember that under Dreamscape, all your opponent's units are Illusions. But what if someone wants to question your Truth and kill your Illusions? Quince has an answer to that too:


With Free Speech, it’s a lot harder for your enemies to pierce your Illusions. You get a whole turn where they can’t cast spells at all, OR use hero abilities. Free Speech is actually generally great anyway. Yeah it protects your Illusions but it also dismantles whatever spell-based plan your opponent was going for. Remember that in Codex if they have a spell in their hand that they want to cast, but they can’t cast it because of Free Speech, they’ll have to discard it along with the rest of their hand at the end of their turn. So it really is like a pre-emptive “counterspell”.

You know about Quince’s Mirror Illusions, but let’s look at a bunch of other Illusions the Truth spec has to offer.


A 3/3 for 1 is a pretty great deal! Your goal here is to ride that value to victory. Force your opponent to spend more to deal with your Illusions than you had to spend to create them. If you can attack with Spectral Hound and deal 3 damage to something, you’re probably a little bit ahead from that. If you’re worried about your Hound dying before he gets to attack, you could put him in the Lookout slot as a patroller. He’ll get resist 1 there so your opponent has to pay 1 extra gold to target him.

Here’s another 1 cost Illusion:


He’s only a 2/2 but he protects your other Illusions. If they want to target one of your Illusions to kill it, they’ll have to target Spectral Flagbearer first. Why would you want to do that when Spectral Hound only costs 1 gold anyway? The answer is because you have other Illusions to protect. The Mirror Illusions that Quince comes with and also your more powerful Illusions at tech II, such as these:

A 5/5 is substantial and a flier is a big threat because flying is so strong in Codex. You can protect these units from dying to something targeting them by using Spectral Flagbearer or the Free Speech spell, but there’s another very powerful layer of protection available to you too:


Macciatus is Quince’s advisor. He’s a mastermind at the art of attaining political power and staying in political power. Although he works in whispers behind the scenes, he’s been a great asset to Quince. Quince speaks a powerful Truth, but Macciatus can enhance that Truth even more. Your Illusions get +1/+1 AND don’t even die when they are targeted anymore! (Philosophical question: if an Illusion is targeted in a forest and it doesn’t die, is it really an Illusion?)

Macciatus is the key to the Illusion plan. He makes your Spectral Hounds into 4/4s for 1. He makes your Spectral Rocs into 5/6s for 4. Remember that 5 ATK is a critical threshold of attack power because it can destroy a tech I, II, or III building in a single hit. Meanwhile, your opponent will have to kill Macciatus before they can easily kill your Illusions. Protect him however you can, but beware that you can’t have two copies of him in play—he’s a legendary unit.

If you want the full combo going, try to have a Reteller of Truths in the mix:


Illusions are cheap to play in the first place, but they still cost a card. With Reteller of Truths, they are still cheap to play, and they basically don’t cost a card anymore. This can be an avalanche of value if you keep this up. Your Illusions seem fragile and easy to kill at first, but this is yet another perk you can pile on that makes them incredibly efficient.

The tech III Truth unit is an unusual one as tech IIIs go:


He only costs 3 gold, which is the least of any tech III unit in the game. He’s so cheap that you might as well play two! Each one is a 5/5 flier with haste (a rare effect for the blue faction). He puts the opponent on a 4 turn clock, but that’s actually only 3 turns for them to react because of the haste. If you play 2 copies of him, your opponent will only get one more turn before they’re dead unless they deal with your Liberty Gryphons.

Liberty Gryphon’s extra text is saying that if you just have one other Illusion, ANY other Illusion, then opponents have to deal with that first before they can even target Liberty Gryphon.

While the Law spec gives the blue faction careful control and an eventual lockdown, the Truth spec is your opportunity for rushdown and highly efficient kills. And at the same time, it's offering its own form of control in that you can shut down spell-based plans and you can make opponents afraid to play big units. The drawback is that relying on Truth also makes you vulnerable to being blown out by an opponent who has lots of targeting effects and who can stop you from assembling your full set of buffs. You can actually still put up a solid fight even in unfavorable matchups with Truth, so the risk isn’t THAT high. But to really maximize your wins, mix up your build orders so the opponent doesn’t quite know how important it is for them to have a bunch of targeting effects.

And if you have any complaints about the blue faction, you better keep them to yourself. Quince speaks the Truth and he’ll enforce the Free Speech laws if you go too far.

Codex: Peace spec

The Peace spec of the Flagstone Dominion is headed up by General Onimaru. Onimaru is a Sun Tzu-like figure—a master of military strategy. Overwhelming military might is the key to Peace, after all.

Here’s General Onimaru’s hero card:


Onimaru is one of the best heroes in combat. Even at level 1, he attacks as a 3/3 because of his frenzy ability. Once he reaches level 5, he can attack and STILL patrol due to his readiness ability. At max level, he becomes a 4/5, which is really beefy for a hero, and he also gets three 1/1 soldiers to command. That’s a lot of combat power before you even get to spells or units.

Not many spells outside of the red faction can directly damage a building, but Onimaru can with General’s Hammer:


The magic number here is 5 damage because that’s how many hit points the tech I, II, and III buildings have. General’s hammer does 3 instantly, but you can also set up the other 2 damage ahead of time with this blue starting deck card:


Even if the opponent has patrollers defending, Traffic Director can sneak by (he knows all the back alleys and shortcuts, after all). Destroying tech buildings is a form of control, and it’s the kind Peace favors more than Law.

Here's another trick up Onimaru's sleeve:


General Onimaru can send any unit to Boot Camp, and even any hero except himself. (He's a commander after all, so he wouldn't be seen doing lowly training exercises.) The good news for the trainee is that it gets a +1/+1 rune, but the bad news is that it becomes exhausted. Notice that you can use this on a friendly OR enemy thing. In other words, you can make your own unit or hero permanently bigger if you just agree not to patrol with it this turn. Or you can remove an enemy unit or hero from the patrol zone (exhausting it does that as a consequence) if you're willing to deal with it being bigger later.

Boot Camp is kind of like paying with a credit card when you use it on enemy units; you get the immediate benefit of clearing out patrollers, but you'll have another problem to deal with later. This can be worth it if it lets you kill the hero or tech building the opponent's patrollers were trying to protect. When used on your own units or heroes, Boot Camp is pretty efficient. As long as you can do it during a turn where you had enough patrollers anyway, you got +1/+1 forever on something for the cost only 1 gold and ZERO cards. Buffing your units without even going down on your card draw is the Peace way: growing your military power keeps the peace.

Back to the part where Onimaru is great in combat though. If you want him to completely dominate in combat, his ultimate spell turns into an incredible powerhouse:


When you attack with the Art of War buff, your Onimaru will be a 7/7 (+1 ATK from his frenzy ability, and +2/+2 more from the spell to his printed stats of 4/5 at max level). He’s also *unstoppable* AND has *swift strike*, which is just totally ridiculous. He can one-shot any tech building other than a base, or he can take take off over a third of a base's max HP in one hit. He pushes past any patrollers the opponent has, yet he still patrols for you due to readiness. The swift strike part means he’ll kill pretty much any unit without even getting hit back. All of this together means you can play him as a control deck, or you can use him as a win condition and go straight for their base.

Need some backup? First, get some tech I soldiers in there to help you.


Some eager cadets are 1/1 for 1, but this much more exciting Overeager Cadet is 2/2 for 0. That’s the right price! 2/2 isn’t that big, but it’s a really efficient use of 0 gold. If you want a bigger soldier, this shining paragon of Flagstone will rush to your aid:


You get a 3/3 for 3, and you often end up not even having to spend a card, sort of. If Brave Knight would die in combat, instead he flees back to your hand.

Let’s look at a few cards from the tech II level. Before, I mentioned how Peace can choose to play control by destroying the opponent’s tech buildings over and over, crippling them while you fill the board with soldiers lead by General Onimaru. Also keep in mind that whenever you destroy a tech building, the opponent’s base takes 2 damage, so you’re also working towards your eventual victory by doing that. This can help:


Sun Tzu said that spies are the most valuable assets in warfare. Onimaru said that too. In Codex, the Flagstone spy is invisible, which is even better than the stealth ability you’ve seen before. Units and heroes that are invisible, like those with stealth, can sneak past enemy patrollers. In addition to that, invisible things can’t be targeted by enemy spells or abilities and they can’t be attacked in combat either. Opponents need a detector to see through invisibility, but those are hard to come by. They could also build the Tower add-on to detect one invisible thing per turn, though they can only have one add-on at a time.

Flagstone Spy is threatening to deal 3 damage to a building every turn. That, plus your other tricks is probably enough to repeatedly destroy a tech building, which is hugely crippling. He’s also gaining information about your opponent's hand, letting you see which cards they teched from their codex. On top of all that, Flagstone Spy steals a gold if they have any gold in their reserves. Opponents simply MUST answer him somehow to avoid being dismantled, but he’s actually pretty hard to stop.

For a completely different line of play, look at these two Peace tech II cards:

Both of these cards trigger when you play a unit from your hand. In Drill Sergeant’s case, he gets a +1/+1 rune that he can then move to any unit. I assume he does that by yelling at them. In Flagstone Garrison’s case, you get to draw a card. If you have both Drill Sergeant and Flagstone Garrison out, playing a single unit will trigger both of them at once. Heck, if you had two copies of each Sergeant / Garrison out, it would trigger all four of them at once. And what could be more Peaceful than two screaming Drill Sergeants and two military garrisons? You won't find any crime on those streets.

And by the way, you know who is a great unit to play from your hand to trigger those last two cards? Overeager Cadet. Costing 0 was never more sweet.

Now let’s talk about closing the game out. Onimaru himself can do it if you use his Art of War ultimate spell a few times. He’s “unstoppable” with that (meaning he ignores patrollers). Another way to ignore patrollers is to fly over them:


Flying is very powerful in Codex. Fliers can fly over patrollers and hit whatever they want, but that’s not even the whole story. On top of that, when they fight ground units or heroes, they don’t even get hit back unless those ground forces have anti-air. If you’re familiar with StarCraft, think of a Mutalisk (flying) attacking a Zealot (ground unit without anti-air). The Zealot can’t hit the Mutalisk ever, and the Mutalisk gets free shots off.

Air Hammers can attack and hit whatever they want, only stopped if the opponent happens to have a flying patroller. If they happen to have an anti-air patroller, your flier can STILL fly over it, but you’ll take damage when you do (all combat damage is dealt simultaneously). In the majority of cases though, you’ll just hit whatever you want and you'll dominate. Air Hammer in particular gets +2 damage against damaged buildings, so that means if you managed to do even 1 damage to a tech building with Traffic Director, Air Hammer can finish it off. It also means if you managed to deal even 1 damage to their base, a single Air Hammer is putting them on a 4 turn clock.

At tech III, you can use a way more powerful flier:


A 6/7 flier is deadly to begin with, but Patriot Gryphon wins with Peace’s signature style of control: destroying buildings. When you use Patriot Gryphon, your opponent has only a few turns to survive, but you’re ALSO crippling them while you’re winning. Usually you have to choose if you want to spend a turn destroying their tech II building or something. This normally will cripple them a bit and deal 2 damage to their base. But Patriot Gryphon’s ability lets him destroy a tech building AND hit the base too. Their base will take 2 damage from the tech building being destroyed AND 6 damage from Patriot Grypon’s ability. Patriot Gryphon's crushing militance is the embodiment of Peace.

Keep the Peace the Flagstone way.

Codex: Law spec

The Flagstone Dominion (blue) faction is part of the Codex Deluxe set. Flagstone is the realm’s capital city, and a paragon of morality, due process, and family values. It’s also a bit of a totalitarian dystopia, but let’s not get bogged down in the details.

You might recognize Quince and Onimaru from my other games, but the Law hero, Bigby Hayes, is new in Codex. Bigby is an iron-fisted judge in the literal sense, and he’s very much in control of the courtroom—and his opponents.


Bigby’s art is intimidating, but his abilities might not look like much. Don’t let that fool you though, the Law spec is overall a control deck and when the pieces come together, it can really lock you down. Bigby having “stash” from level 1 helps you line up your card draws across turns to have the answers you need at the right times. Stash lets you replace one of the cards you WOULD draw next turn with a card that’s already in your hand this turn.

If you don’t have the answer you need, his max level ability lets you draw a card. When playing a control-style gameplan, digging for whatever the answer is to your current predicament can be a life-saver.

As a control spec, your first goal with Law is just to survive the early game. You have a lot of late game power, but you need some time to set it up. The blue starting deck cards aren’t as good at defense as some other decks, but they have some good tricks. (I’ll leave you to find those yourself later!) And notably, the blue starting deck has two cards in particular that are really strong later in the game. First, Reputable Newsman.


Flagstone’s news is more like propaganda, but it sounds so good when Reputable Newsman says it. He really gets in the opponent’s way, being a 0/3, so you can imagine him singing the praises of Chancellor Quince while you’re just trying to get past him. Gameplay-wise, his effect is powerful, but he requires you to know the game well. Sometimes later in the game, one of the main things you’re worried about losing to is an opposing hero’s ultimate spell (or possibly an upgrade). You can “pre-counter” that just by naming the appropriate cost with Newsman.


It looks like poor DeGrey is in jail for civil disobedience. Makes you wonder what’s behind that.

Jail is basically a way to stall that stays valuable throughout the game. Your opponent plays a unit but—oops—it goes to jail first, and whatever was already in jail gets released. The Jail is small, so it can only hold one unit at a time, even though that unit can be a Helpful Turtle or a an enormous Pirate Gunship. I wonder how the logistics of that work. Anyway when you get to late-game and you're racing to play a super powerful unit first, you’re happy to slow the opponent down with Jail.

Law’s tech I units are tailor-made to stall and set you up for stronger plays later—and who better to do that than this pair of bureaucrats?

They both cost 2 gold, and they give you some decent defenders. One can help you grow your gold reserves, while the other can help you get ahead on cards. 

One perk of Law is that even if a spell is outside your Jurisdiction, you can rig the laws to allow it anyway:


There's a lot of great properties there. You're basically able to play any spell from the other heroes on your team just by paying an extra 2 gold for it. That's more useful than it might even sound at first glance. This gives you access to a potential toolbox of effects that can solve whatever problems you're encountering at the moment. Usually when you want add a spell to your deck that will solve a problem, you have to do that a couple of turns before the problem arises. Jurisdiction turns into whatever you need at that moment. (In fighting game parlance, that's known as an "option select," which is also the name of a Puzzle Strike chip!) 

Let’s get to the part where you really start to exert some control though. Two Law spells in particular are great at this. First, Injunction.


Injunction really gums up their works. Let's compare it to when you destroy a tech building. In that case, that player will have to spend a turn rebuilding it before they can produce more units from it. They also have to wait a turn before they can build the next higher tech building. But when you use Injunction on a tech building, you force them wait for those things AND a bunch of their units can’t defend or attack for a turn. That can slow them down a lot, especially when you factor in that you might play a second copy of this spell on the following turn.

If you need a more permanent solution, Judge Bigby Hayes has a ruling for you:


This destroys all units on the table other than tech III units. It won’t kill heroes, but it’s devastating nonetheless. If your opponent overcommitted, you just made them waste all those resources. And unlike most ultimate spells, you CAN play this one as a comeback. Usually, you need to have a max level hero in play at the start of the turn in order to cast an ultimate spell. If you’re losing control of the battlefield, it will be hard to do that because even if you play a hero, then level it to max, your opponent will probably kill it before it’s your turn again. With Judgment Day though, you can play it the same turn you max your hero because it says so right on the card. So even if Bigby is in the command zone (not actually in play), you can summon him, level him to max, then cast Judgment Day all on the same turn.

You can strengthen your lock once you get to Law tech II.


The Censorship Council is there to keep our ears safe from anything potentially offensive. Gameplay-wise, it shuts down a whole bunch of strategies your opponents might have and it makes it hard for them to make a comeback if they start to get behind. Usually, you play about one thing per turn other than a worker anyway, but as soon as you get some kind of card draw (even if it’s from one of your patrollers dying in the technician slot) you want to play more. Even without extra card draw, you sometimes need to play more just to keep up. But your opponent CAN'T do that under the watchful eyes of Censorship Council. 

Law also happens to have a fantastic way to take care of whatever one thing the opponent plays:


You can’t resist that mustache. When Arresting Constable lives a turn, you’ll be able to exhaust him to lock down any unit other than a tech III. This is sort of like destroying that unit because you can keep doing that every turn, except if the opponent plays an even better unit, you can switch over to locking that one down instead.

Remember, it’s not JUST Arresting Constable at work here. Your opponent is already probably slowed down by Jail, had their forces wiped out by Judgment Day, and who knows what else. When they finally scrape together a decent threat, now it gets locked down forever. Control players: this is your time to shine.

When it comes to actually winning the game, you have a few choices. One is this handsome battering ram:


Justice will be done! The Justice Juggernaut is a good win condition for two reasons. First, it’s unstoppable so it can hit a base no matter how many patrollers the opponent has. You’re putting the opponent on a 5 turn clock with this unit alone, which is pretty long, but the controlly nature of Law makes that still viable. Second, Justice Juggernaut is so tough that it has to die twice before it really goes away. That means when you wipe the board with Judgment Day, the likely outcome is that all units go away EXCEPT your Justice Juggernaut!

If you want an even more fantastic way to win, go for the tech III:


While Lawbringer Gryphon is out, your BASE gets flying. Ground attackers won’t even be able to attack it at all unless they have anti-air. That’s really useful because even if you were about to lose a damage race, this can put your base out of reach and buy you the extra turns needed to win. The opponent will have to get rid of your Lawbringer Gryphon to be able to attack your base again, but that’s pretty difficult to do considering the Gryphon is also flying and it has resist 2. As soon as you attack with this Gryphon, the devastation begins. It will only take 3 attacks to deal enough damage to win, and each of those times your opponent will lose FOUR units. That's a crazy amount of power, but if you're able to spend 10 gold on a tech III, then you probably already won anyway. Might as well do it in style.

If you want to be in total control, Judge Bigby Hayes and the Law spec might be for you.

Codex: Finesse spec

River Montoya is the Finesse hero in Codex. She sees sword fighting as an elaborate dance. She loves the performing arts such as dancing, singing, and acting, and considers her fencing yet another kind of dramatic performance.

Here is her hero card:


When she reaches level 3, she can clear out any single early game defender from the patrol zone. That’s especially handy against specs that want to have fewer, but more powerful units on the board such as the Bashing spec.

At maximum level, River’s tech 0 units cost 1 less gold to play. Those are the units in the 10-card starting deck. Usually you want to stop playing those units as you reach the midgame, but River can actually still get some value out of them because of how cheap they become.

The Finesse spec offers two main different gameplans, as well as some extra cards that are just generally good in lots of gameplans. The first gameplan has to do with Virtuosos. Both Finesse tech I units are Virtuosos:

Nimble Fencer gives herself haste,  and that alone makes her an important card. She also gives Star-Crossed Starlet Haste.

That Starlet is a bit of a diva, but her acting and sword fighting are superb. Getting 3 ATK for just 2 gold is a great deal, but the drawback is that Star-Crossed Starlet is ultimately doomed. She’ll normally only get to attack one time before she dies to her own upkeep ability...unless she has haste from Nimble Fencer. That will let her attack twice before dying if she manages not to take any damage in the process.

Star-Crossed Starlet could really use a hand from Helpful Turtle too.


Helpful Turtle is a card in the neutral faction starter deck that heal 1 damage from ALL your units and heroes if he survives just one turn after you play him. He’ll keep healing them each turn he lives after that too. He's a fun guy to be around, especially at parties. He interacts very well with Star-Crossed Starlet because he can heal just before she takes her damage each turn (you choose the order of your simultaneous effects) which means she can keep on performing indefinitely.

Speaking of starting deck cards, let’s not forget Tenderfoot either:


Tenderfoot might look like a bad card, but understanding why that’s wrong will probably teach you a thing or two about Codex. First, even a 1/1 that costs 1 is pretty great to have in your starting deck. In the early game, you want to do a lot of things at once, such as summon a hero (those all cost 2 gold), play a worker each turn (that costs 1 gold each time), and more. So just having ANY unit at all that costs 1, no matter what it is, has some value. That’s true for attacking as well as defending. And when you defend, you can even patrol that unit in the scavenger or technician slots to get an extra gold or extra card when it dies.

But Tenderfoot isn’t a 1/1 for 1—she's a 1/2 for 1. So she's already good even if we stopped right there. But look more closely...even though she’s new at her craft, she’s a Virtuoso, destined for greatness. That means she also gets haste from Nimble Fencer! AND she is a tech 0 card which means with a max level Finesse hero and a Nimble Fencer in play, Tenderfoot becomes a 0 cost 1/2 with haste.

Once you reach tech II, you’re ready for a lesson in stat valuation that’s even more crazy than Tenderfoot’s story. Check out this guy, who looks like some sort of misprint:


Leaping Lizards! He has anti-air, ok whatever you’re thinking. He’s a 3/5 for 1 gold. 1 gold! As crazy as that sounds, you deserve quite a lot of power at the tech II level, and you would generally RATHER pay more and get a bigger guy, so that’s why Leaping Lizard is allowed to be as amazing as he is.

The even more surprising part is that when you first see Leaping Lizard, you think surely you will play this guy all day, how could you not when he’s such a fantastic deal. And then you learn there’s another guy who is even better most of the time:


This master thespian has an upbeat attitude, and he has a lesson to teach. Just like Leaping Lizard, he is a 3/5, but he costs 2 gold more. His ability makes Virtuosos cost 0 though. Your tech I Virtuosos both normally cost 2 gold, so if you cast even ONE of those, ONCE then you already broke even with playing Leaping Lizard. The difference is that instead of having anti-air, all your Virtuosos get to deal 2 damage to a building (including the opponent’s base—the thing you need to destroy to win the game) without having to deal with combat or enemy patrollers. The deal really sweetens when you cast a second, third, or fourth Virtuoso. That’s a lot of gold savings right there.


While Maestro is rambunctious and giddy, Grounded Guide is that dour downer of a professor we’re all afraid of. You have to admit though, he knows his material, and Virtuosos are especially good at learning from him. They get a whopping +2/+1 as long as he’s around. The synergies here are quite powerful.

Finesse has other non-Virtuoso units too, but I’d rather shift over to tell you about a very different gameplan that Finesse players can use. This has to do with River’s spells, especially Harmony.


Harmony has channeling, which means the effect will stay in play until you lose your Finesse hero, then you’ll lose Harmony as well. While it’s in play, it gives you a free Dancer every time you play ANY spell. You can only have 3 Dancers at a time.

Before we get to why you even want a Dancer, let’s think about how easy they are to get. Finesse has pretty good spells, so you’re generally happy to play them anyway, even when no Dancers are at stake. Finesse also has CHEAP spells, which makes playing several of them to get Dancers even easier than it would be for other heroes. No Finesse spell costs more than 2, and there’s even a neutral starting deck spell that costs 1:


Even River’s ultimate spell costs 1:


Appel Stomp is a tricky spell. If you have two copies of it in hand, you can play both of them over and over, each one drawing the other copy. That lets you sideline X number of patrollers by paying X gold. In other words, you can pretty much ignore all the opponent's defenders once you get this going.

Back to the Dancers though, what are they? Well, they’re 0/1s, but they have a line of text on them:


If you look back at the Harmony spell, it says you can sacrifice Harmony anytime you want to “Stop the music”. That together with the text on the Dancer token means you can sacrifice your Harmony to flip over all your Dancers. Dancers are double-faced cards and this is what you see when you flip them over:


Dancers flip out when the music stops, and they become unstoppable Angry Dancers. Unstoppable means they can ignore patrollers, so they can attack whatever they want. Would you try to get in the way of an Angry Dancer? Didn't think so.

In Angry mode, they become 2/1 instead of 0/1 so they’re quite dangerous. If you have 3 Angry Dancers, that means you have 6 ATK of unstoppable damage. You can destroy a tech I, II, or III building in one shot, or turn that damage towards the opponent's base to go for the kill.

The last Finesse card I’d like to show you now is the tech III unit,  a master of swordsmanship and performance:


The Blademaster himself (or herself?) deals 7 damage and that damage is swift strike damage. If it would kill an enemy, that enemy doesn’t even get to hit back unless it also has swift strike, which it probably doesn’t. That bonus applies to ALL of your units and heroes when a Blademaster is out, so you’ll likely wipe the opponent’s board and keep most of your forces intact.

And in case you didn’t notice the subtle detail...Blademaster is a Virtuoso, too. Yes, it’s really free if you have a Maestro! Now that’s Finesse.

Codex: Bashing spec

The Renegades are the neutral faction in Codex. They have no allegiance to anyone, and are generally mercenaries and workers-for-hire. From lovable dancing rogues to violent lizards, they are a motley crew.

There are two neutral heroes, Troq Bashar of the Bashing spec and River Montoya of the Finesse spec. The neutral cards are generally simpler than the cards of other factions because they are meant as an intro to the game. By playing Bashing vs Finesse, you can learn how the overall game system works while using relatively simpler cards, and fewer cards too. In the Starter Set, each player controls one hero, but when you go to the Core Set and beyond, you can play 3 heroes at a time and have a much larger card pool to build your deck from as you play.

That said, the neutral faction cards are not just throwaway, beginner cards. They are very much a part of the game, and are actually the EASIEST to combine with other factions when choosing your team. Usually, teams that have more than one color of hero on them pay an extra 1 gold the first time they build a tech building or add-on each game. But the neutral heroes sidestep that; they are renegades who don't care who they work with. So they don’t count as a color here, and if you have a team of Red / Red / Neutral heroes, you don’t pay extra for your first building (while Red / Red / Green would).

Furthermore, the minor spells in the neutral starting deck are easier for other color heroes to cast, too. Usually a “wrong color” hero must pay 1 extra gold to cast a minor spell, but any hero in the game can cast a neutral minor spell without paying extra. So after you learn the basics of the game with Bashing vs. Finesse, you can certainly keep using them in your teams later on.

Troq is the hero of the Bashing spec:


Troq isn’t that smart, and he’s not that loyal either (as he used to work as a henchman for the Blood Anarchs, and before that as a soldier for the Flagstone Dominion.) He is well-meaning though, and has a big heart. He also has a big body. He likes to smash, and he loves potions of giant growth.

Troq is a simpler hero in Codex, but formidable in combat because of his stats. While he starts out as a 2/3 just like River Montoya, the Finesse hero, he becomes 3/4, then 4/5 as he levels up. He costs more to reach max level than she does, but his stats are ultimately higher.

Troq likes to smash, and his spells enable you to do that. Need to smash a unit? Give it The Boot.


This spell lets you destroy any early game unit, no questions asked. (Remember, heroes aren’t units, but Troq can hopefully take care of another hero simply by fighting them in combat.) Many early game units cost only 1 or 2 gold, so paying 3 gold to destroy them might put you slightly behind, but the versatility of this spell makes it worthwhile anyway. It’s pretty much always going to help you, it’s just a matter of how much.

Want to smash a building?


Wrecking Ball is an interesting spell because even though the effect itself is very simple and straightforward, it’s not so straightforward to know when or how to use it. Dealing 2 damage for 0 gold is generally a great deal, but it can only hit a building, so it won’t actually help you deal with enemy units on the board. You should think about two main categories of buildings here: a), tech I, III, and III buildings (they have 5 hit points each), and b) the opponent’s base (which has 20 hit points). Which kind of buildings should you smash with a Wrecking Ball?

Destroying a tech I, II, or III building puts your opponent behind one turn. It can make their hand full of dead cards that turn as they rebuild that building, and that can be enough of an advantage to pull ahead. Also, if you destroy one of those 5-hit point buildings, it will automatically deal 2 damage to their base, too. So you’ll get to slightly cripple them, and take of 10% of their base's maximum hit points in the process.

If you’re already closer to winning the game, then you can turn your Wrecking Balls directly to the base and deal 2 each time. That’s more efficient than dealing 5 to a tech I building and only having 2 of that hit their base. So usually early on, this spell is about crippling the opponent and right at the end, it’s about going for the kill.

Here's another way to damage buildings, from your starting deck:


Brick Thief lets you do that critical 1 point of damage you’ll need to destroy a tech building after you play two Wrecking Balls (or before, that works too). He also teaches you what the resist keyword does. And he teaches masonry on Sundays.

A lot of Troq’s power is actually in his ultimate spell though. So if you really want to smash the opponent, make sure to Final Smash them:


Final Smash has some drawbacks. It’s expensive to cast because you need to get Troq to level 8 first (so 2 told to summon him at level 1, then an additional 7 gold to get him to level 8) and the spell itself costs 6 gold. The general rule for ultimate spells is that you have to already have your hero at max level at the START of the turn to be able to cast it. So you’ll be telegraphing your ultimate a little. Another minor drawback is that the effects of Final Smash are not optional. So if the only tech I unit on the table is yours, you’ll return it to your hand, which you probably don’t want.

Now that we got that out of the way, consider the positives: it’s crazily, ridiculously good. If you actually smash someone with this for the full effect, the swing of getting rid of THREE of their units, and ALSO getting one of their tech II units for yourself is devastating. Troq has a lot of late game power here, so if you can survive until the late game, you can ride Final Smashes to victory.

Let’s shift over to looking at the Bashing units. The Bashing tech I units are very straightforward. I also hope you enjoy their theme and art.

Revolver Ocelot is a 3/3 for 2 gold with a combat ability. If he attacks a patroller, he can deal 1 extra damage to a patroller in the next slot over, if there is another patroller there. For example, an opponent who uses BOTH the Technician slot and the Scavenger slot in the patrol zone will be vulnerable to possibly taking an extra damage from Revolver Ocelot because those slots are adjacent. That means they will probably choose to patrol in less optimal slots just because of the threat of this.

Iron Man might not look like much, but he’s actually a benchmark of power. A 3/4 for 3 is near the top end of power that a tech I unit can even have. There are a few tech Is in the game stronger than him, but most of those have some sort of drawback. It turns out that those raw stats at that point in the game can be tough to deal with for specs that don’t have a 3/4. Basically, he’s really good at Bashing.

At tech II, you can get a Hired Stomper:


He can help you clear the board when he arrives, and he’ll stick around the clean up the mess afterwards. Be sure to compliment his jacket.

Bashing isn’t all bashing though. At least Sneaky Pig is slightly more subtle (or is he?)


At the tech II level, a 3/3 that costs 3 isn’t that great, BUT it’s a whole different story when you have Sneaky Pig’s abilities. He can bash right now, and he can bash exactly what you want. No matter what the opponent patrols with, Sneaky Pig can slip right past them and bash a hero for 3 damage, which is often enough to kill them. Or he can bash a tech building at a critical moment. He’s sort of like a damage spell that doubles as a unit if you need to defend with him instead. He's also unlikely to be identified due to his sneaky mask.

For more raw stats, try an awesome looking Harvest Reaper:


That 6 ATK is a heavy hit. It can even take out two patrollers at once sometimes! Having claws for hands really comes in handy here.

When it comes time to end the game, slam this down:


It’s hard to lose the game once this hits the table. It immediately deals 20% of the damage you need to win the moment it arrives. If it survives until your next turn, which it probably will because it’s an 8/9(!), it will a) attack for 8, b) ALSO deal another 20% of the damage you need to win directly to their base, and c) ALSO destroy two of the opponent’s units. That is one badass wooden duck. What’s inside him anyway? And will enemies really be tricked into letting him into their base? History says yes.

If you’re looking for some straightforward bashing, I hope you try Troq’s Bashing spec. If you want more finesse though, look into the other neutral spec: River Montoya’s Finesse spec.

Codex: Growth spec

Argagarg Garg is the Growth spec hero of the green faction. Outsiders stereotype Argagarg’s fish-like people as being savage and barbaric, but they have it completely backwards; the Merfolk are wise and patient. Just because they look different from humans, doesn’t make them bad!

Here’s Argagarg’s hero card:


He comes with a 0/1 wisp, which gives you an extra defender. His max level ability summons a 3/3 water elemental with anti-air, which is quite a perk. Argagarg himself tends to stay out of combat; he sits back and buffs units while they do most of the work.

Speaking of defense, the green starter deck in general offers good defense. Look at these Treants:

Young Treant basically doesn’t cost a card and Ironbark Treant turns into a 1/4 while patrolling. That’s equivalent to a 1/5 if you make him your Squad Leader. The point is, basic green cards are already good defenders, and Argagarg gets a wisp and a water elemental thrown in without spending any cards at all.

Argagarg himself only gets 1 ATK even at max level, but his spells are very strong. He can grow a unit huge, or shrink it down to nothing:

Dinosize makes one of your units big enough to kill basically anything, and Polymorph Squirrel turns even the most terrifying enemy unit into something you can easily kill. The perk of Dinosize is that even though you can often use it to kill an enemy unit or hero, later in the game it helps you set up for a huge turn where you attack their base for 20+ damage. One perk of Polymorph Squirrel is that it can kill units that are normally unkillable, such as indestructible units—they aren't indestructible when they lose all their abilities! It also lets you get around triggering any "Dies: Do X" abilities the victim unit might have, because those are erased too while it's a squirrel.

Are you looking for awesome art that is too great for this Earth?


There you go. And while you’re at it, have a crazily powerful spell too. Somehow it GAINS gold every turn, and it buffs your guy, and it heals all your guys. That’s a lot of upside. If +2/+2 on one unit isn’t enough for you and you want to straight up win the game by overrunning your opponent, use this:


Even if you weren’t really winning by much on the board, Stampede can give you an explosive 20+ damage turn to win in one shot. You'll have set up for it by having a max level Argagarg already in play when you cast your ultimate spell.

The green faction is also really good at generating gold. Argagarg’s friend Galina Glimmer is able to boost your economy a lot:


I mentioned in the article about the Feral spec that you can use Young Panda and Giant Panda to get more green units to make your Gigadons cheaper, and the same advice applies here to power Galina Glimmer. The Feral spell Murkwood Allies would also be an incredible compliment to her. (Green specs have a lot of synergy with each other!)

At the tech II level, check out Artisan Mantis:


He’s a very proper, fancy Mantis. Rarely seen without his top hat or monocle, he’s a master architect and able to repair structures better than anyone else in the game. If your opponent is blowing up your tech buildings in one hit, or threatening to take down your entire base in one hit, he won’t help. But often there’s a race for damage, especially against the red faction, and he works wonders there. He’s the key to some matchups, so use him wisely.


Blooming Ancient is the kind of guy who grows completely out of control if opponents don’t put a stop to him, fast. Blooming Ancient grows every time you play a unit from your hand, and ALSO grows every time you summon a token unit such as a wisp from one of the pandas or Argagarg, or all those frogs from Murkwood Allies. If you play your cards right, Blooming Ancient will be covered with +1/+1 runes, then you can distribute them as you see fit across your other units.

For those of you who like to lie awake at night, fantasizing about card powers that work out just right, this is for you:


All you have to do is deal combat damage 5 times after you play this, and all your units AND heroes grow ridiculously large. It’s pretty hard to lose if this goes off, but the trouble is getting those 5 growth runes. Might of Leaf and Claw is a tech II upgrade, which means it comes somewhat late in the game, and the upgrade itself can’t attack or patrol. So you’re putting yourself a little behind by playing it, and you’re facing an opponent who probably has access to tech II stuff. Ideally, you have a whole bunch of units laying around who can attack at once and trigger it in a single turn. Then you can live the dream of +5/+5 for everything.

At tech III, you get Guargum, Eternal Sentinel:


Guargum is the heart of the forest, the most powerful watcher over nature’s children. He’s legendary, which means you can’t have two of him, but you shouldn’t need two anyway. As a 10 cost tech III, he’s very, very expensive, but his last ability lets you play Growth spells for free, and without even having a Growth hero. Have a Dinosize and Stampede in your hand? That usually costs a total of 10 to cast, but go ahead and do that for free. And by the way you get a 12/12 with resist 2 and obliterate 4 while we’re at it. Obliterate 4 is totally crazy. Every time you attack, your opponent will lose 4 units, and there’s no way they can keep up with that while a 12/12 is grinding them down and casting free spells at the same time.

The Growth spec starts with a small Merfolk named Argagarg, but it ends with Guargum: Growth’s ultimate incarnation, taller than trees.

Codex: Feral spec

Introducing the Feral spec hero, Calamandra Moss of the Moss Sentinels. She has a deep connection with the forest. Animals sense this, respect her, and fight for her. She can unleash the full feral force of animals, as well as employ their cunning and stealth abilities. Here's her hero card:


Her first ability is a constant threat to the opponent. Even when a level 1 Calamandra is on the board, the opponent has to factor in that at any moment they could take 4 damage to anything. That’s because the Calamandra player might dump 4 gold into leveling her to max so she can be a 4/5, and discard two cards to give her stealth. That lets her ignore patrollers, so she can attack anything she wants. The cost of discarding two cards is very high, so you won’t want to actually use the ability very much, but the threat of it is a game changer that opponents must do their best to play around. Opponents might consider building a Tower add-on against her to nullify the threat of her stealth.

Her max level ability is also notable in that it can get tech II tigers from your codex and put them into play even if you don’t have a tech II building. That means you can focus a lot on spells yet still access some pretty ferocious 4/4 tigers without sinking 4 gold into making a tech II building.

Let's take a look at her spells.


Ferocity gives its buffs to ALL your units (even untargetable ones, by the way). Armor piercing is most likely to be relevant against an opposing Squad Leader. Usually the Squad Leader slot in the patrol zone gets 1 armor, but that's useless against Ferocious units. Even more terrifying, all your units get swift strike. If you have all units that are the same size as your opponent, it means you get to kill all of theirs without taking any damage to any of yours. Your 3/3 with swift strike remains unharmed when it kills their 3/3, your swift strike 2/2 is unharmed when it kill a 2/2, etc.). You can't always make this line up, but you generally have beefy units with green so it's definitely possible to blow out opponents with this.

Murkwood Allies wins games:


Calling upon her friends from Argagarg’s swampy Murkwood Marsh, she can get four 1/1 frogs or a 4/4 beast...or both! (Is Midori around? His middle ability will give those all +2/+2 because they are units that don’t have abilities).

You can see Calamandra’s cunning in her Behind the Ferns spell:


Small units, such as all the frogs you just got from Murkwood Allies, can sneak past patrollers. That can be dominating because it allows you to take out an opponent’s hero to lock them out of certain spells, or take out a tech building to lock them out of certain units, or just win the game by attacking their base, no matter what they had patrolling. Remember that you’re threatening to attack for an additional 4 damage with stealth from Calamandra herself anytime you’re willing to discard two cards to activate that.

Prefer to win by the tooth and nail of powerful units? Try this:


If you boost it for a total of 8 gold, you can put two units from codex directly into play, without even bothering to wait a couple turns to draw them. If you have a tech II building, those can be tech II units. If you have a tech III building, they can be tech III units, which is just totally crazy overkill at that point.

Back to reality though, the Feral tech I units are notable in what “workhorses” they are, so to speak:

These are some of the most solid tech Is in the game. What I mean by that is they aren’t trickshots, they aren’t reliant on certain combos or anything, they are great, simple units you can count on no matter what happens. For 2 gold, you get a 3/3 with some combat abilities, and for 3 you get a 3/4 with overpower. Centaur is actually one of the focal points of the game. A 3/4 at tech I is so powerful that opponents often have to spend a lot of resources to deal with it. If you patrol it as your Squad Leader, it will get 1 armor, making it effectively a 3/5. That’s pretty hard for early game units to deal with.

Barkcoat Bear is a similarly solid guy at tech II:


A 5/5 for 4 gold is pretty good, especially with a combat ability like overpower. Resist 2 really puts it over the top, because it means spells that might kill it now cost 2 more—quite significant. That encourages opponents to fight in combat instead, but it’s a damn 5/5! Also, look at that art, it’s so great. He is truly a “Barkcoat Bear.”

If you want something more splashy, try Rampaging Elephant:


The 6/7 body is pretty nuts to begin with, but it can attack TWICE?! That’s one deadly elephant—he’s dishing out 12 damage when he attacks, and that's before you even buff him!

Check out Gigadon:


An 8/8 with overpower is so enormous that it’s really difficult to kill. But if they don’t kill him, he’s threatening to wipe out two patrollers at a time because of overpower (if that deals enough damage to kill one patroller, it can send the excess damage to a second patroller, though that doesn't cascade to kill a third). Pretty high cost though, right? In reality, you can play him for a lot less than 9. Maybe even 0 if you’re lucky. Get some frogs in there from Murkwood Allies and make sure to use one of these pandas, too:

They each come with a wisp, and those count as green units that reduce Gigadon’s cost. The Giant Panda is a Growth card rather than a Feral one, but as long as you have the Growth hero on your team, your tech I building can still produce it.

At tech III, you can unleash massive Feral power with...squirrels:


The squirrels he summons have haste (can attack right away) and are invisible. The invisible part means they can ignore patrollers and attack whatever they want, and it also means opponents can’t attack them or even target them on their turn unless they have a detector or a Tower add-on, which they probably don’t.

Let’s do the math with Moss Ancient. Let’s say you want to do all the damage you can to your opponent’s base. The turn he arrives, he can have 3 squirrels attack for a total of 3 damage. On the second turn, he can surely attack *something* and live, which means he’ll summon 3 more squirrels. So the squirrels alone will do 6 damage this turn. Same story on the following turn, except there will be 9 squirrels by then.

The summary is that on turn 1, 2, 3 of having him your squirrels did a total of 3, then 9, then 18 damage. That’s 18 damage that probably can’t be stopped by patrollers, PLUS 16 more damage from Moss Ancient himself attacking on turns 2 and 3 of this sequence. Also factor in that tech III units are generally hard to get rid of with spells, and Moss Ancient is untargetable, making him practically impossible to deal with outside of combat.

From the biggest of creatures to the smallest, the Feral spec commands them all!