Codex: Future spec

While the mystic historians of the purple faction look to the past, another part of the Vortoss culture is about looking to the future. The prospect of building newer and better technology drives engineers like Vir Garbarean, purple’s Future hero.


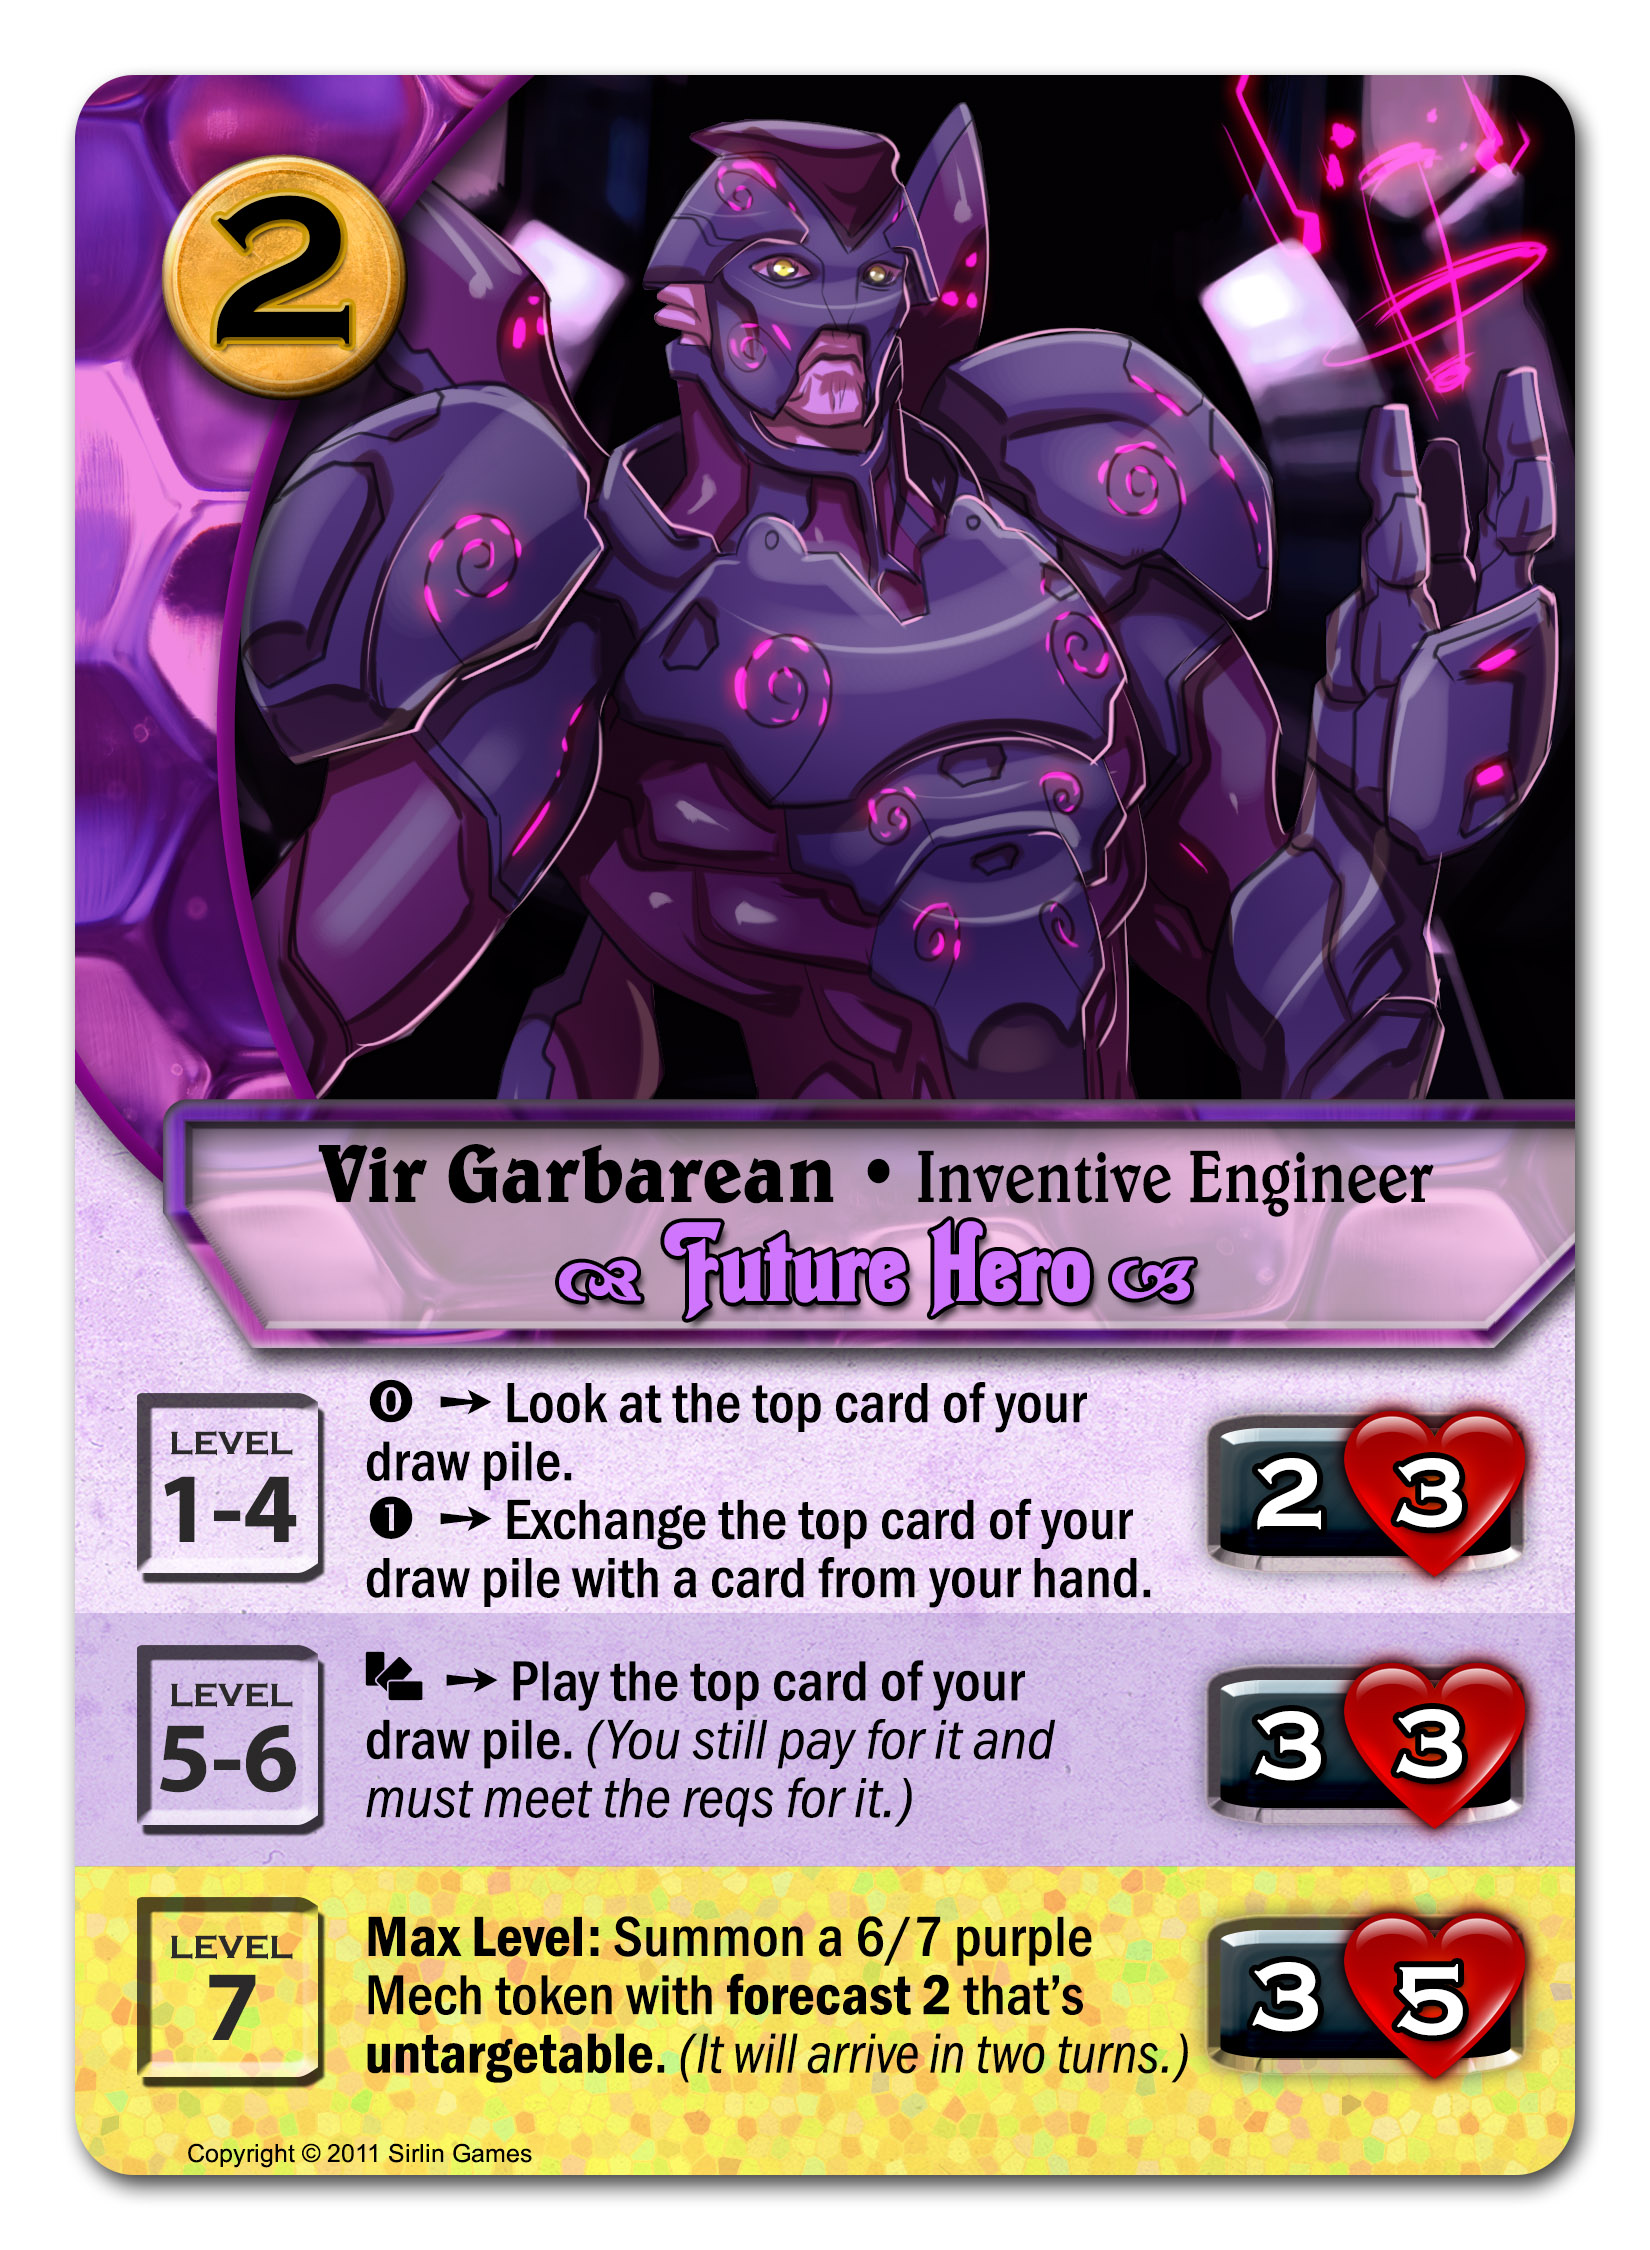
Vir can see a little bit into the future by knowing the next card that you’ll draw. For just 1 gold, he can realize that future by putting the card in your hand (at the cost of losing another card). When he reaches level 5, he can do even better by allowing you to play the future card without even putting it in your hand first. That saves you 1 gold, but it also saves you losing a card. You’ll be able to play one extra card per turn this way without reducing your card draw. (In Codex, towards the end of your turn you discard your hand, and draw however many cards you discarded plus 2, but capped at 5.)

At max level, Vir gets a ridiculous 6/7 mech token that’s untargetable...but it’s forecasted. He’ll get that mech 2 turns later. Vir is a pretty great engineer, and this monster of a mech is proof of that!

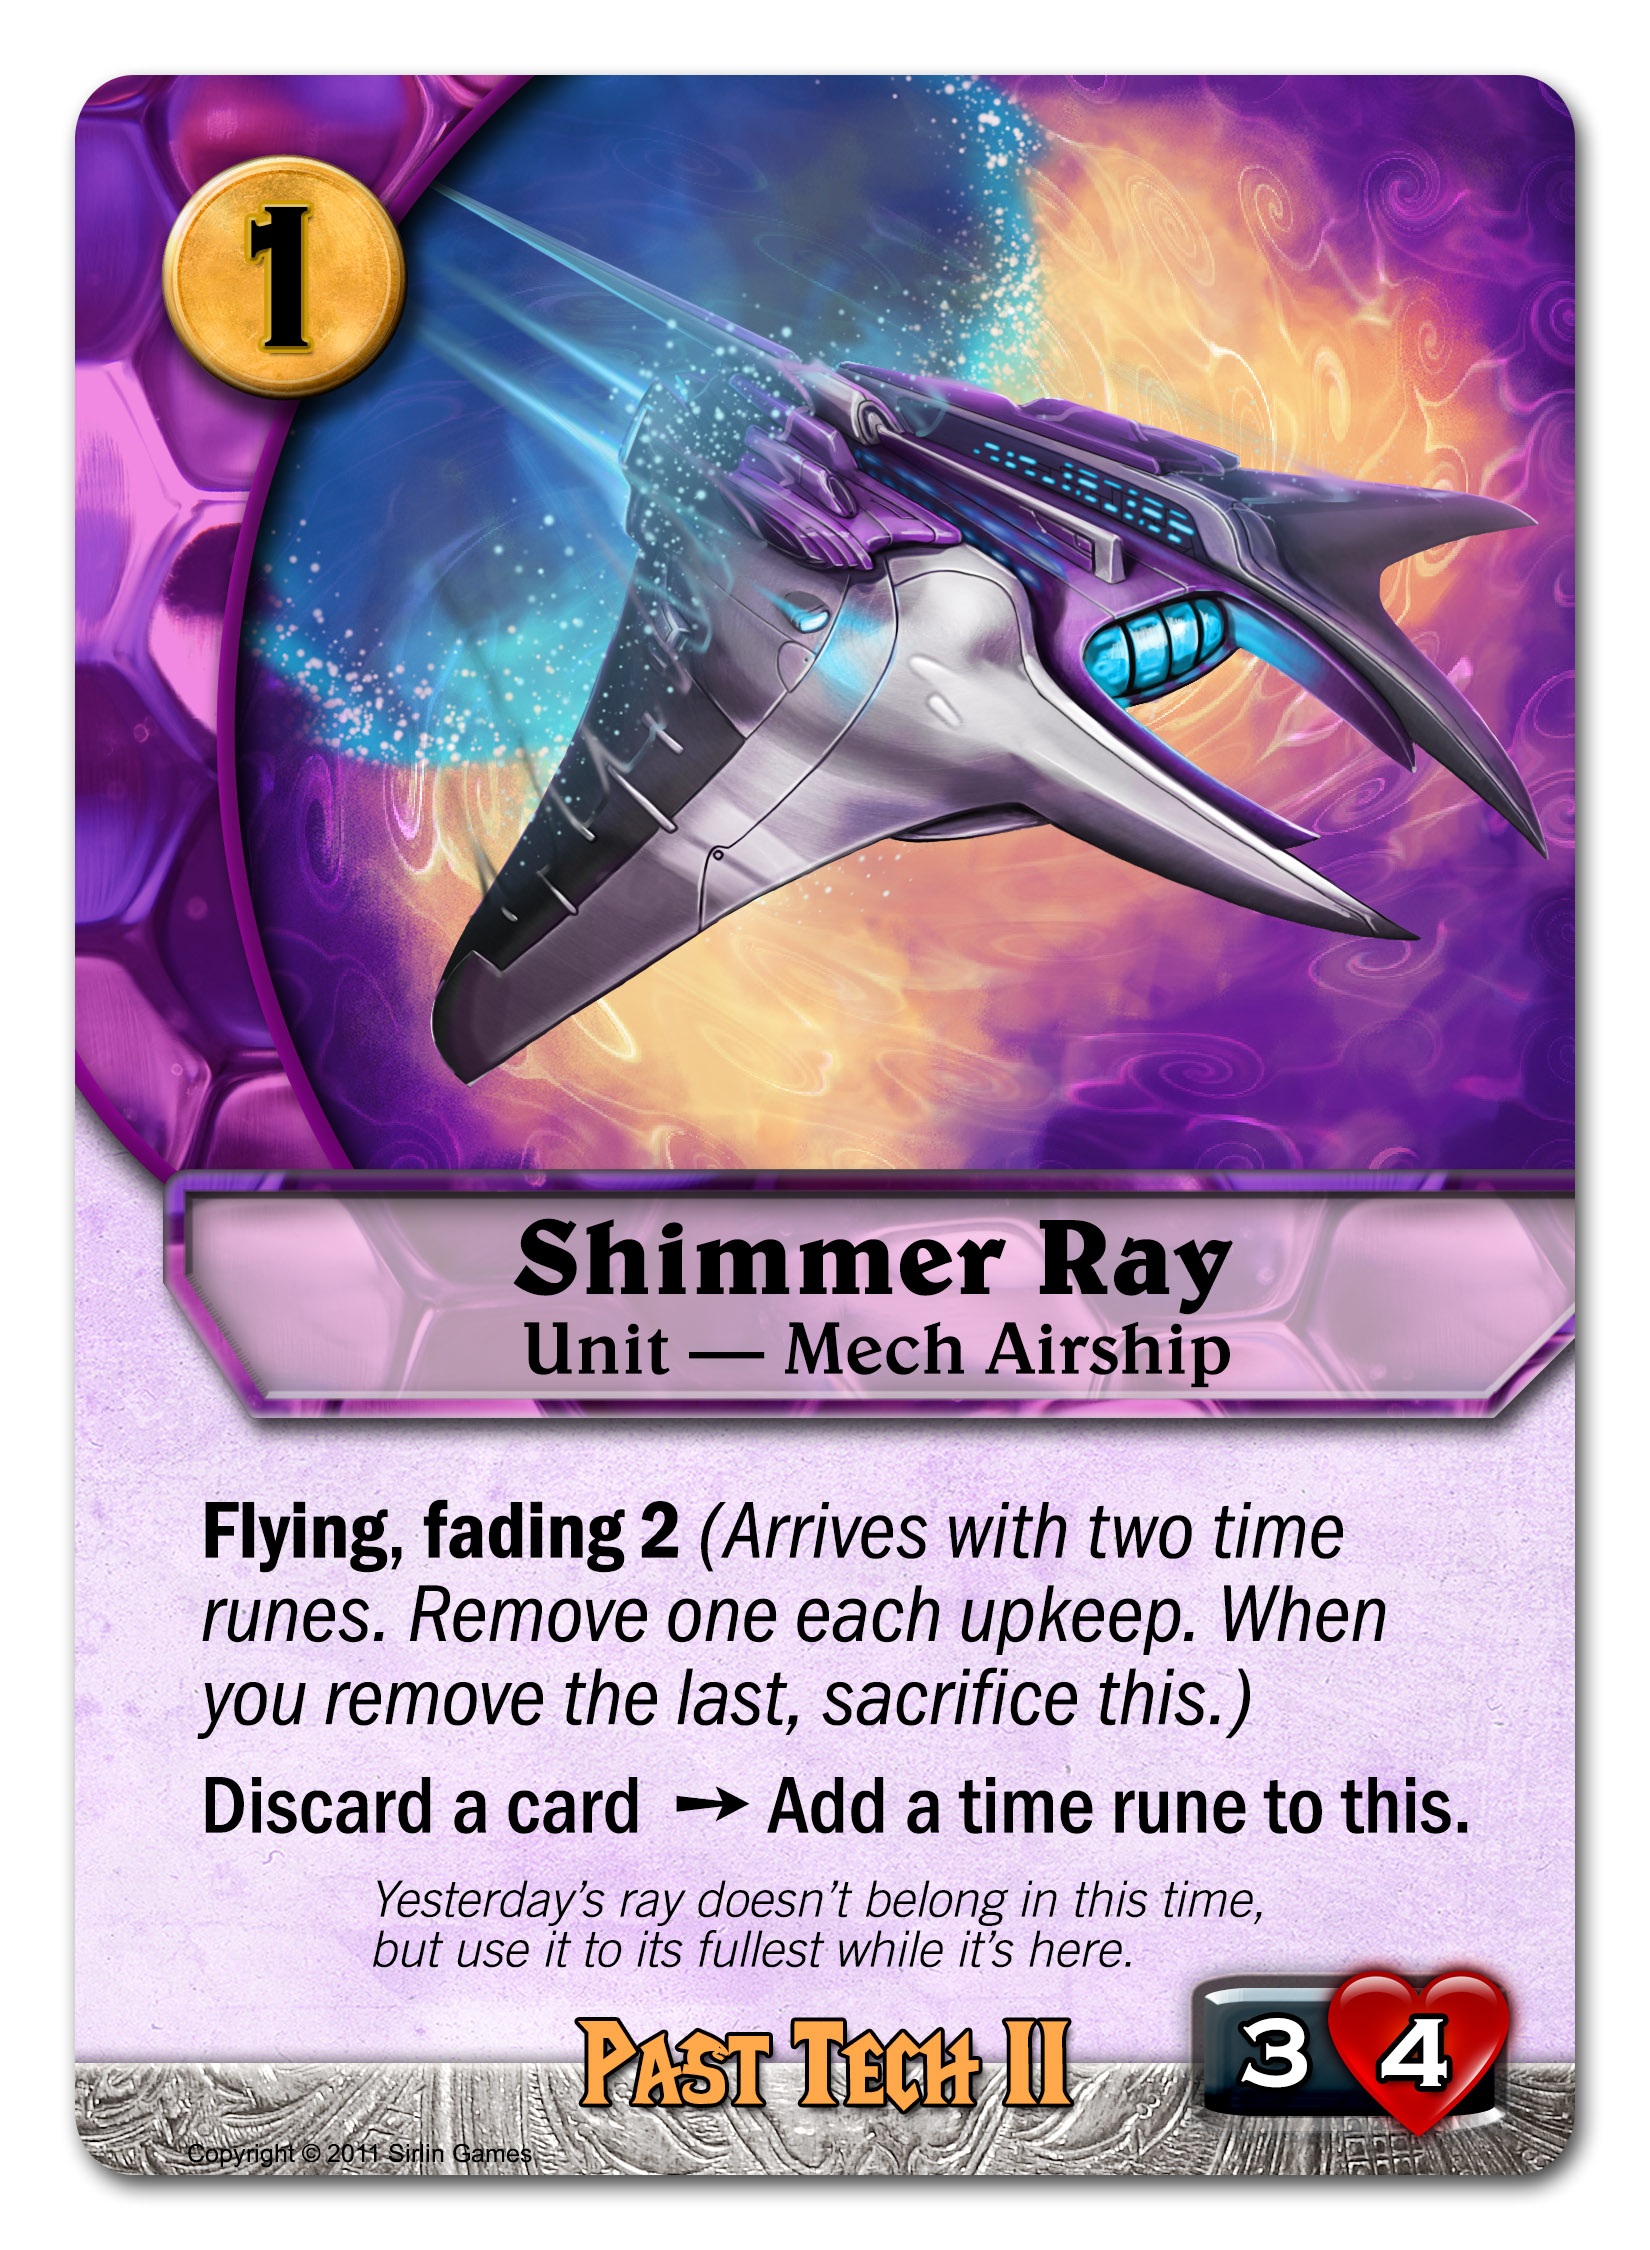
The forecast mechanic involves units from the future arriving in our time. Here’s a purple starting deck card that has forecast:


A 2 cost 4/4 is way too powerful for a starting deck card, but Plasmodium starts off in the future and takes some time to get synced up with our timeline. Once the strange beast arrives though it gives you a lot of beatdown power.

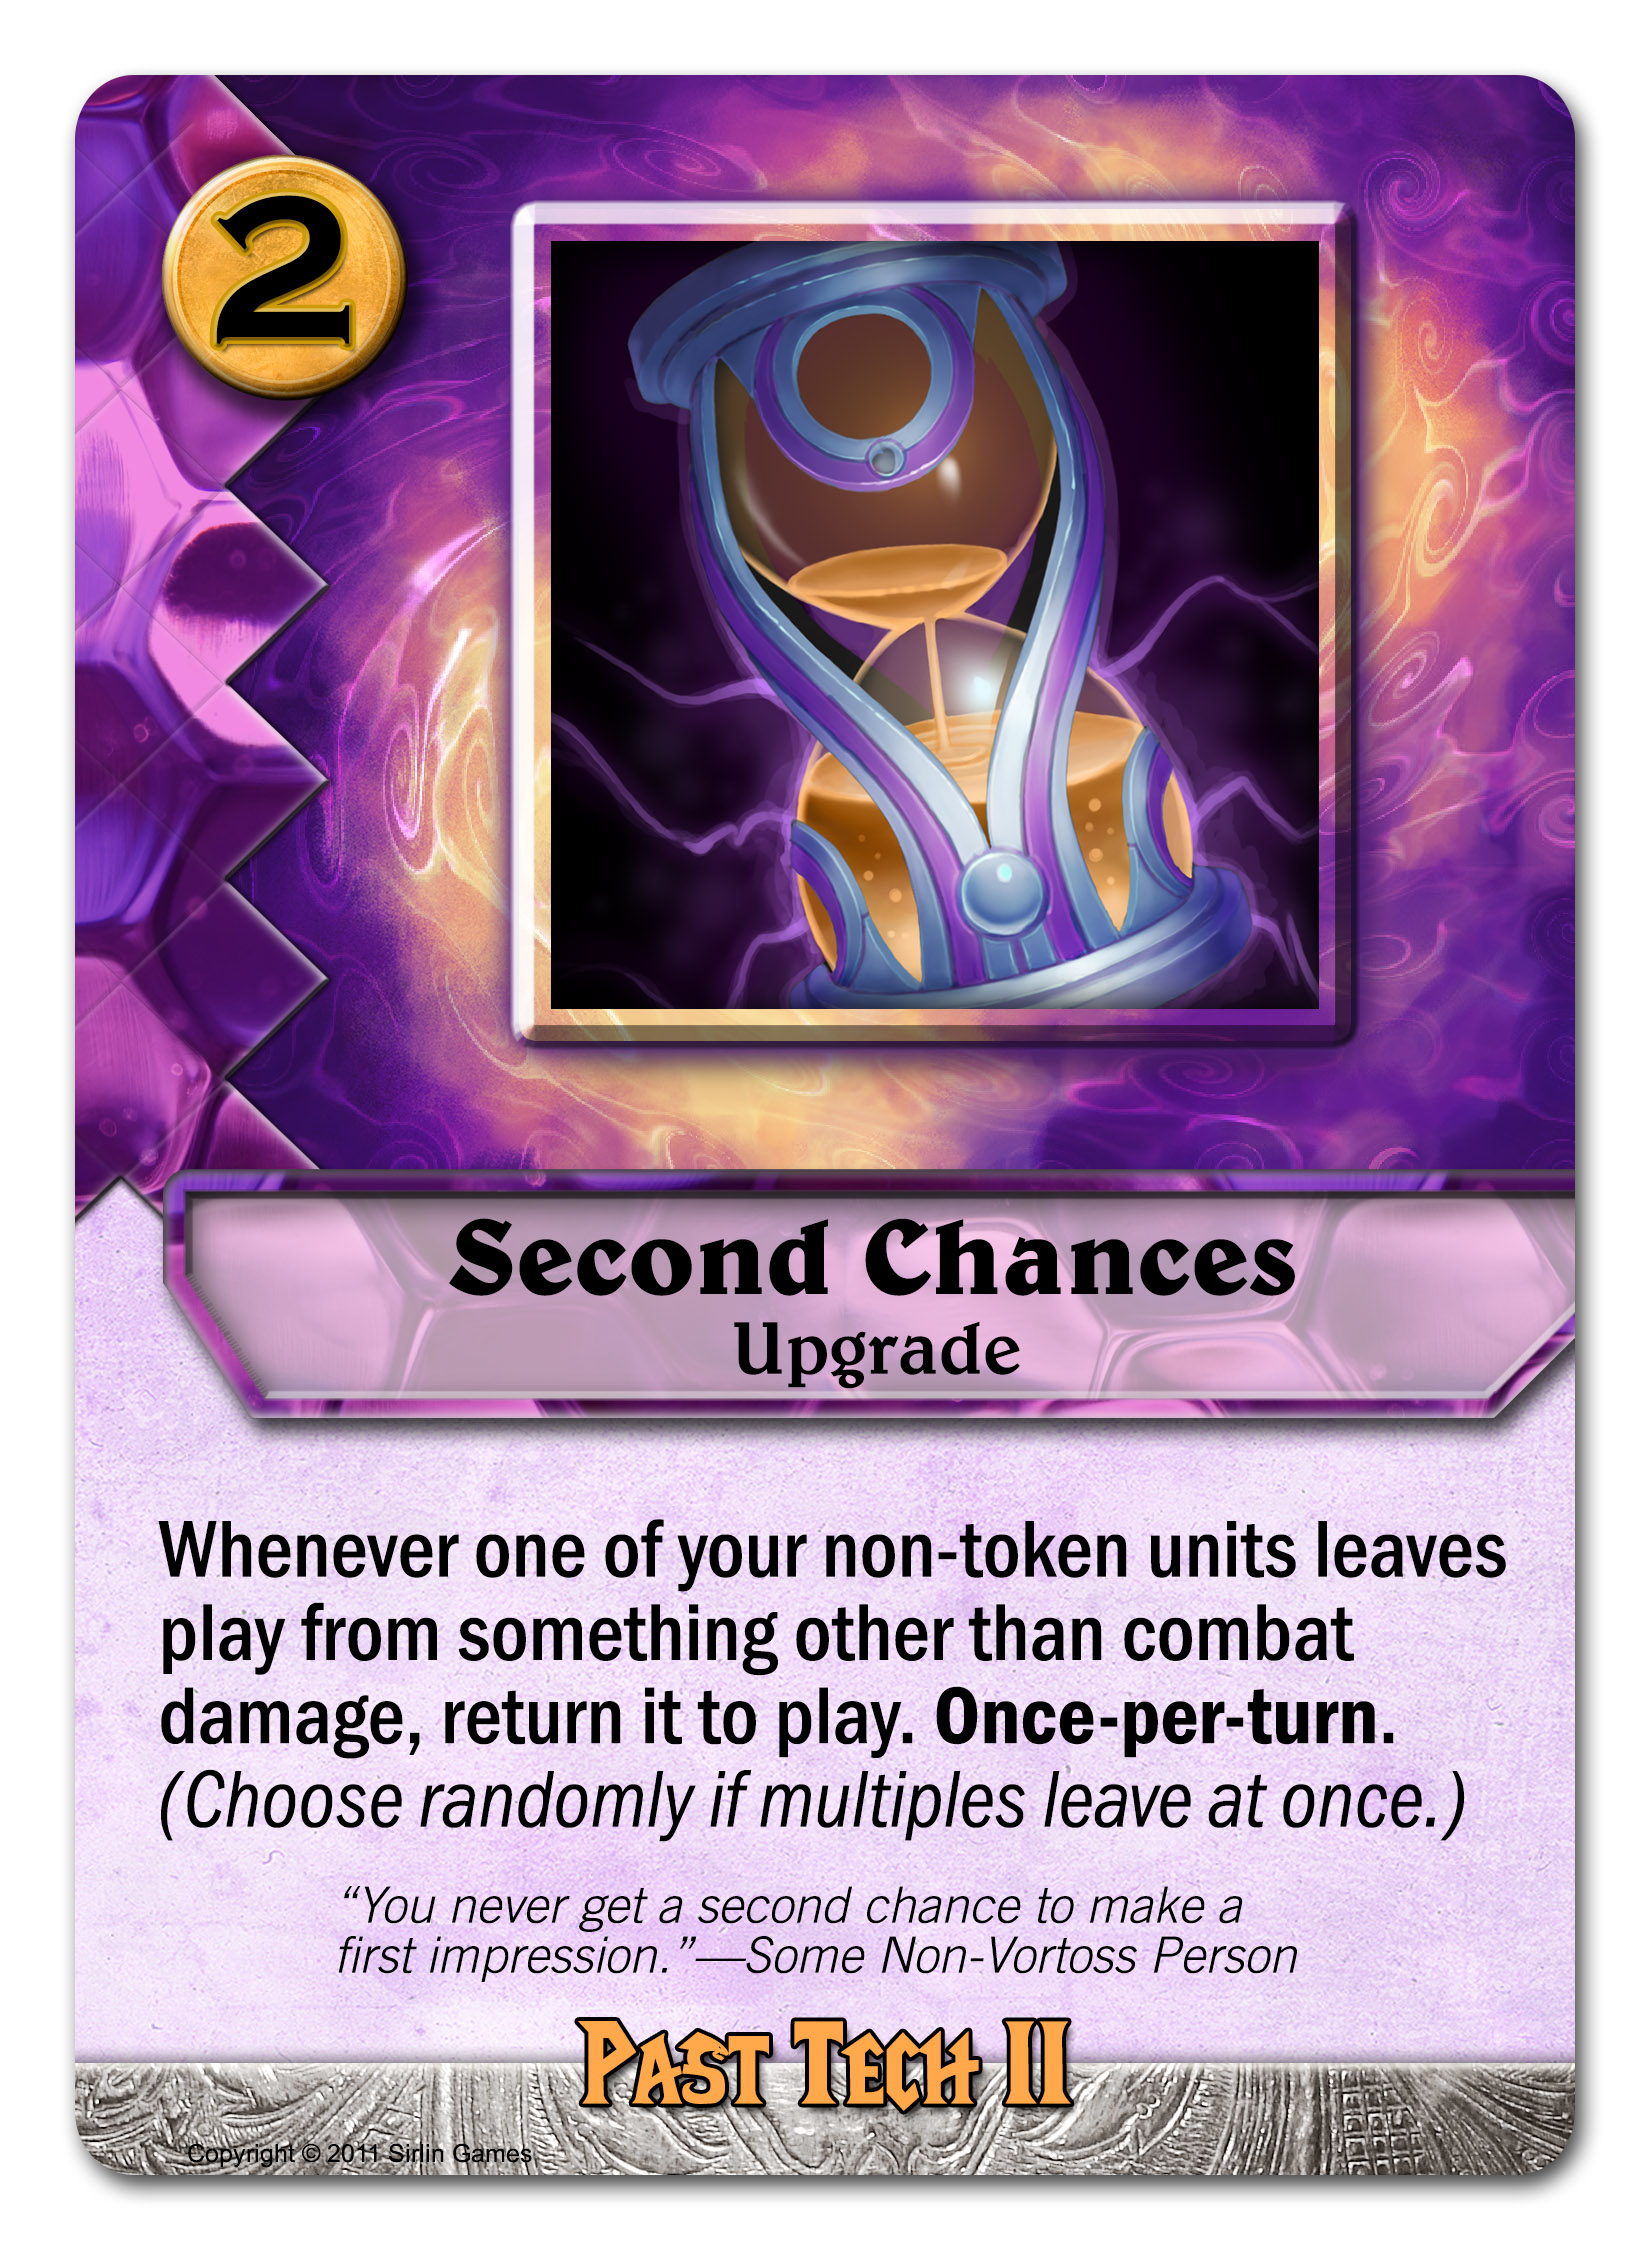
You can speed up your forecasts by finding some way to remove time runes, such as this purple starting deck spell:


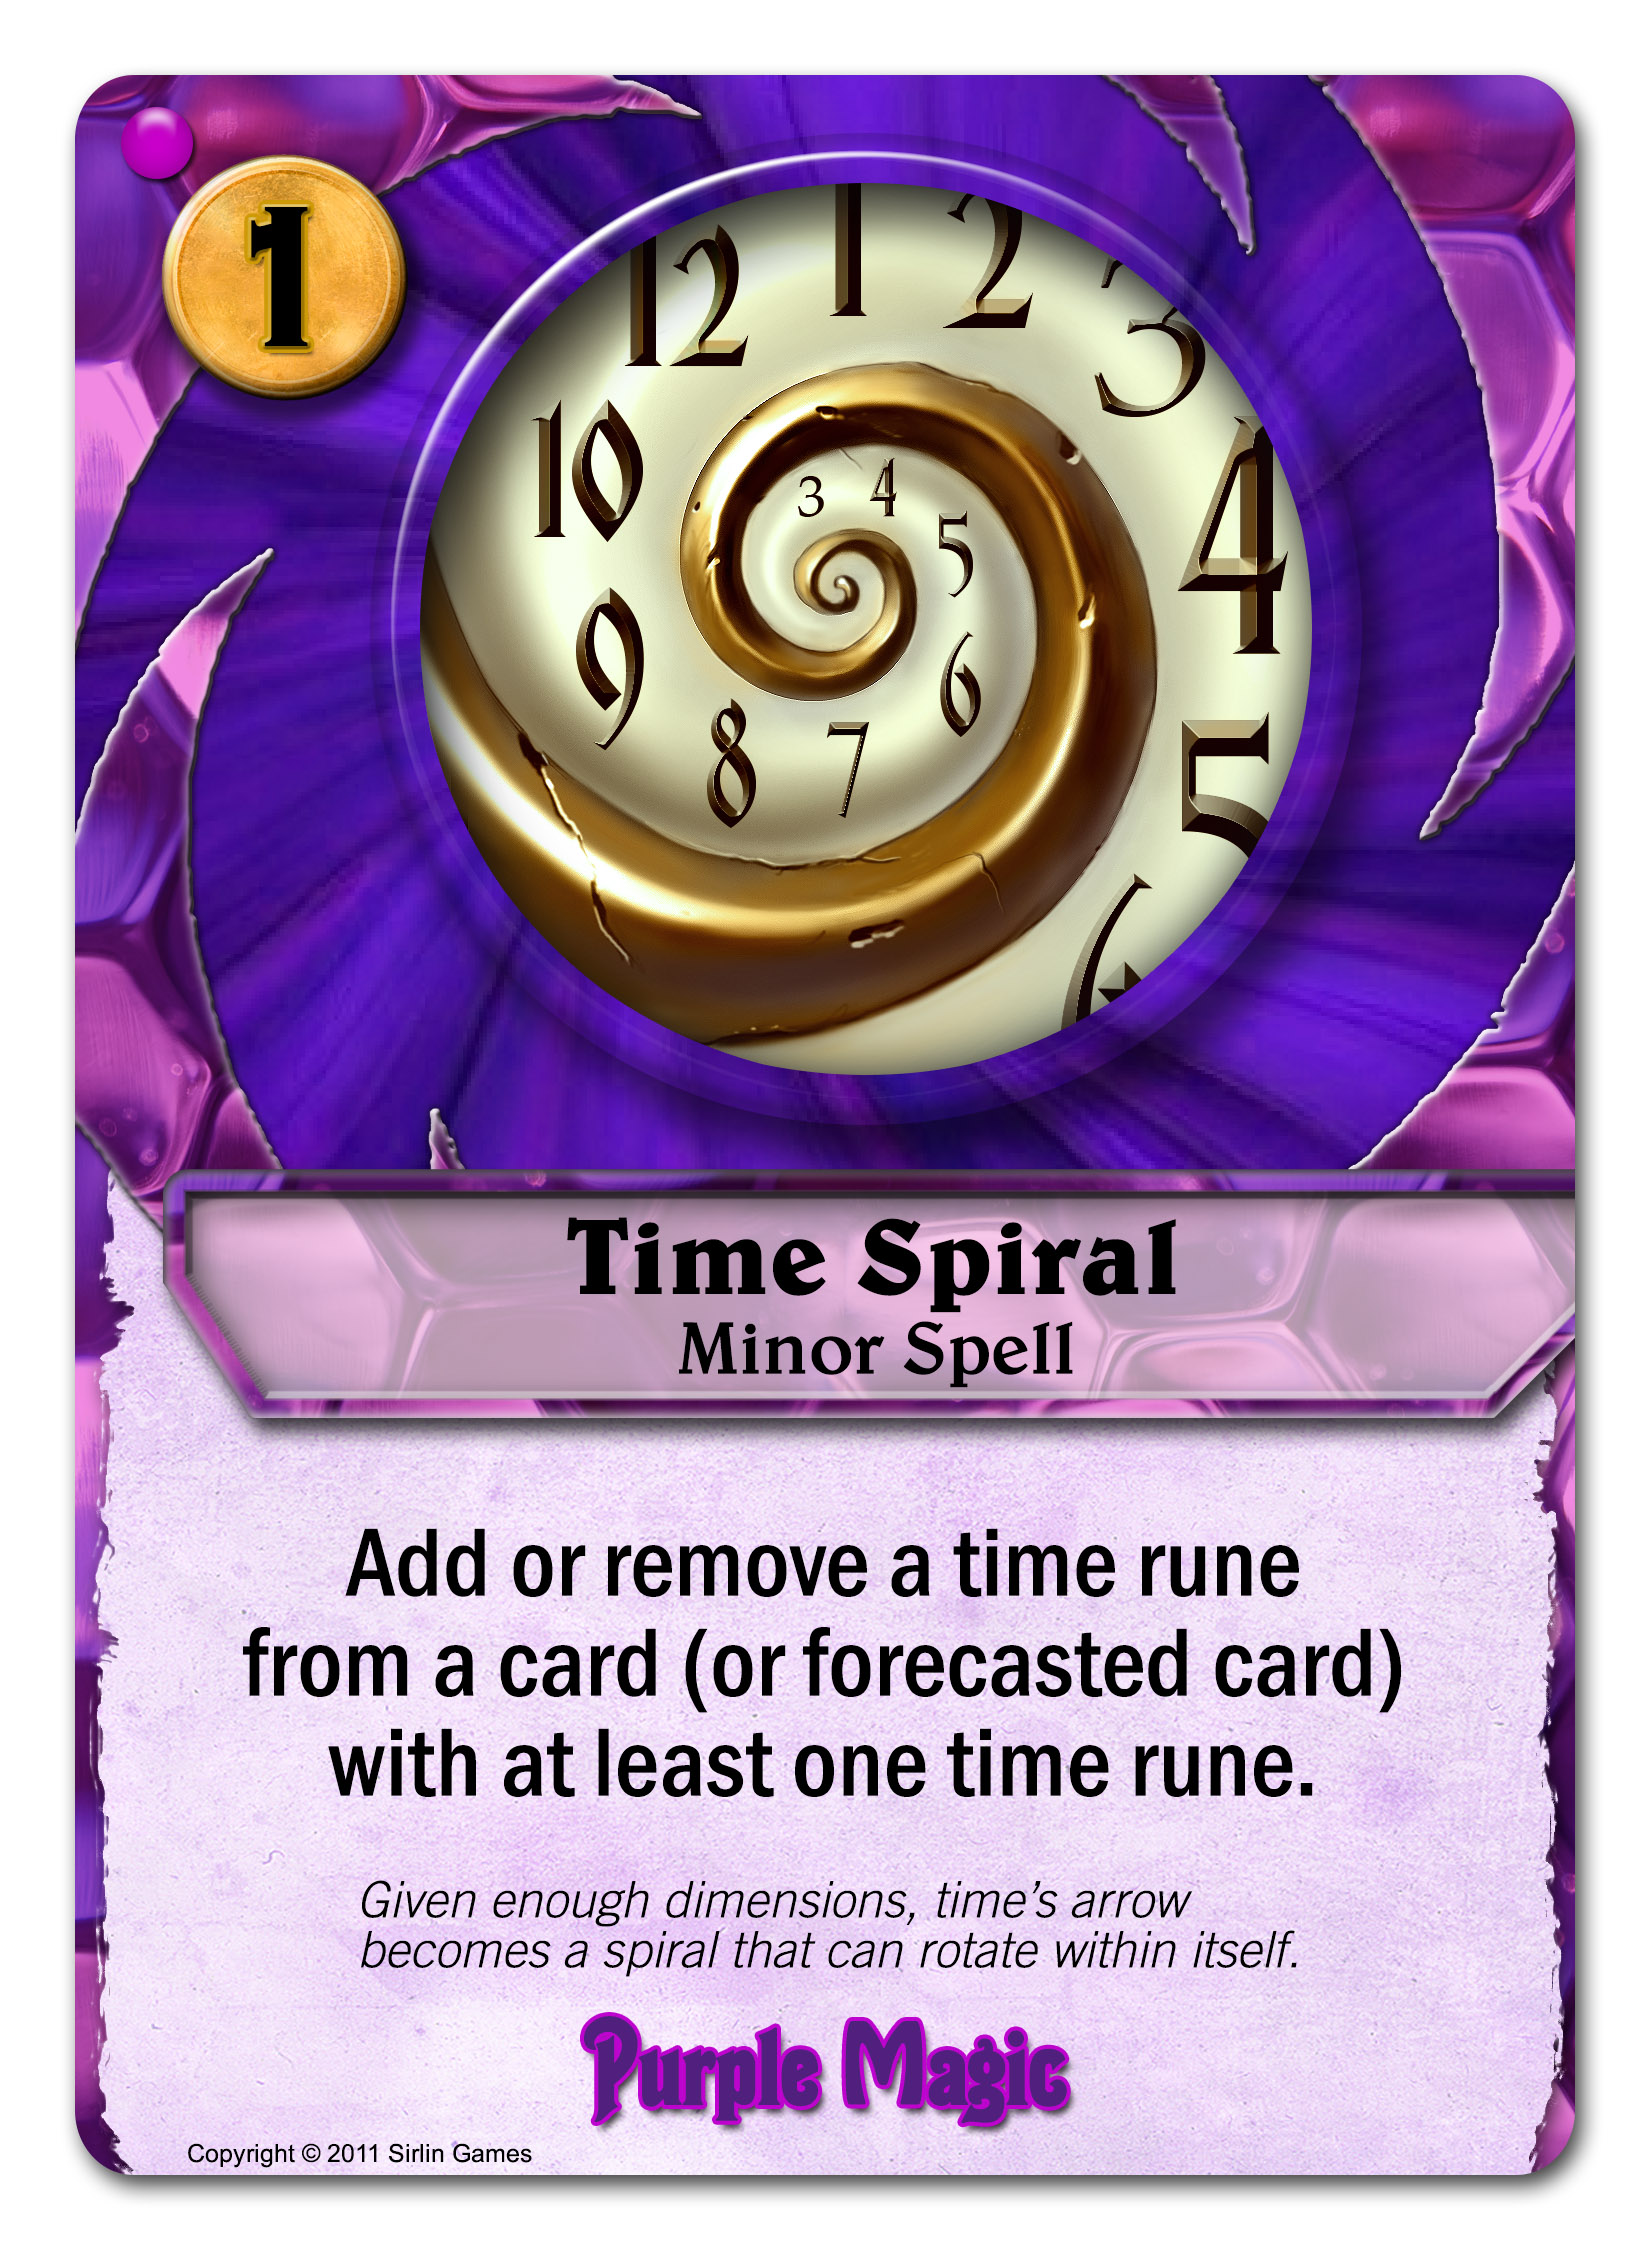
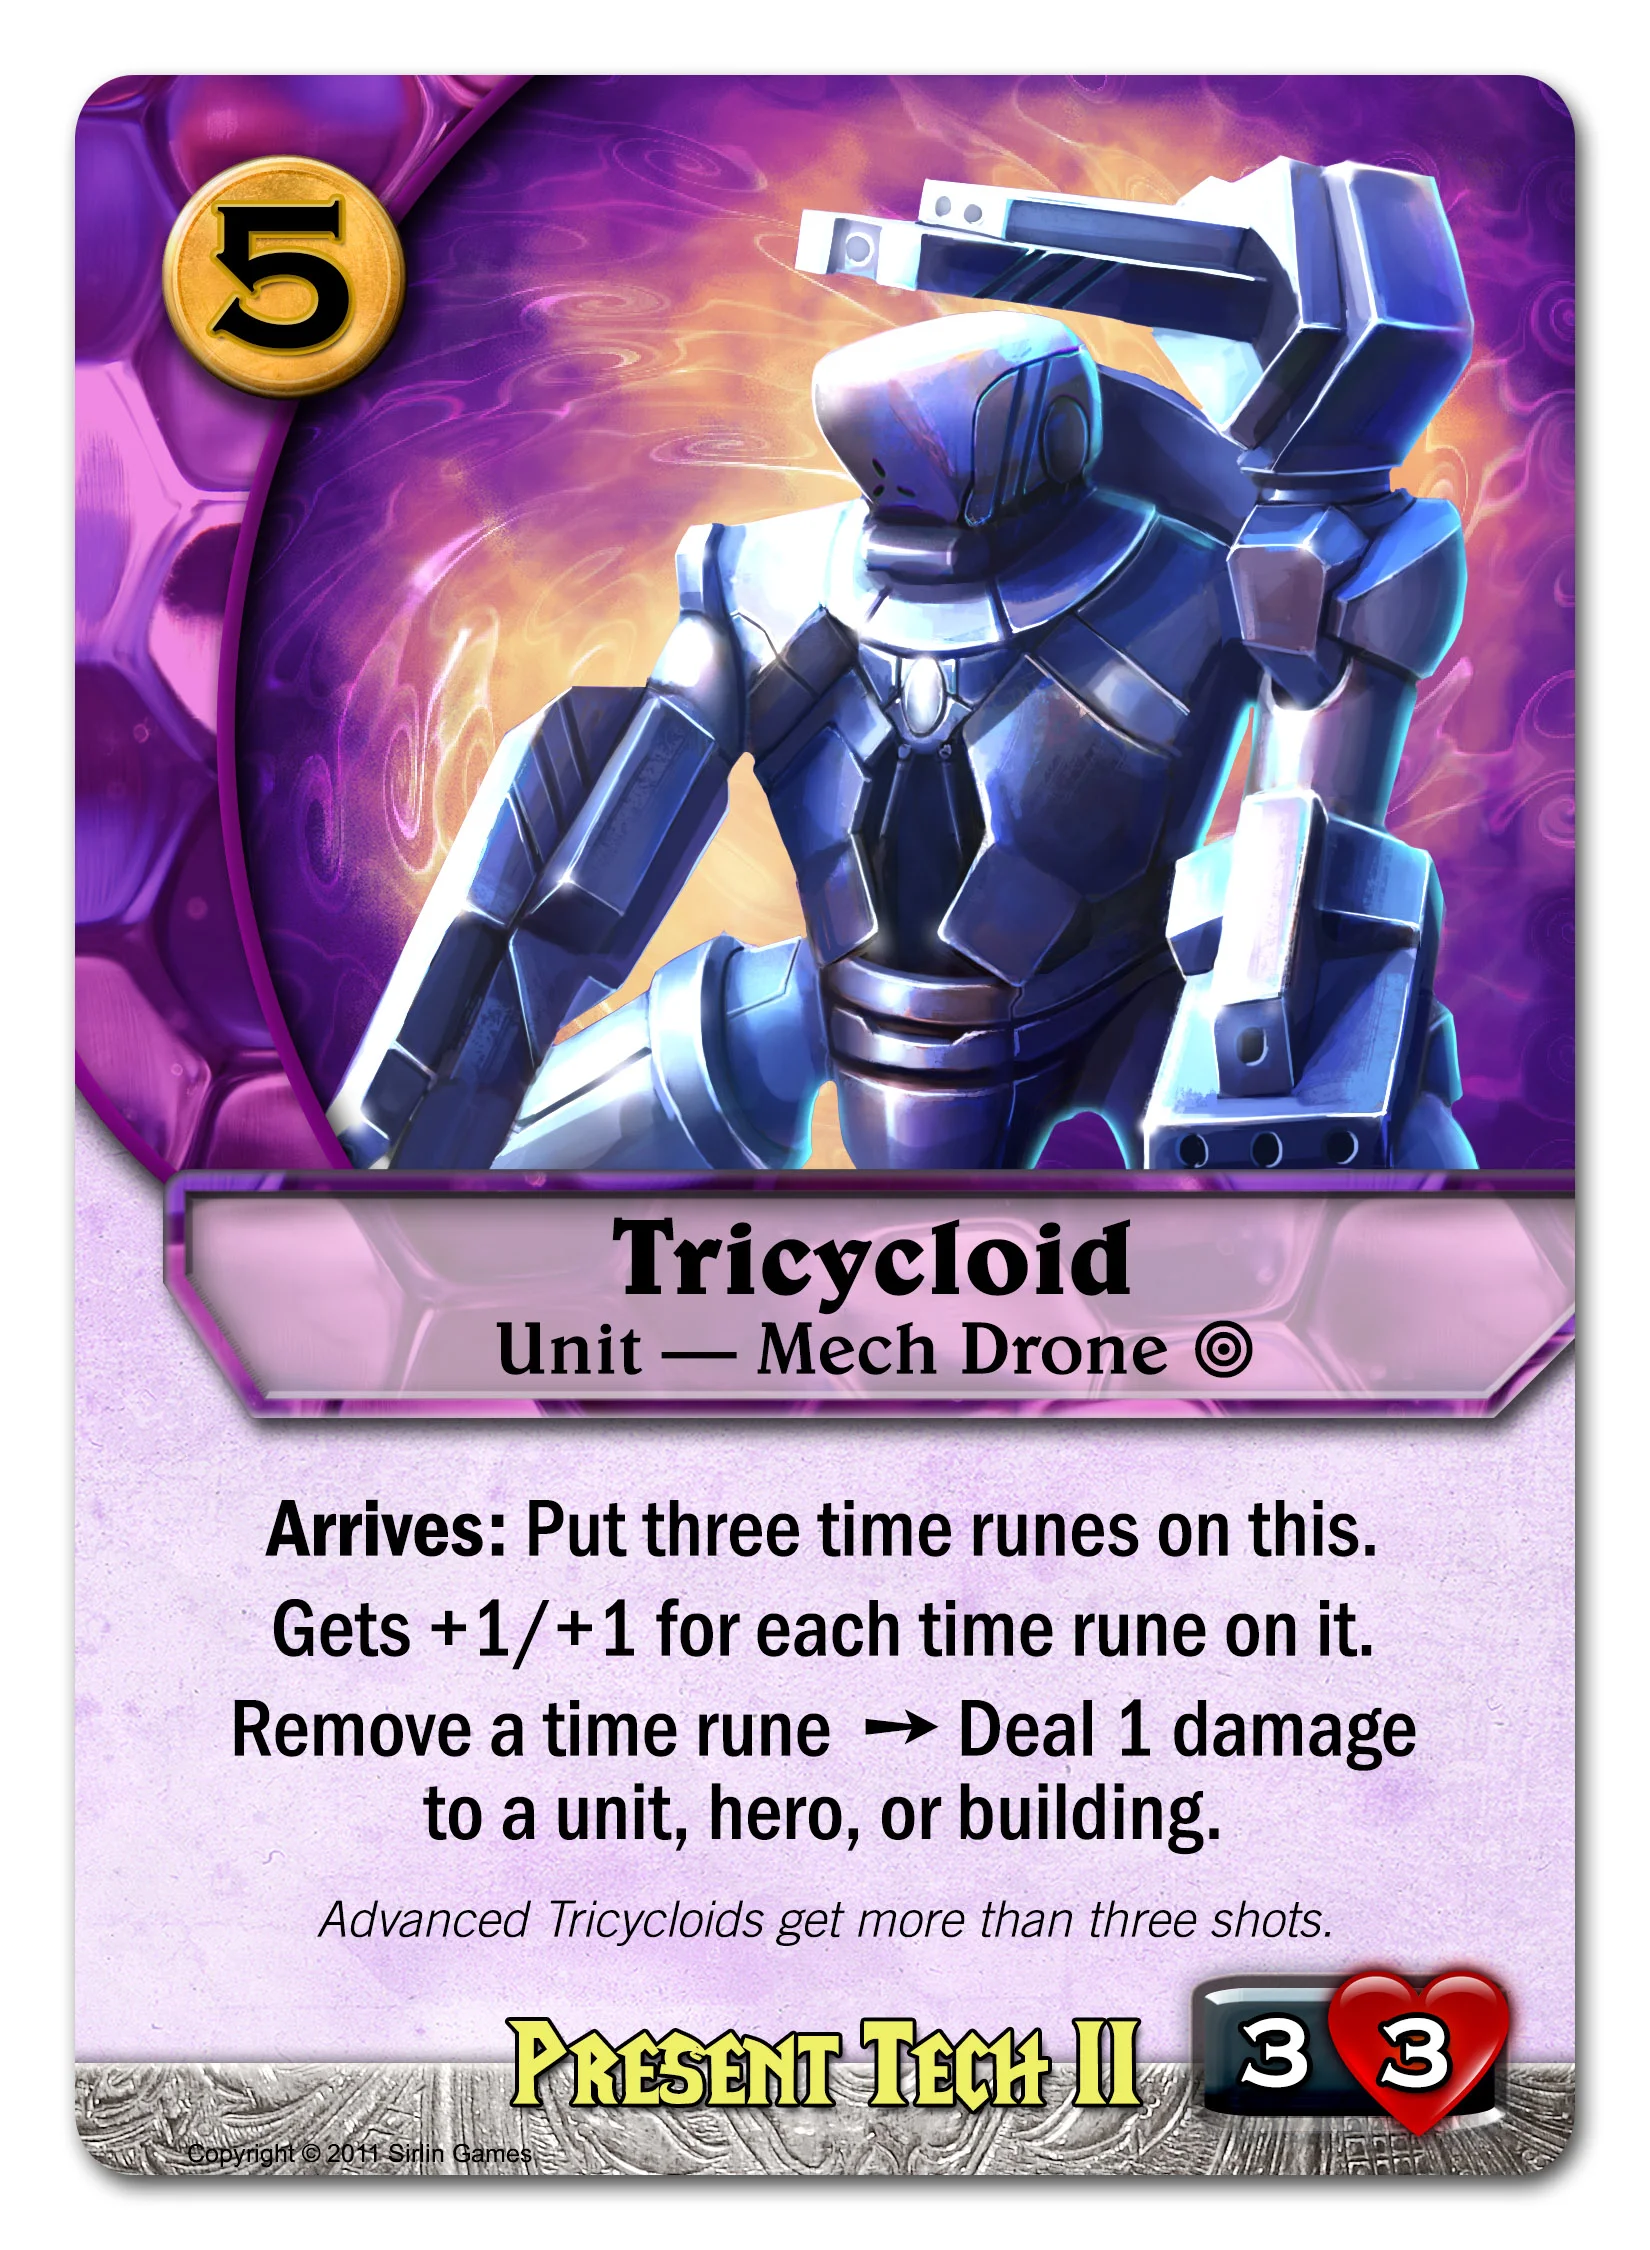
You can also use Time Spiral to add time runes to your fading units to keep them from fading away so fast, and you can even add them to Present tech II's Tricycloid so he can fire his time cannons more, but the most powerful use is probably in speeding up your forecasts. Here’s another way to do that:


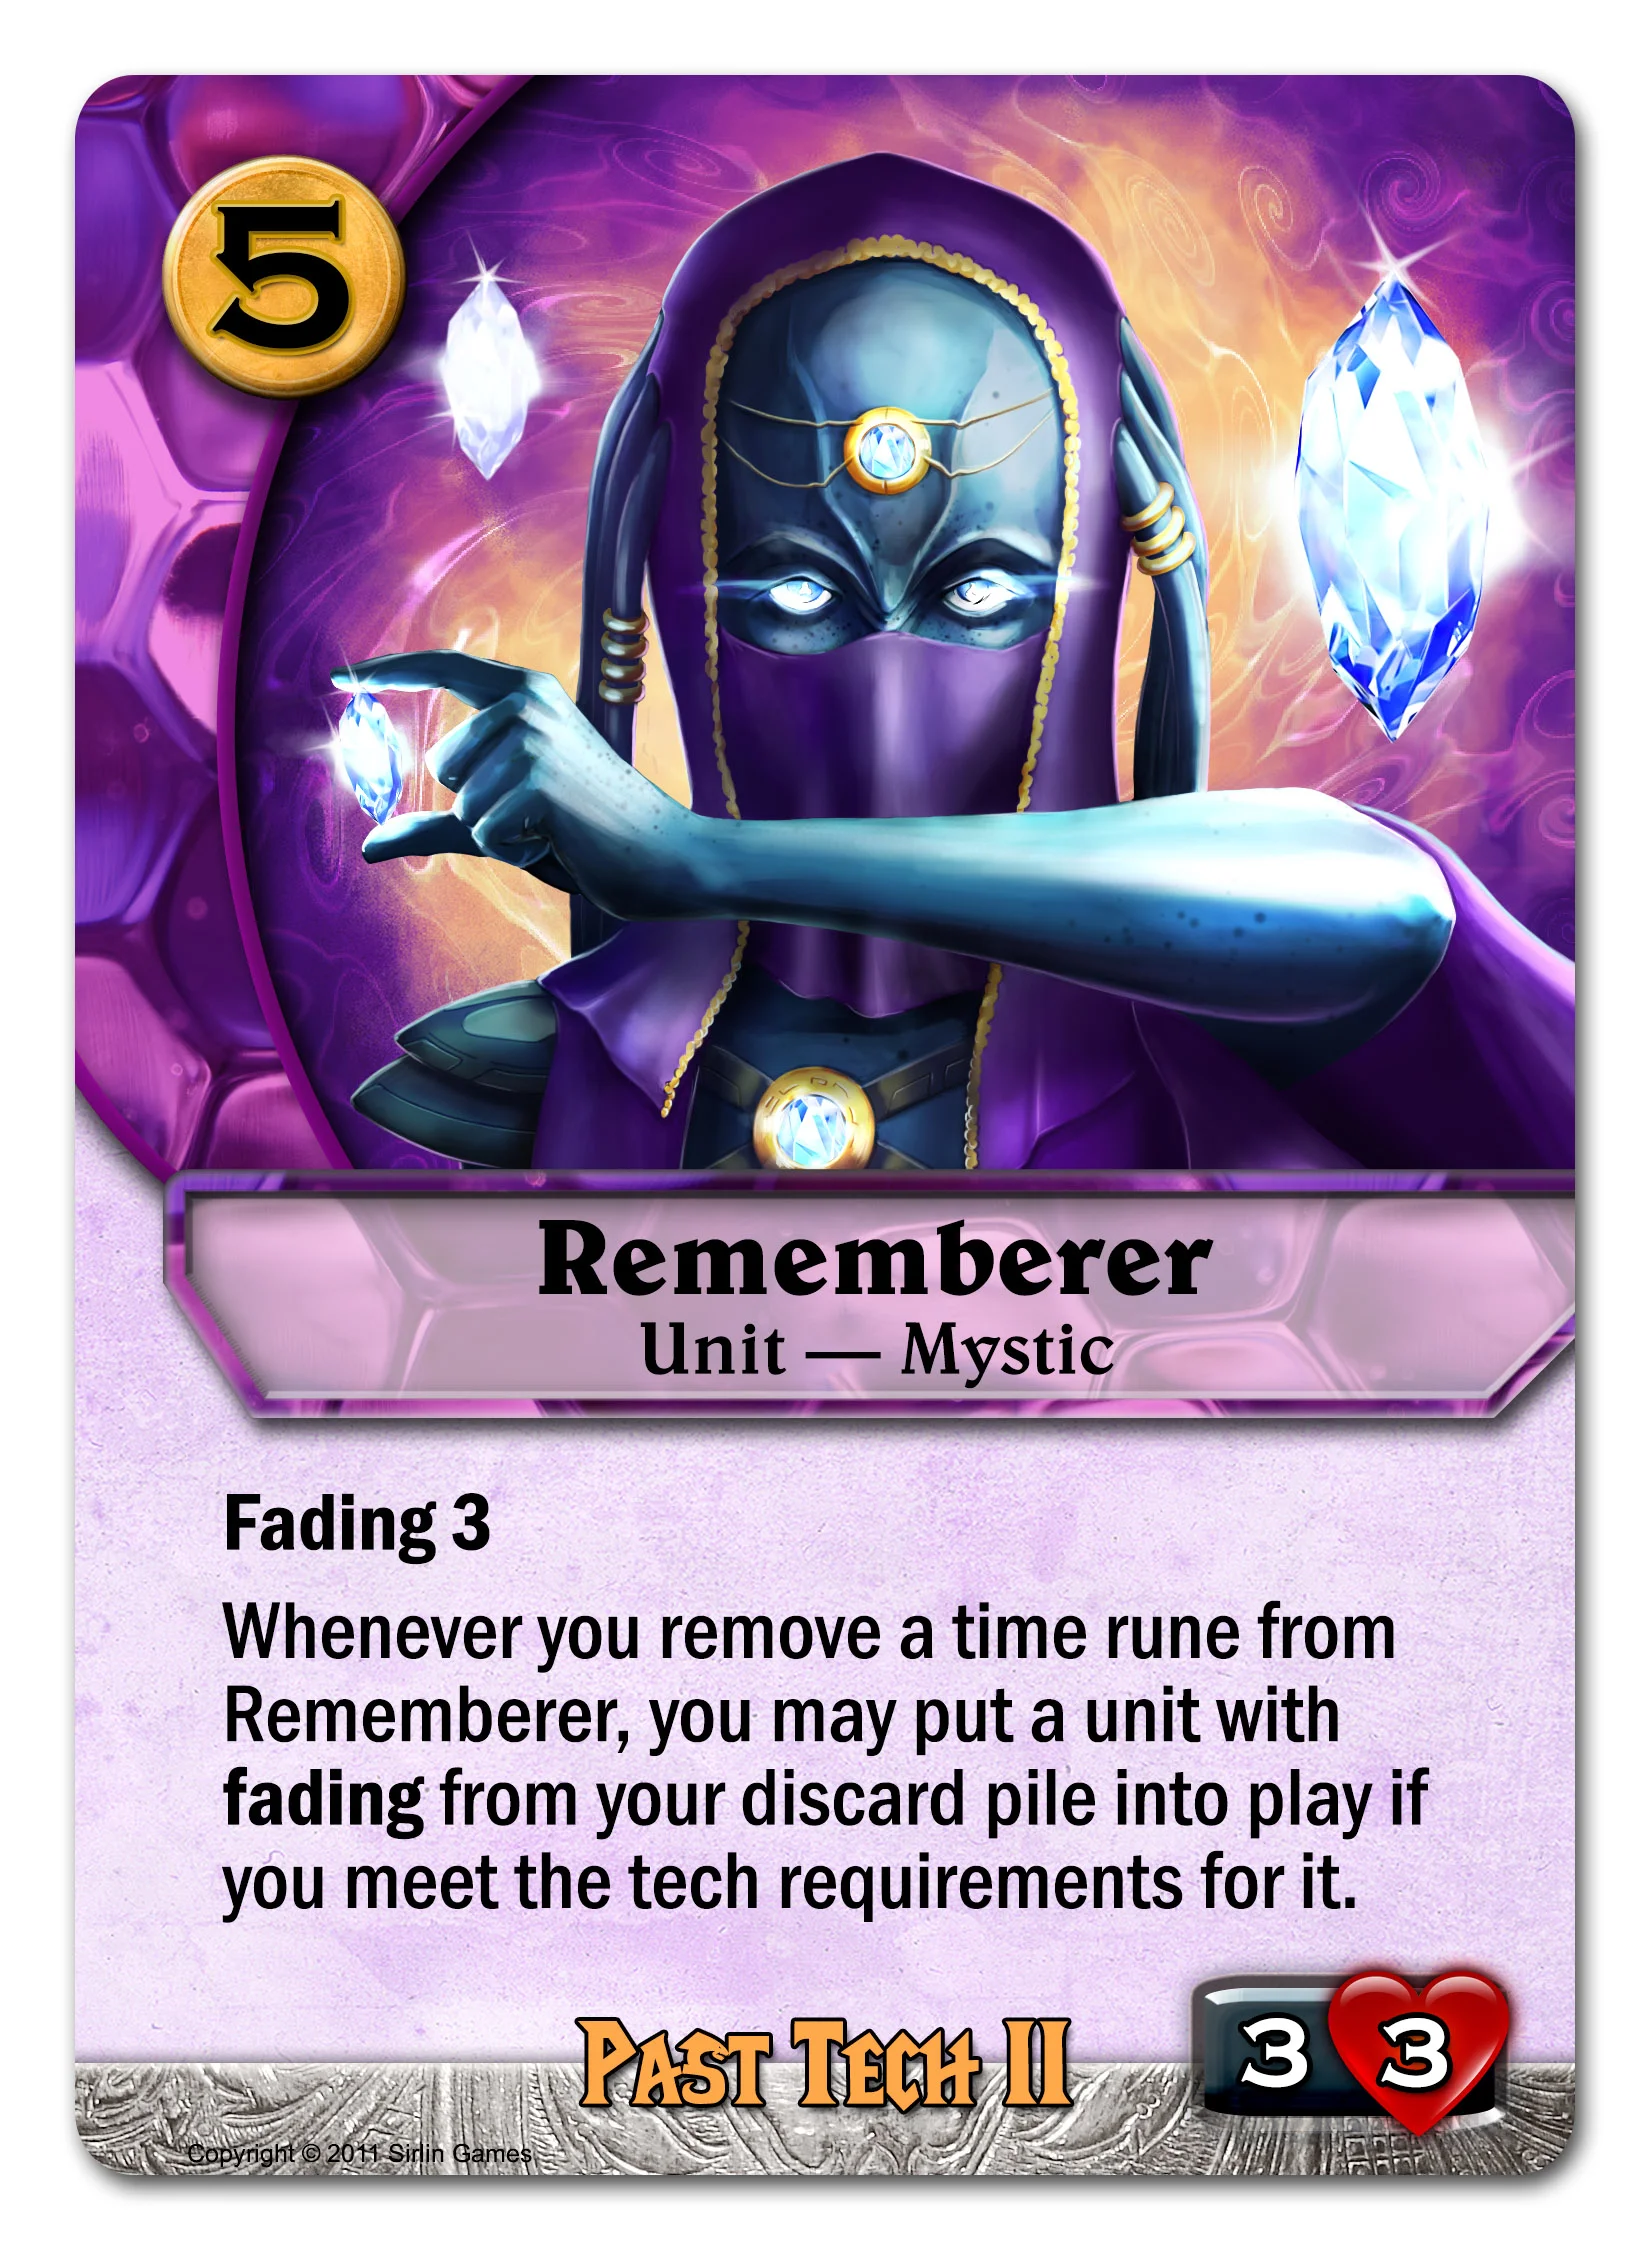
Tinkerer loves playing with new technology. His ability to add or a remove a time rune is so powerful, that he really is a must-kill unit. It might not look like much to spend 2 gold for a 1/2 at first, but your opponents can’t let you activate him turn after turn so playing him really forces them to respond.

Vir Garbarean’s spells show his mastery of technology. He can use this advanced cloaking field:


This powerful spell lets any unit or hero (it works on heroes!) slip past patrollers. The invisibility effect even lasts until your next turn, so you can use it to make something untargetable and unattackable by your opponents for a turn, too.


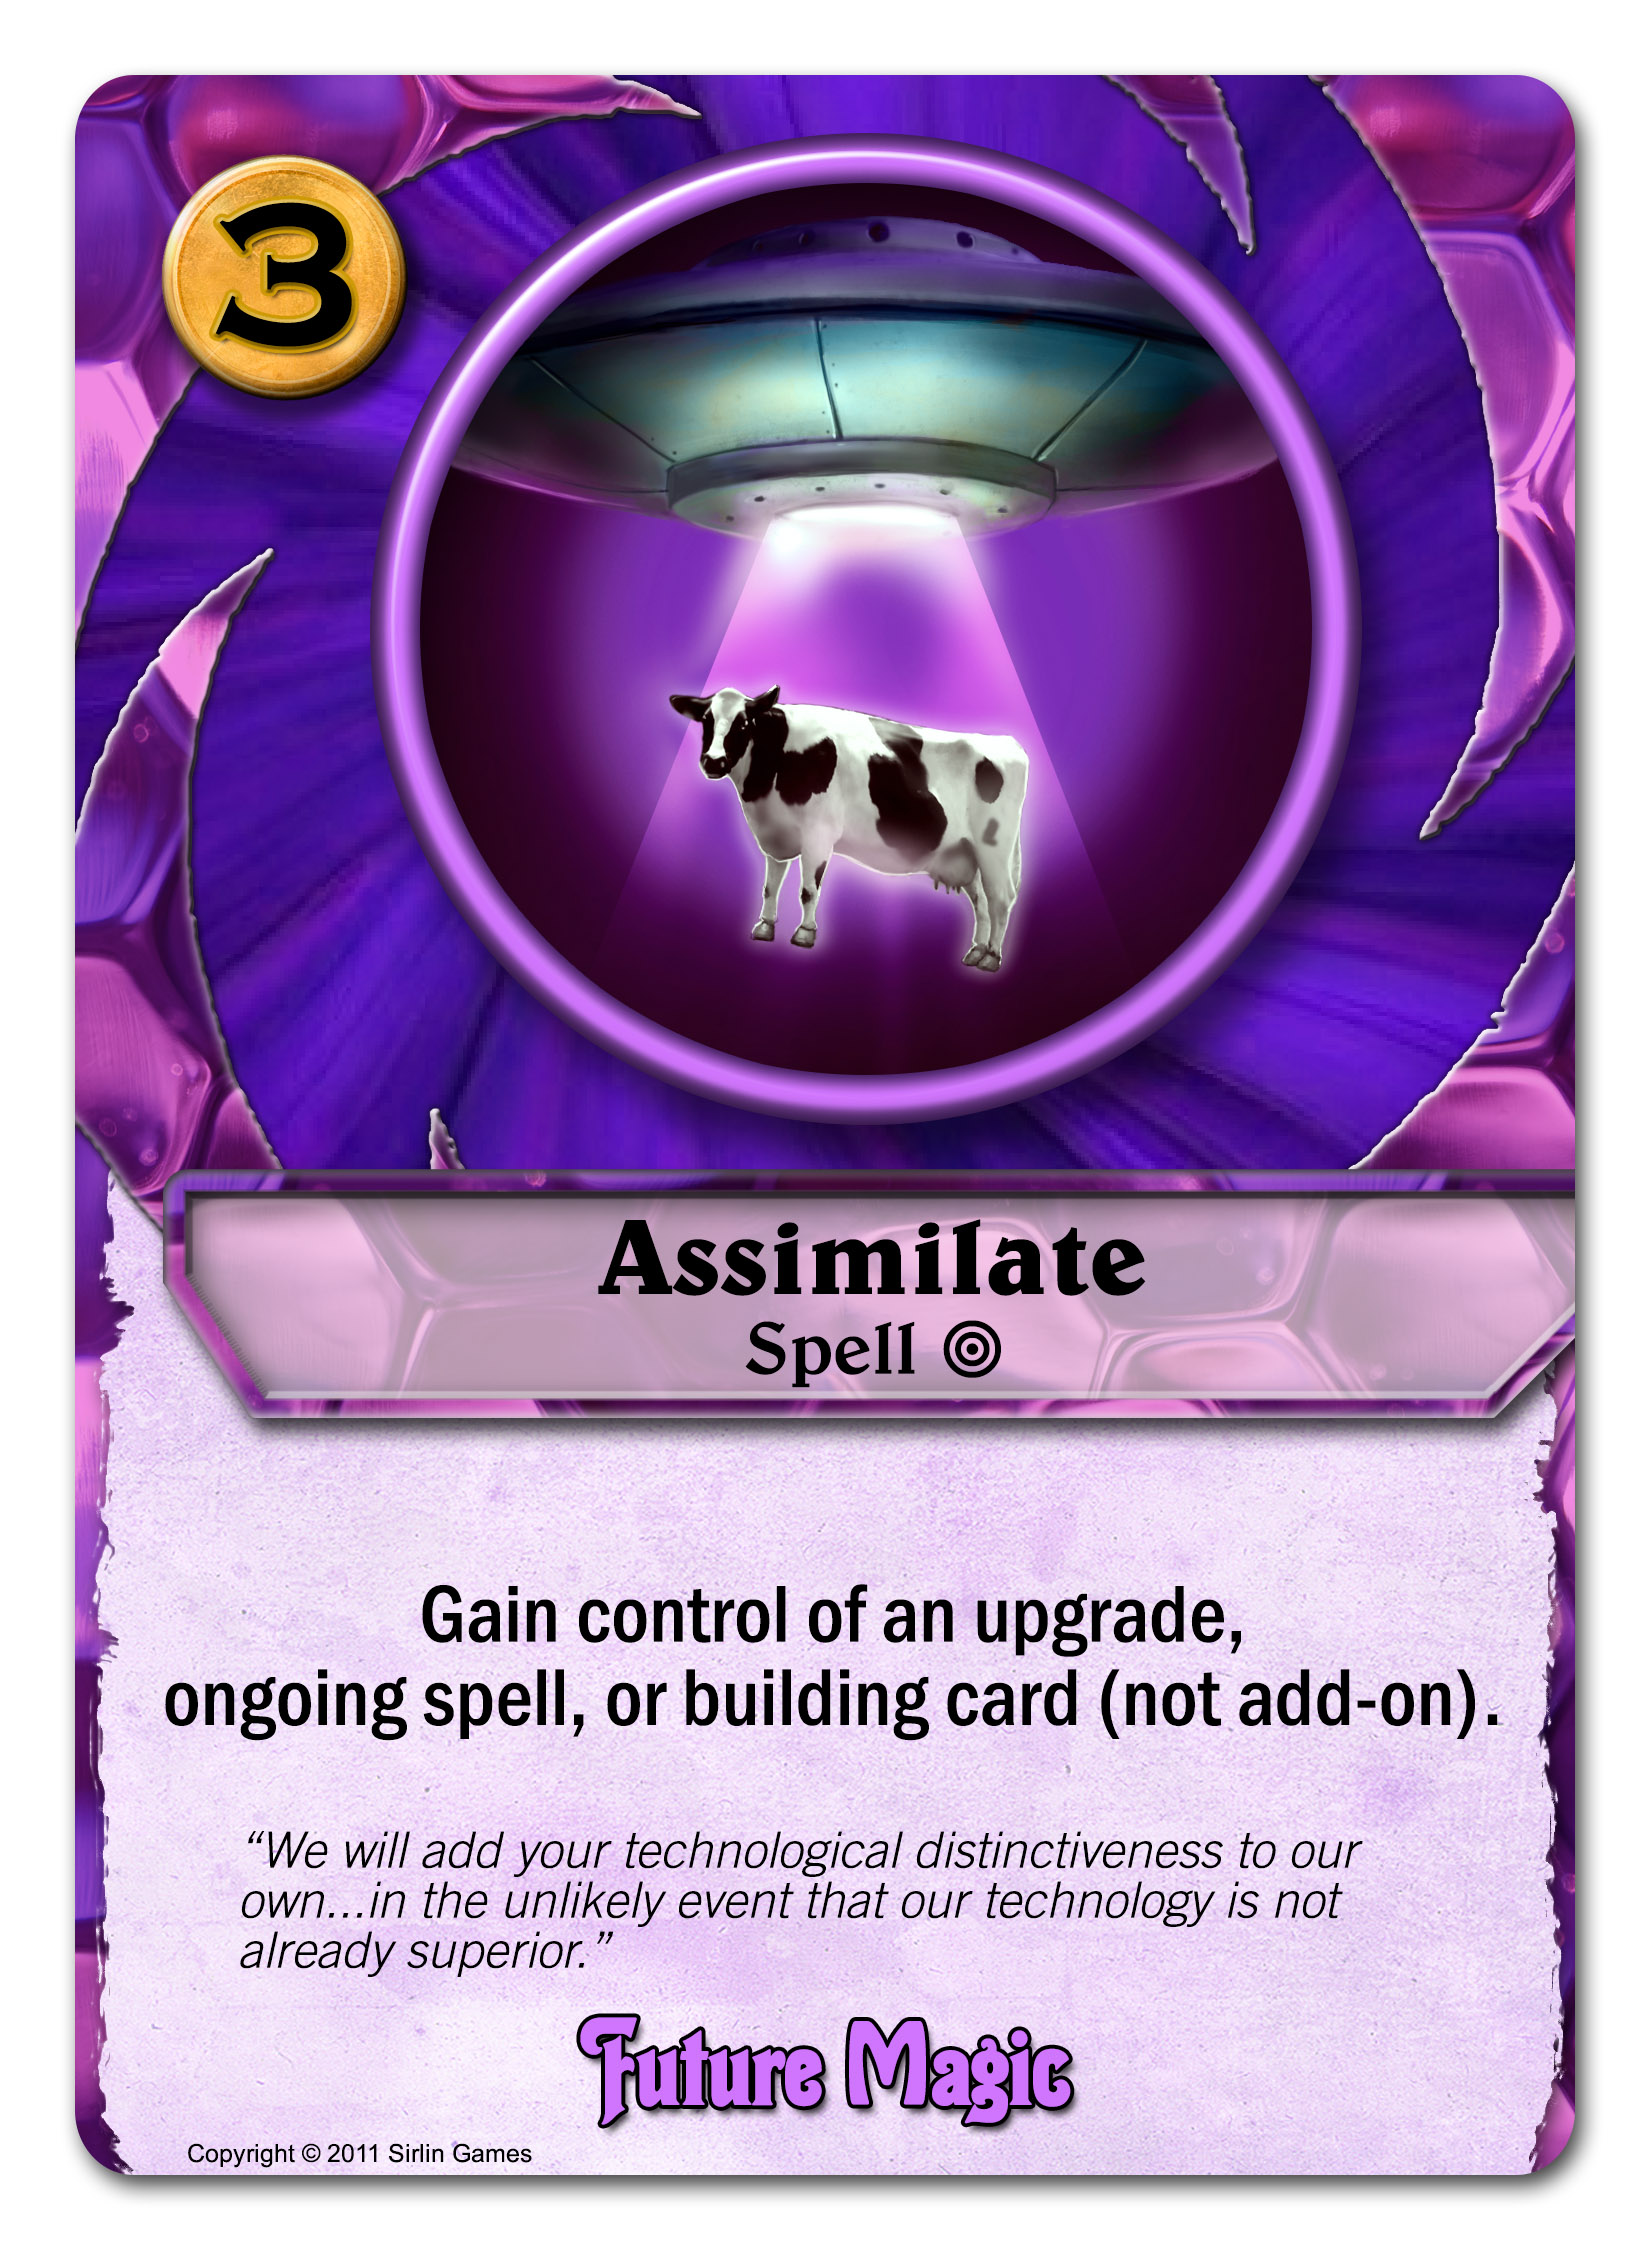
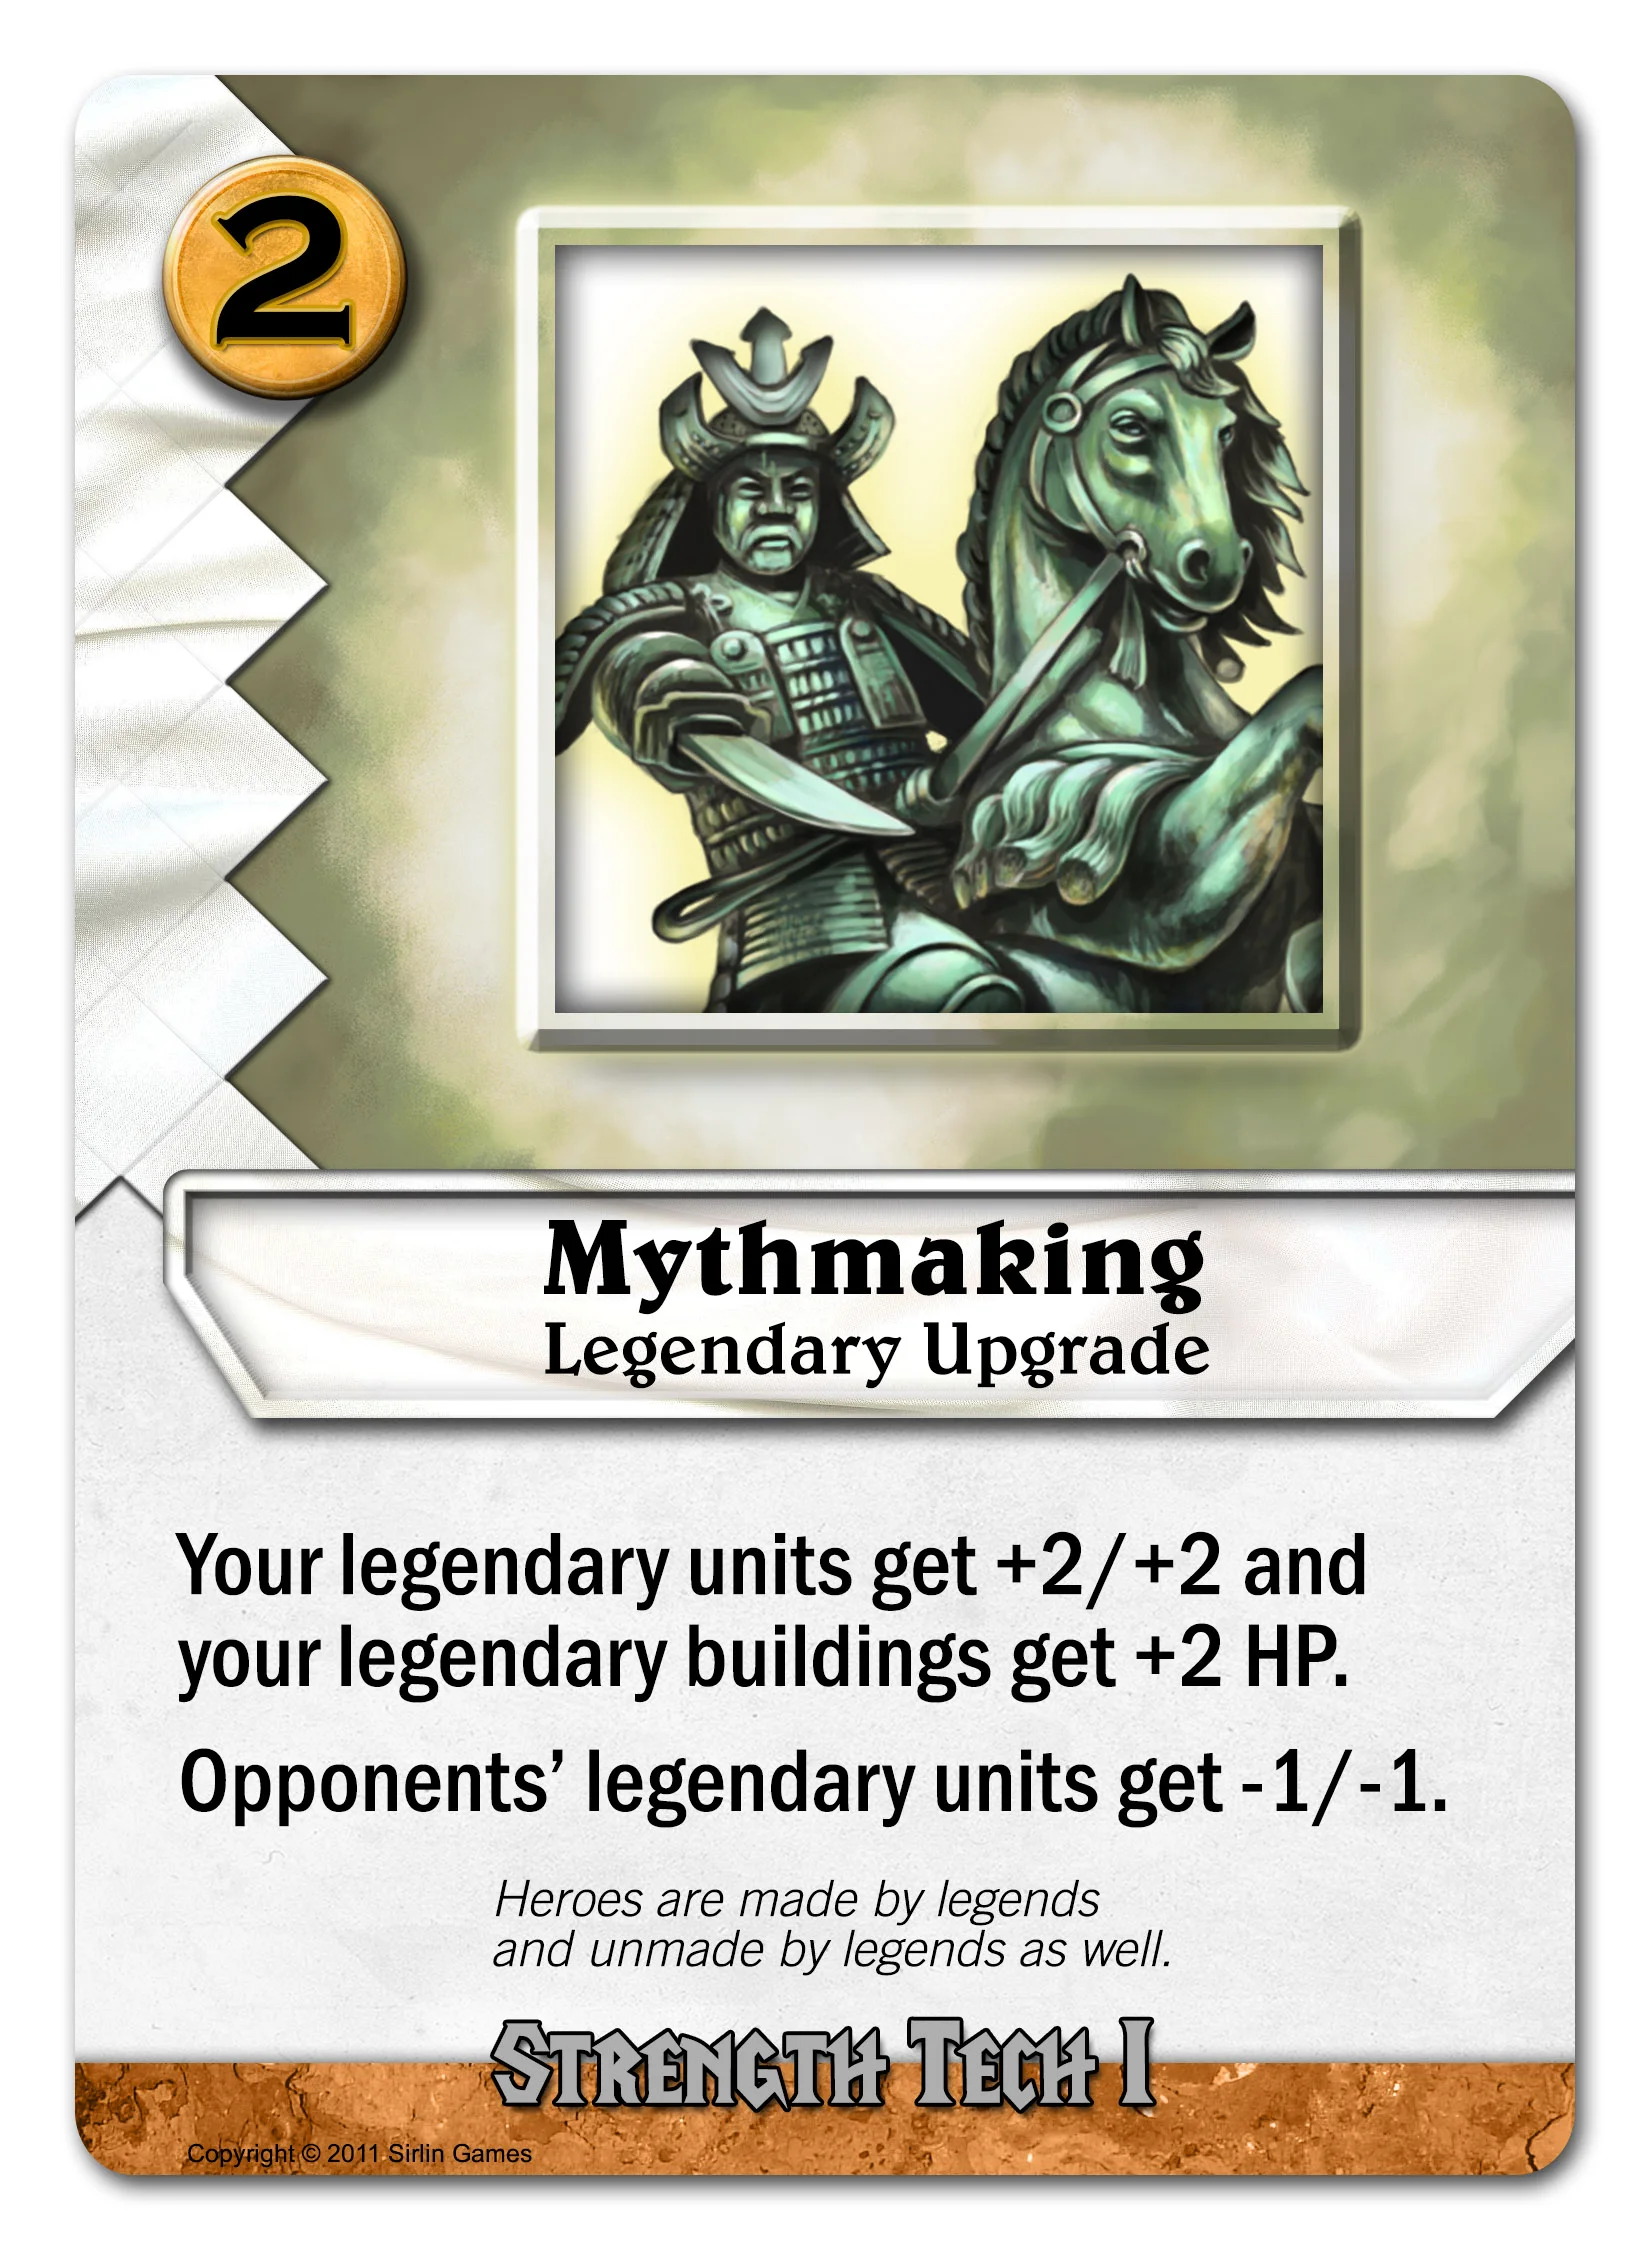
There aren’t many ways to destroy an upgrade in Codex. Dealing with ongoing spells and building cards can be tough too. Midori can trash unnatural things with Nature Reclaims, but Vir Garbarean can do even better: he incorporates the opponent’s technology into his own. Remember red’s Firehouse building and Bloodburn upgrade? Blue’s Censorship Council building or white’s Mythmaking upgrade? You can Assimilate all of that and more.

Vir also shows his mastery of the Future with:


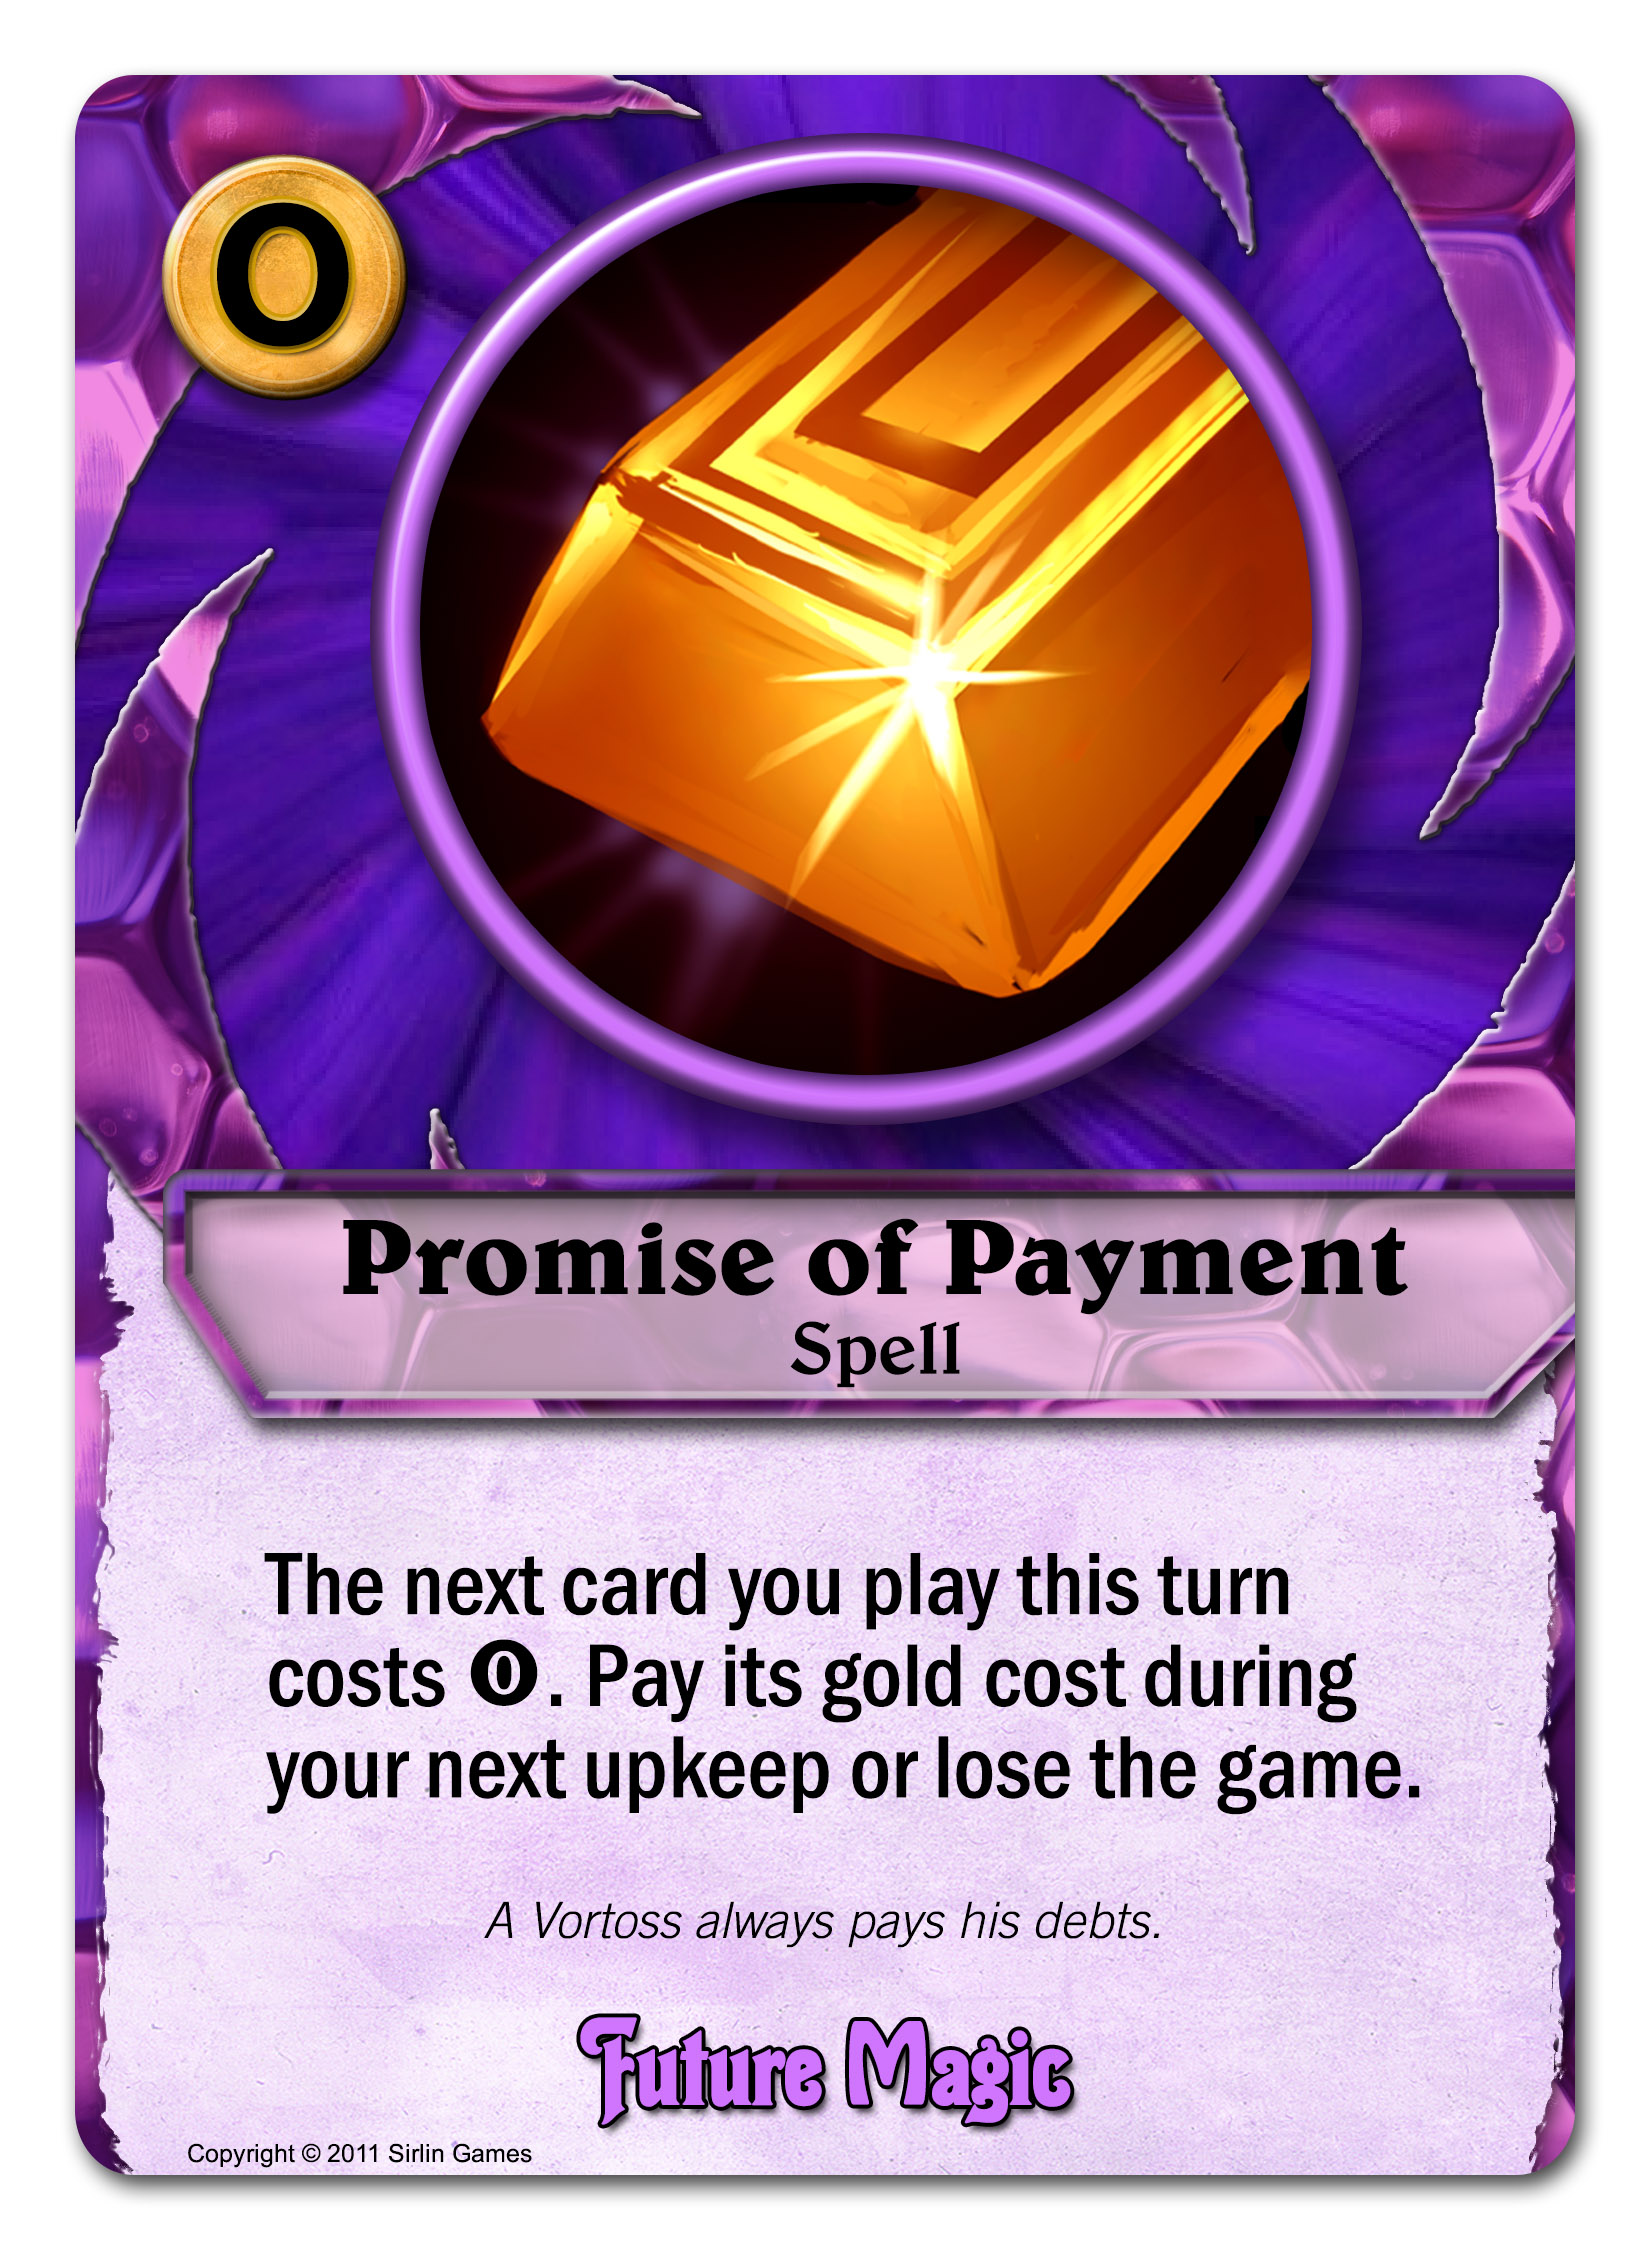
He can pay for the here and now with gold from the future, but you can’t violate the inegrity of the timeline or you lose the game (and also destroy the universe). Promise of Payment is best used with something really expensive. That way, you’re getting a big threat one turn before you’d normally be able to. That’s what the Future spec is all about, allowing you control over the timing of your offense and defense.


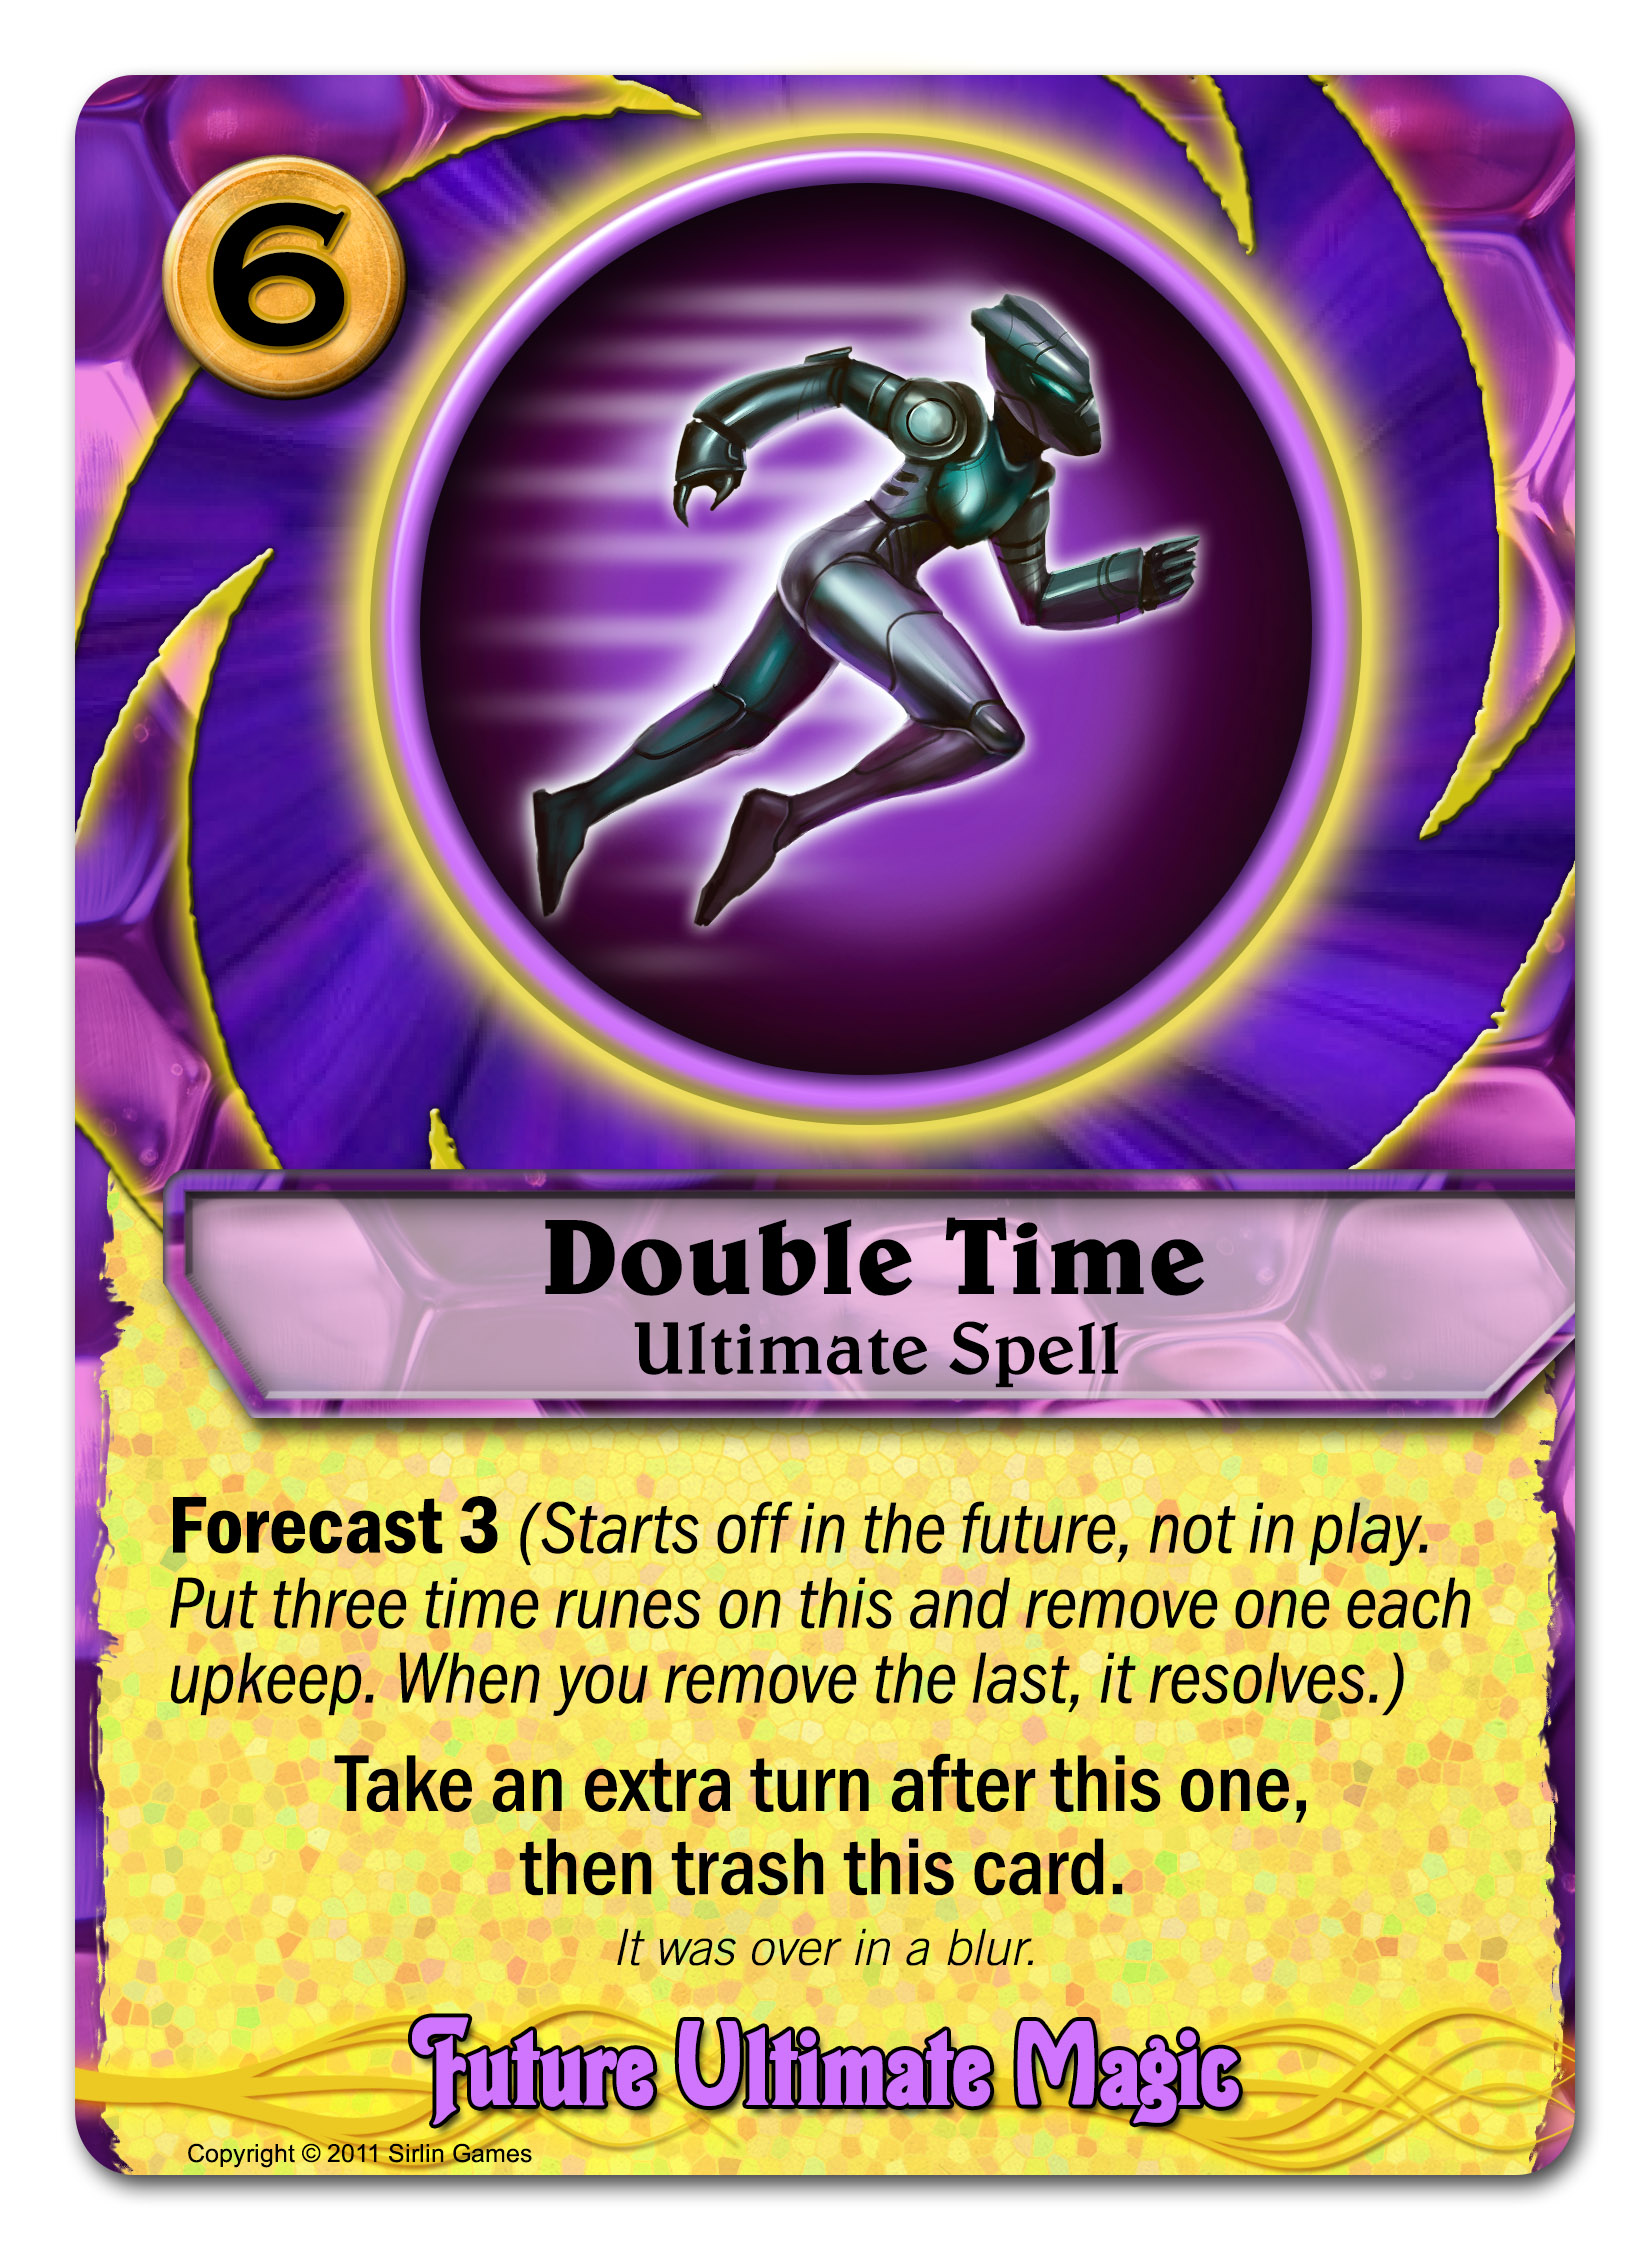
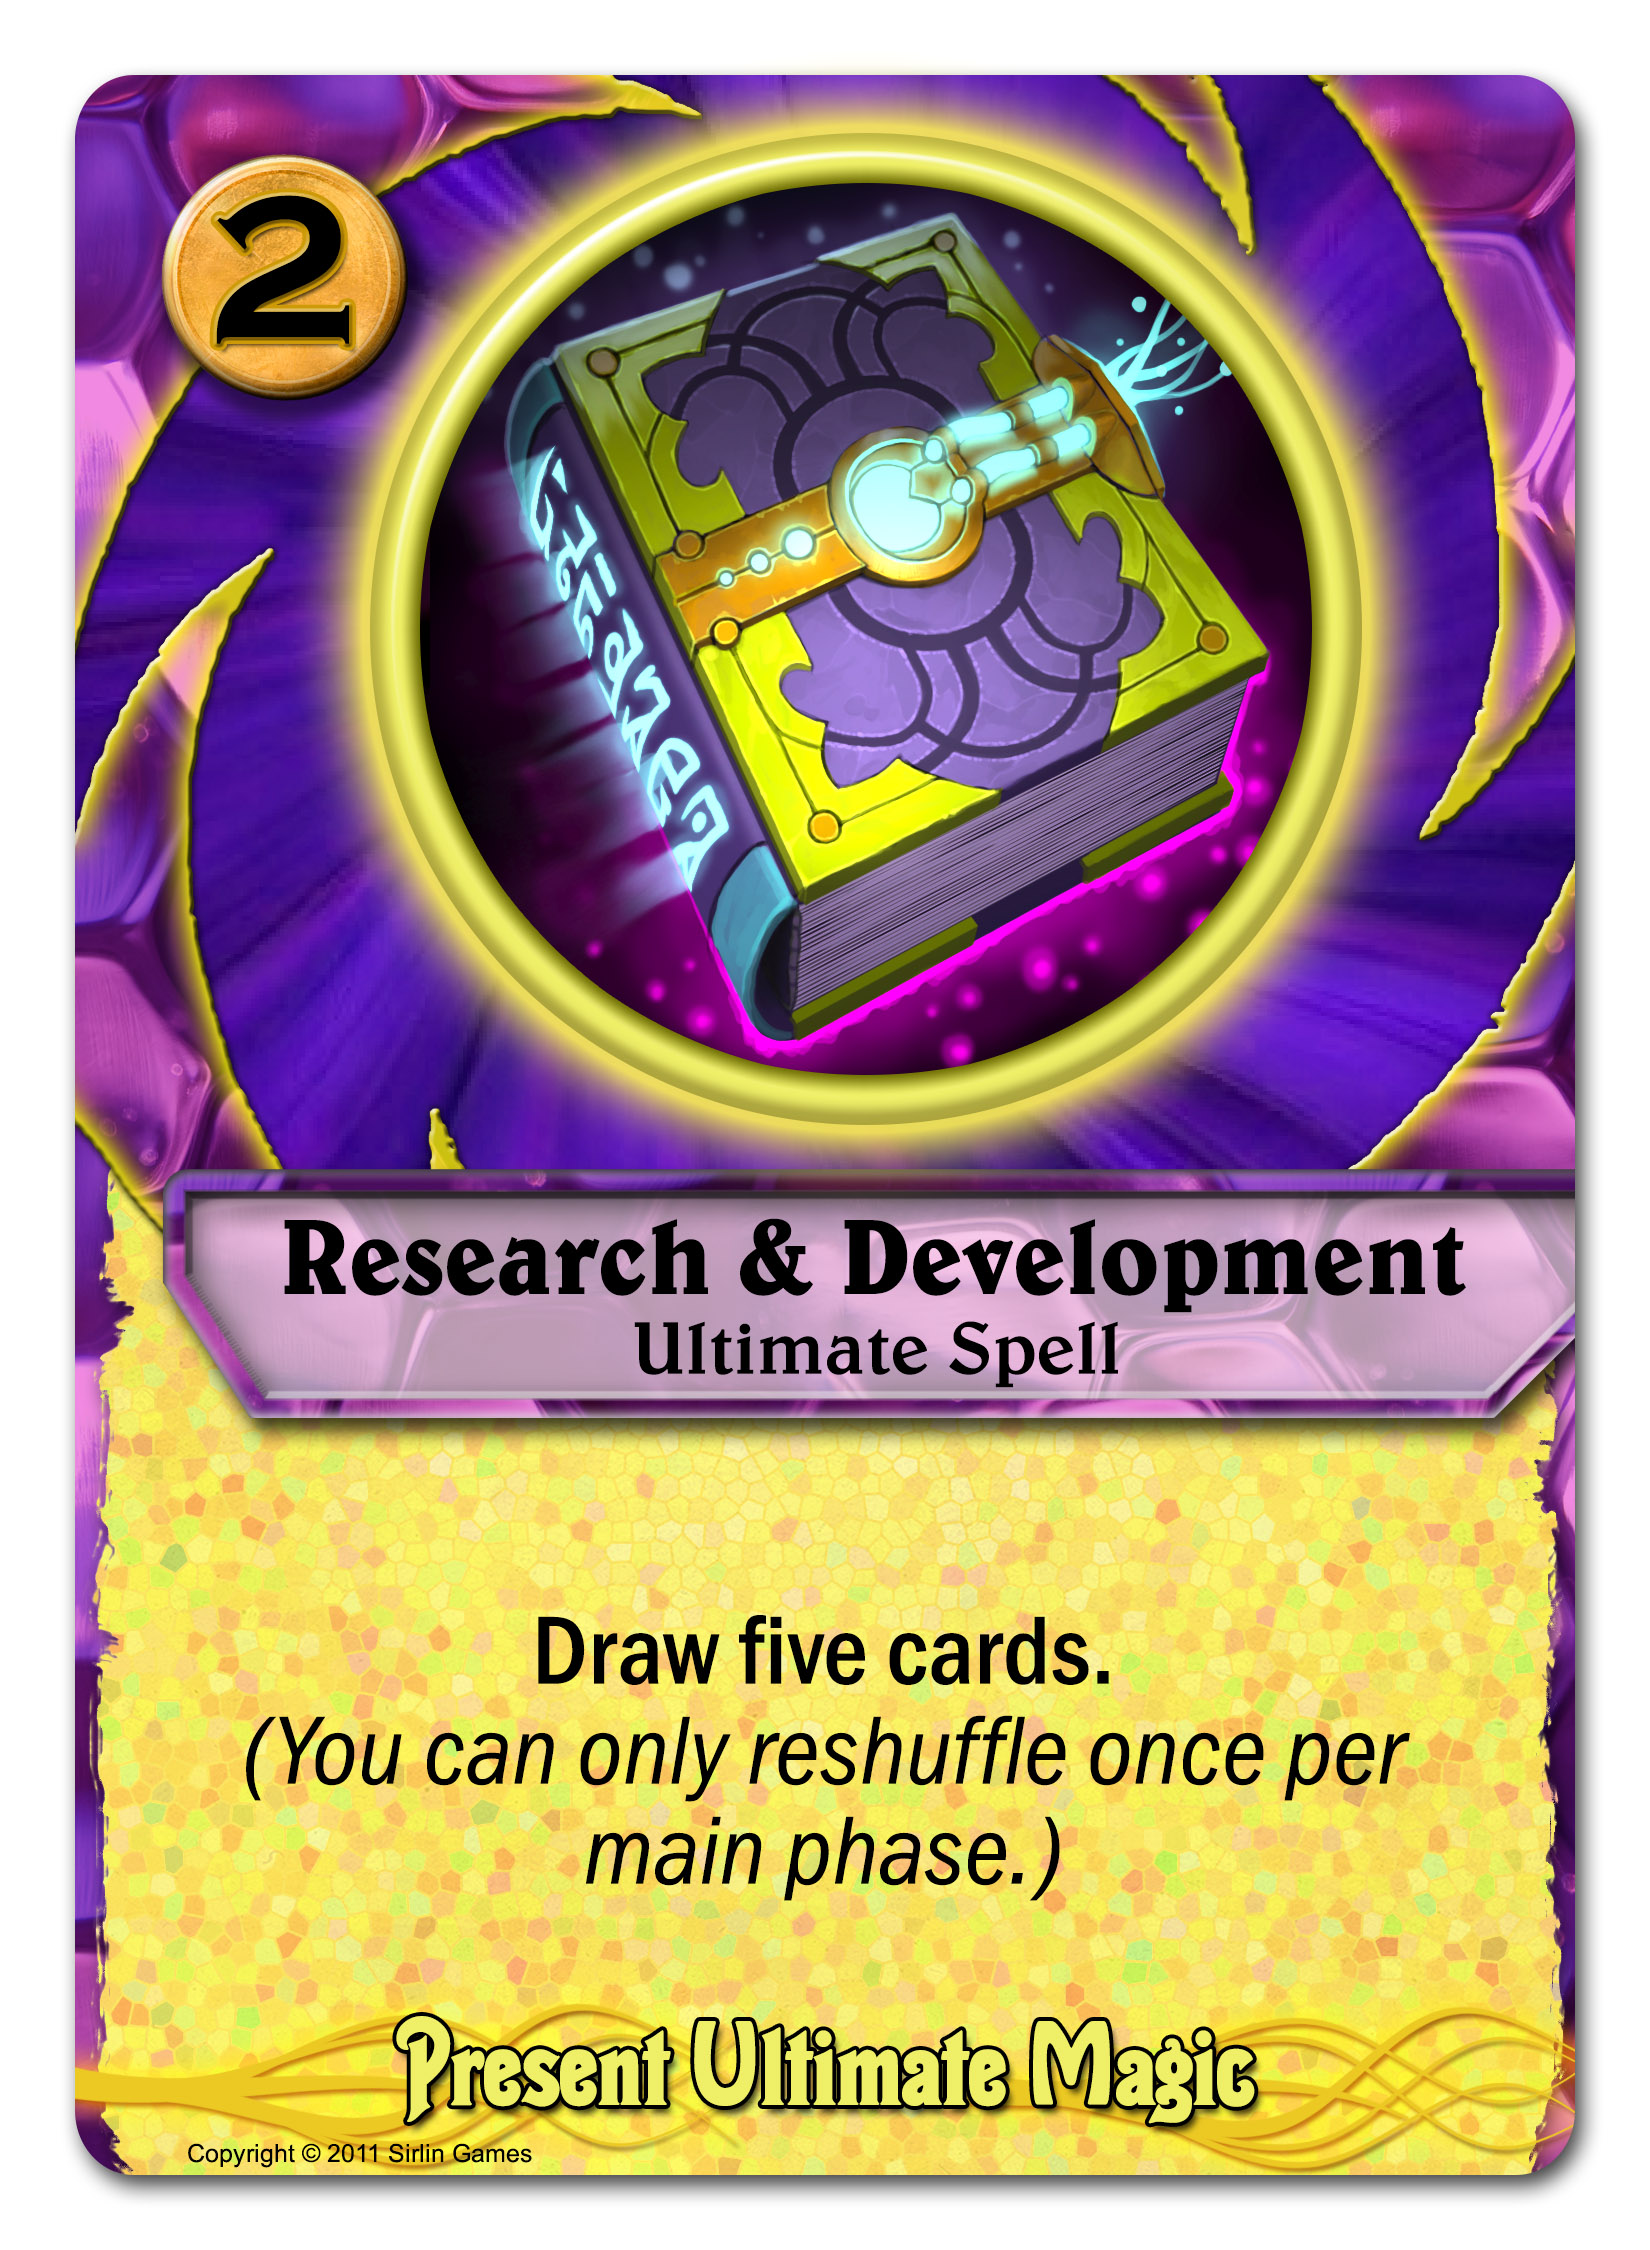
This ultimate spell lets you take an extra turn, which if you’ve ever played a card game before, you know is totally crazy. You probably don’t need me to list the ways you can use an extra turn to do ridiculous things, so I’ll leave that to your imagination. Just keep in mind that it’s a very expensive spell. You’ll need your hero to be max level, which is already a total of 8 gold for Vir (2 to summon, 6 more gold to level to max) and then Double Time costs 6, so that’s 14 gold total and then you still have to wait for the spell to resolve. But when it does, oh my, that will be your sweet day.

As a general rule for ultimate spells, you need to have your Future hero in play at the start of your turn and already max level in order to cast this. Then it’s forecasted and you’ll have to wait a few turns to get it (though probably you’ll cheat it in pretty fast with some sort of time rune nonsense). Your Future hero does NOT need to still be in play when this spell finally resolves, only when you initially play it to the future.

Now let’s look at some Future tech I units.


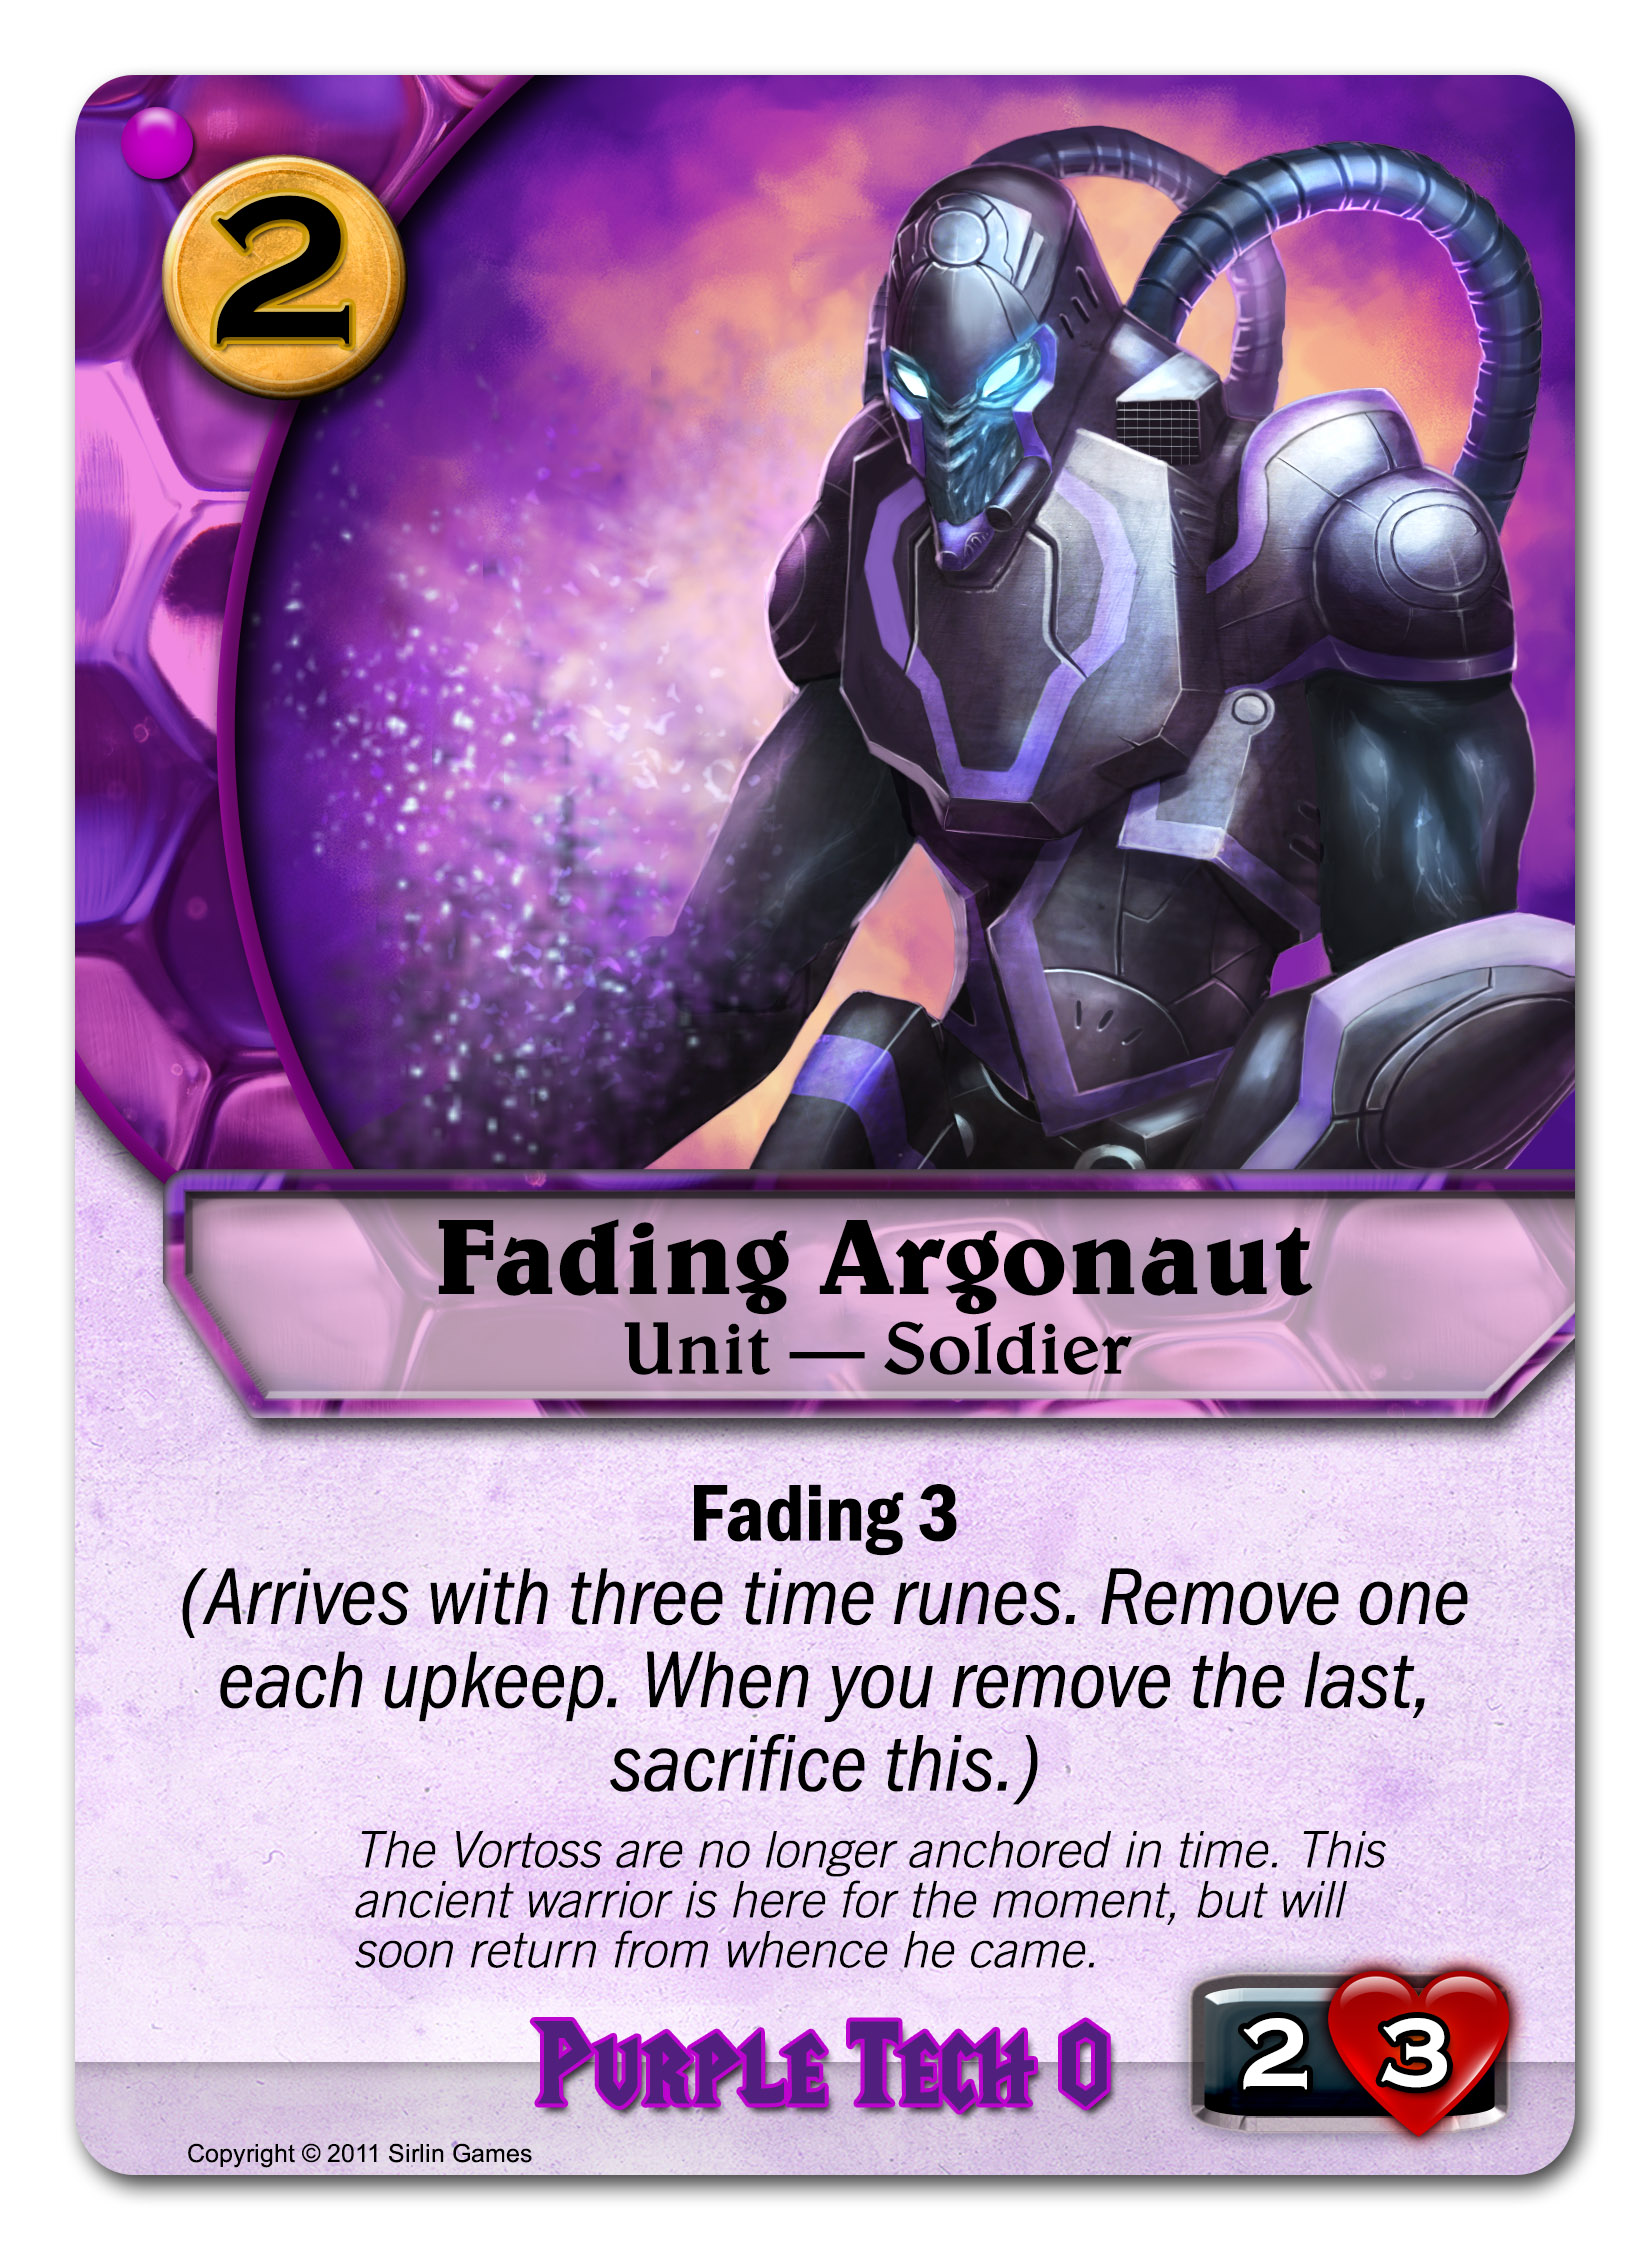
This is a tricky card to play. Forecast generally lets you trade tempo at one point in time for another. Here, you’re spending a card and getting no additional patrollers in the early game. That’s a big drawback and you’ll need some other form of defense (which luckily the purple starting deck is pretty good at providing). If you can suffer through a bit of tempo disadvantage, you get a huge boost later with a 4/4 for 0 gold. 0 gold is really amazing here and that he has resist 1 is even better because he can end up making your opponent spend even more gold to get rid of the thing you paid 0 gold to produce.


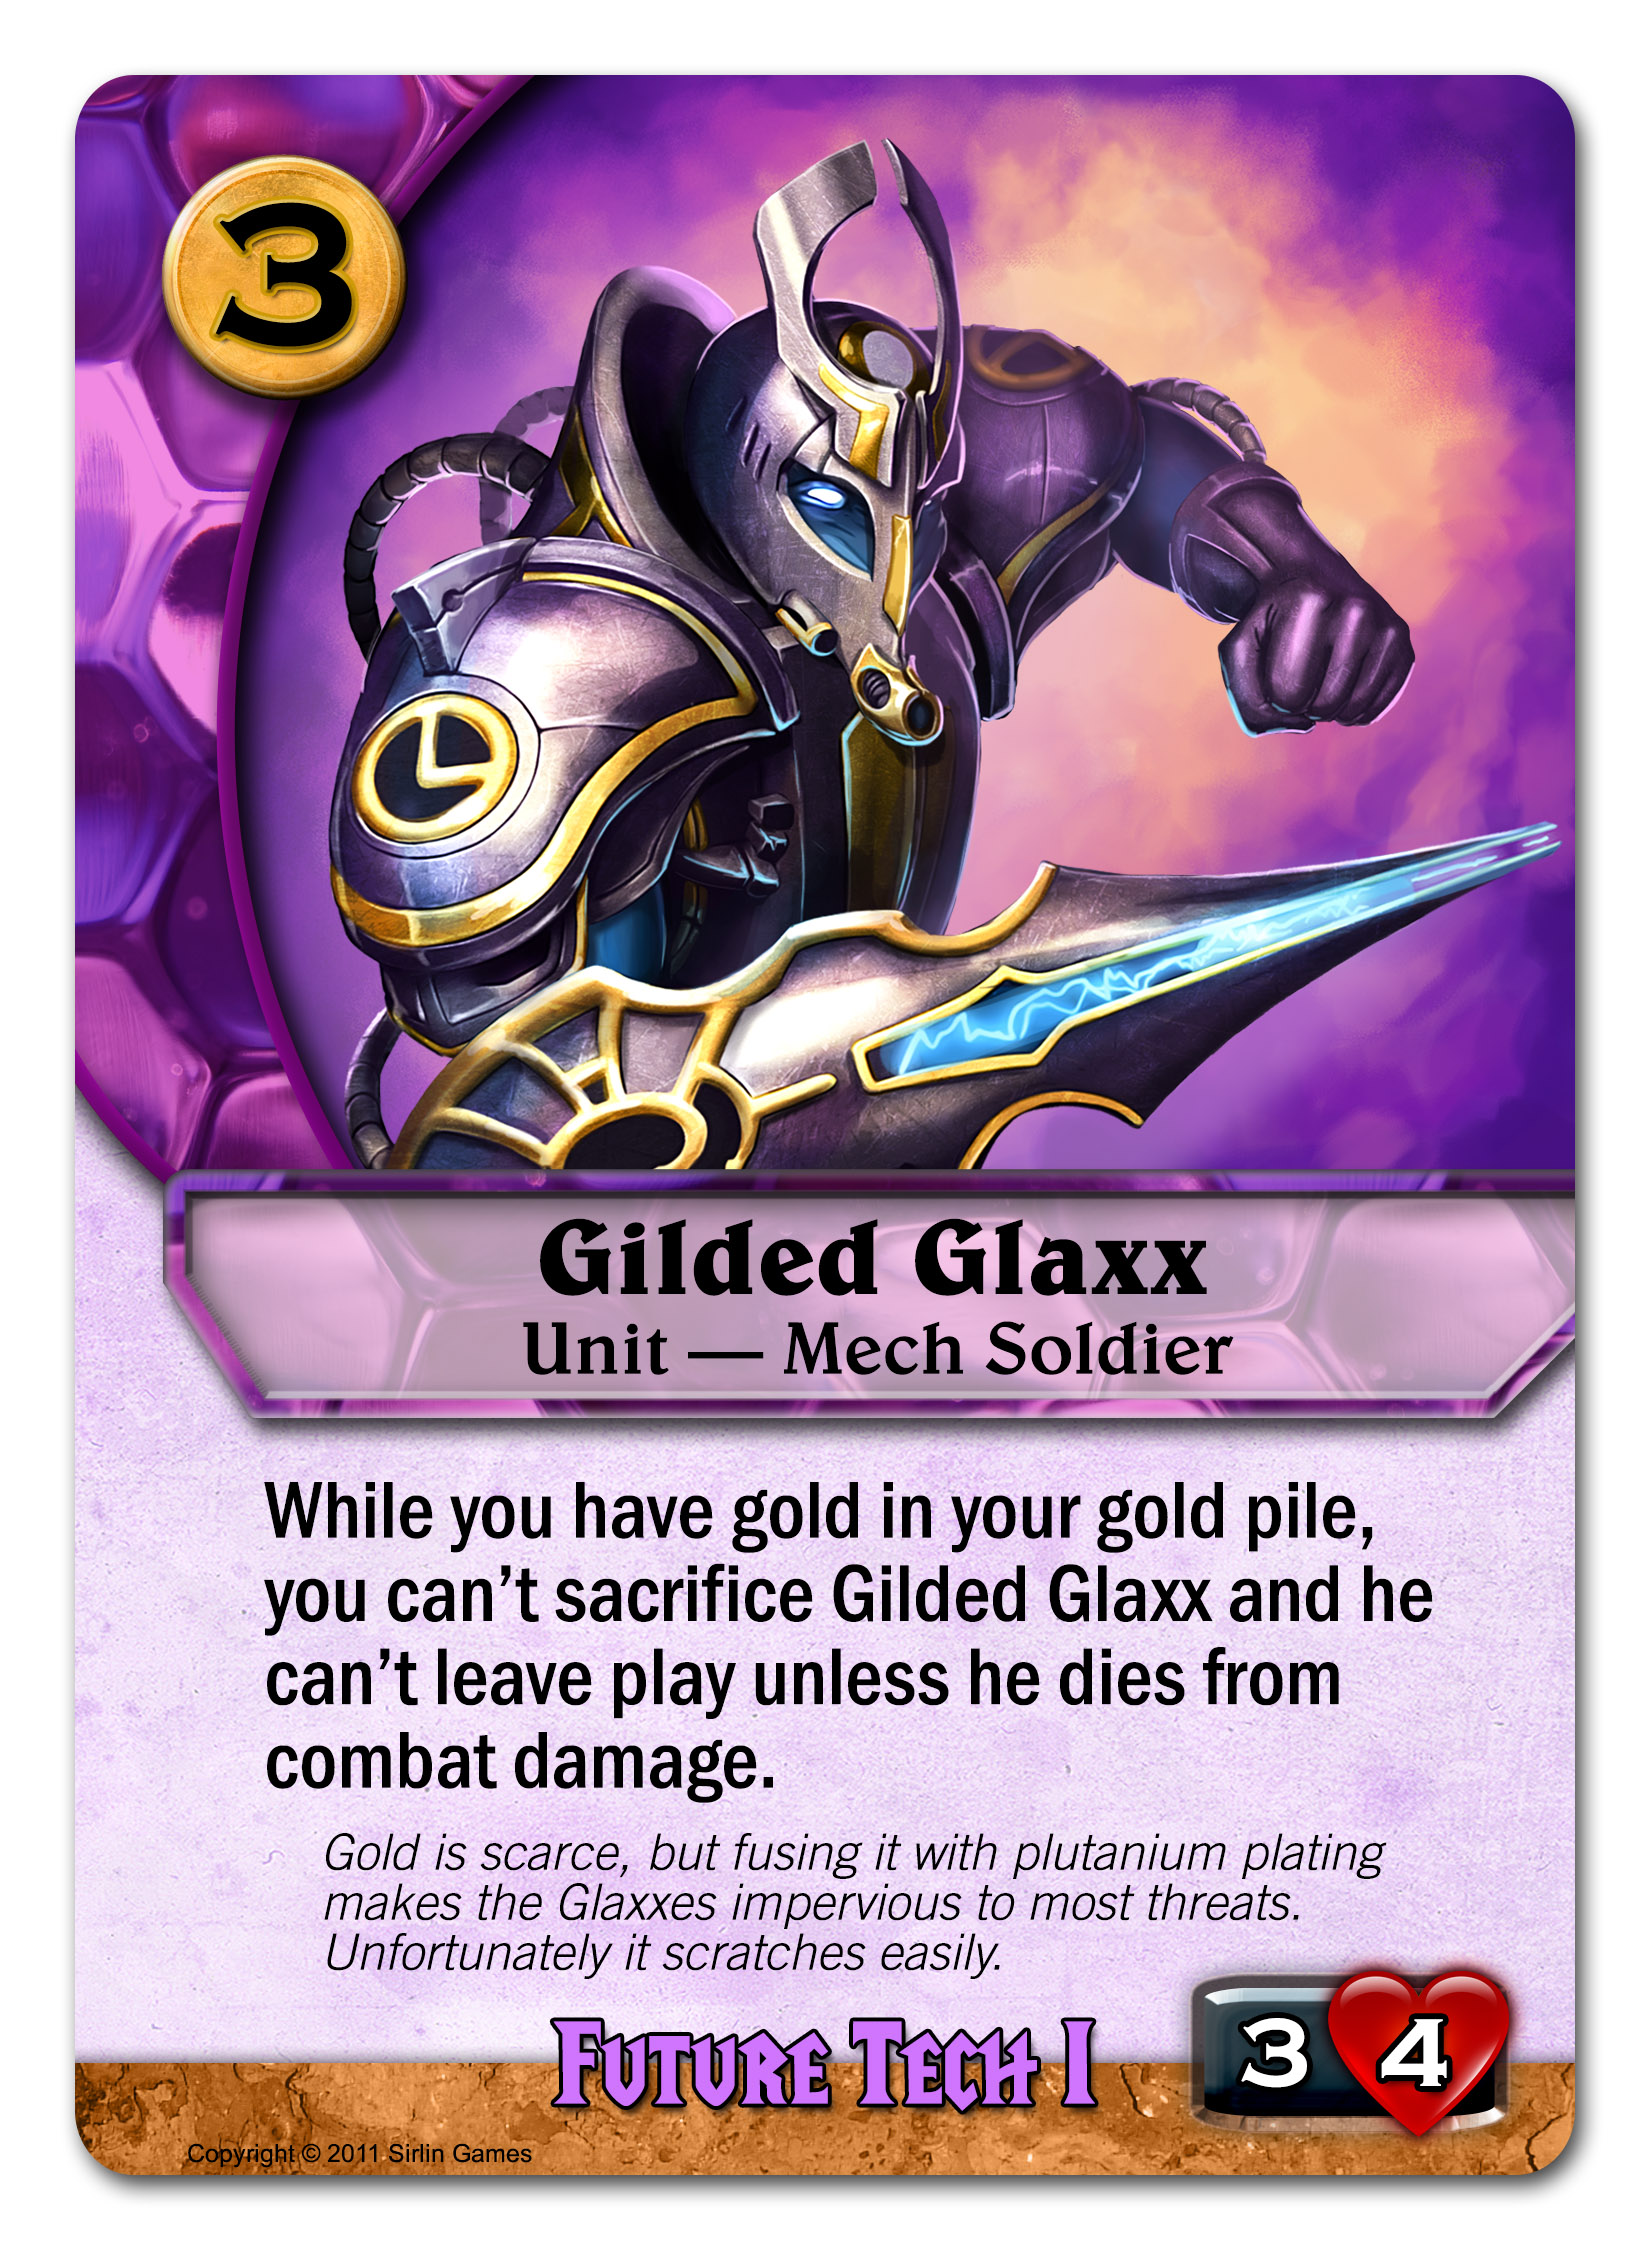
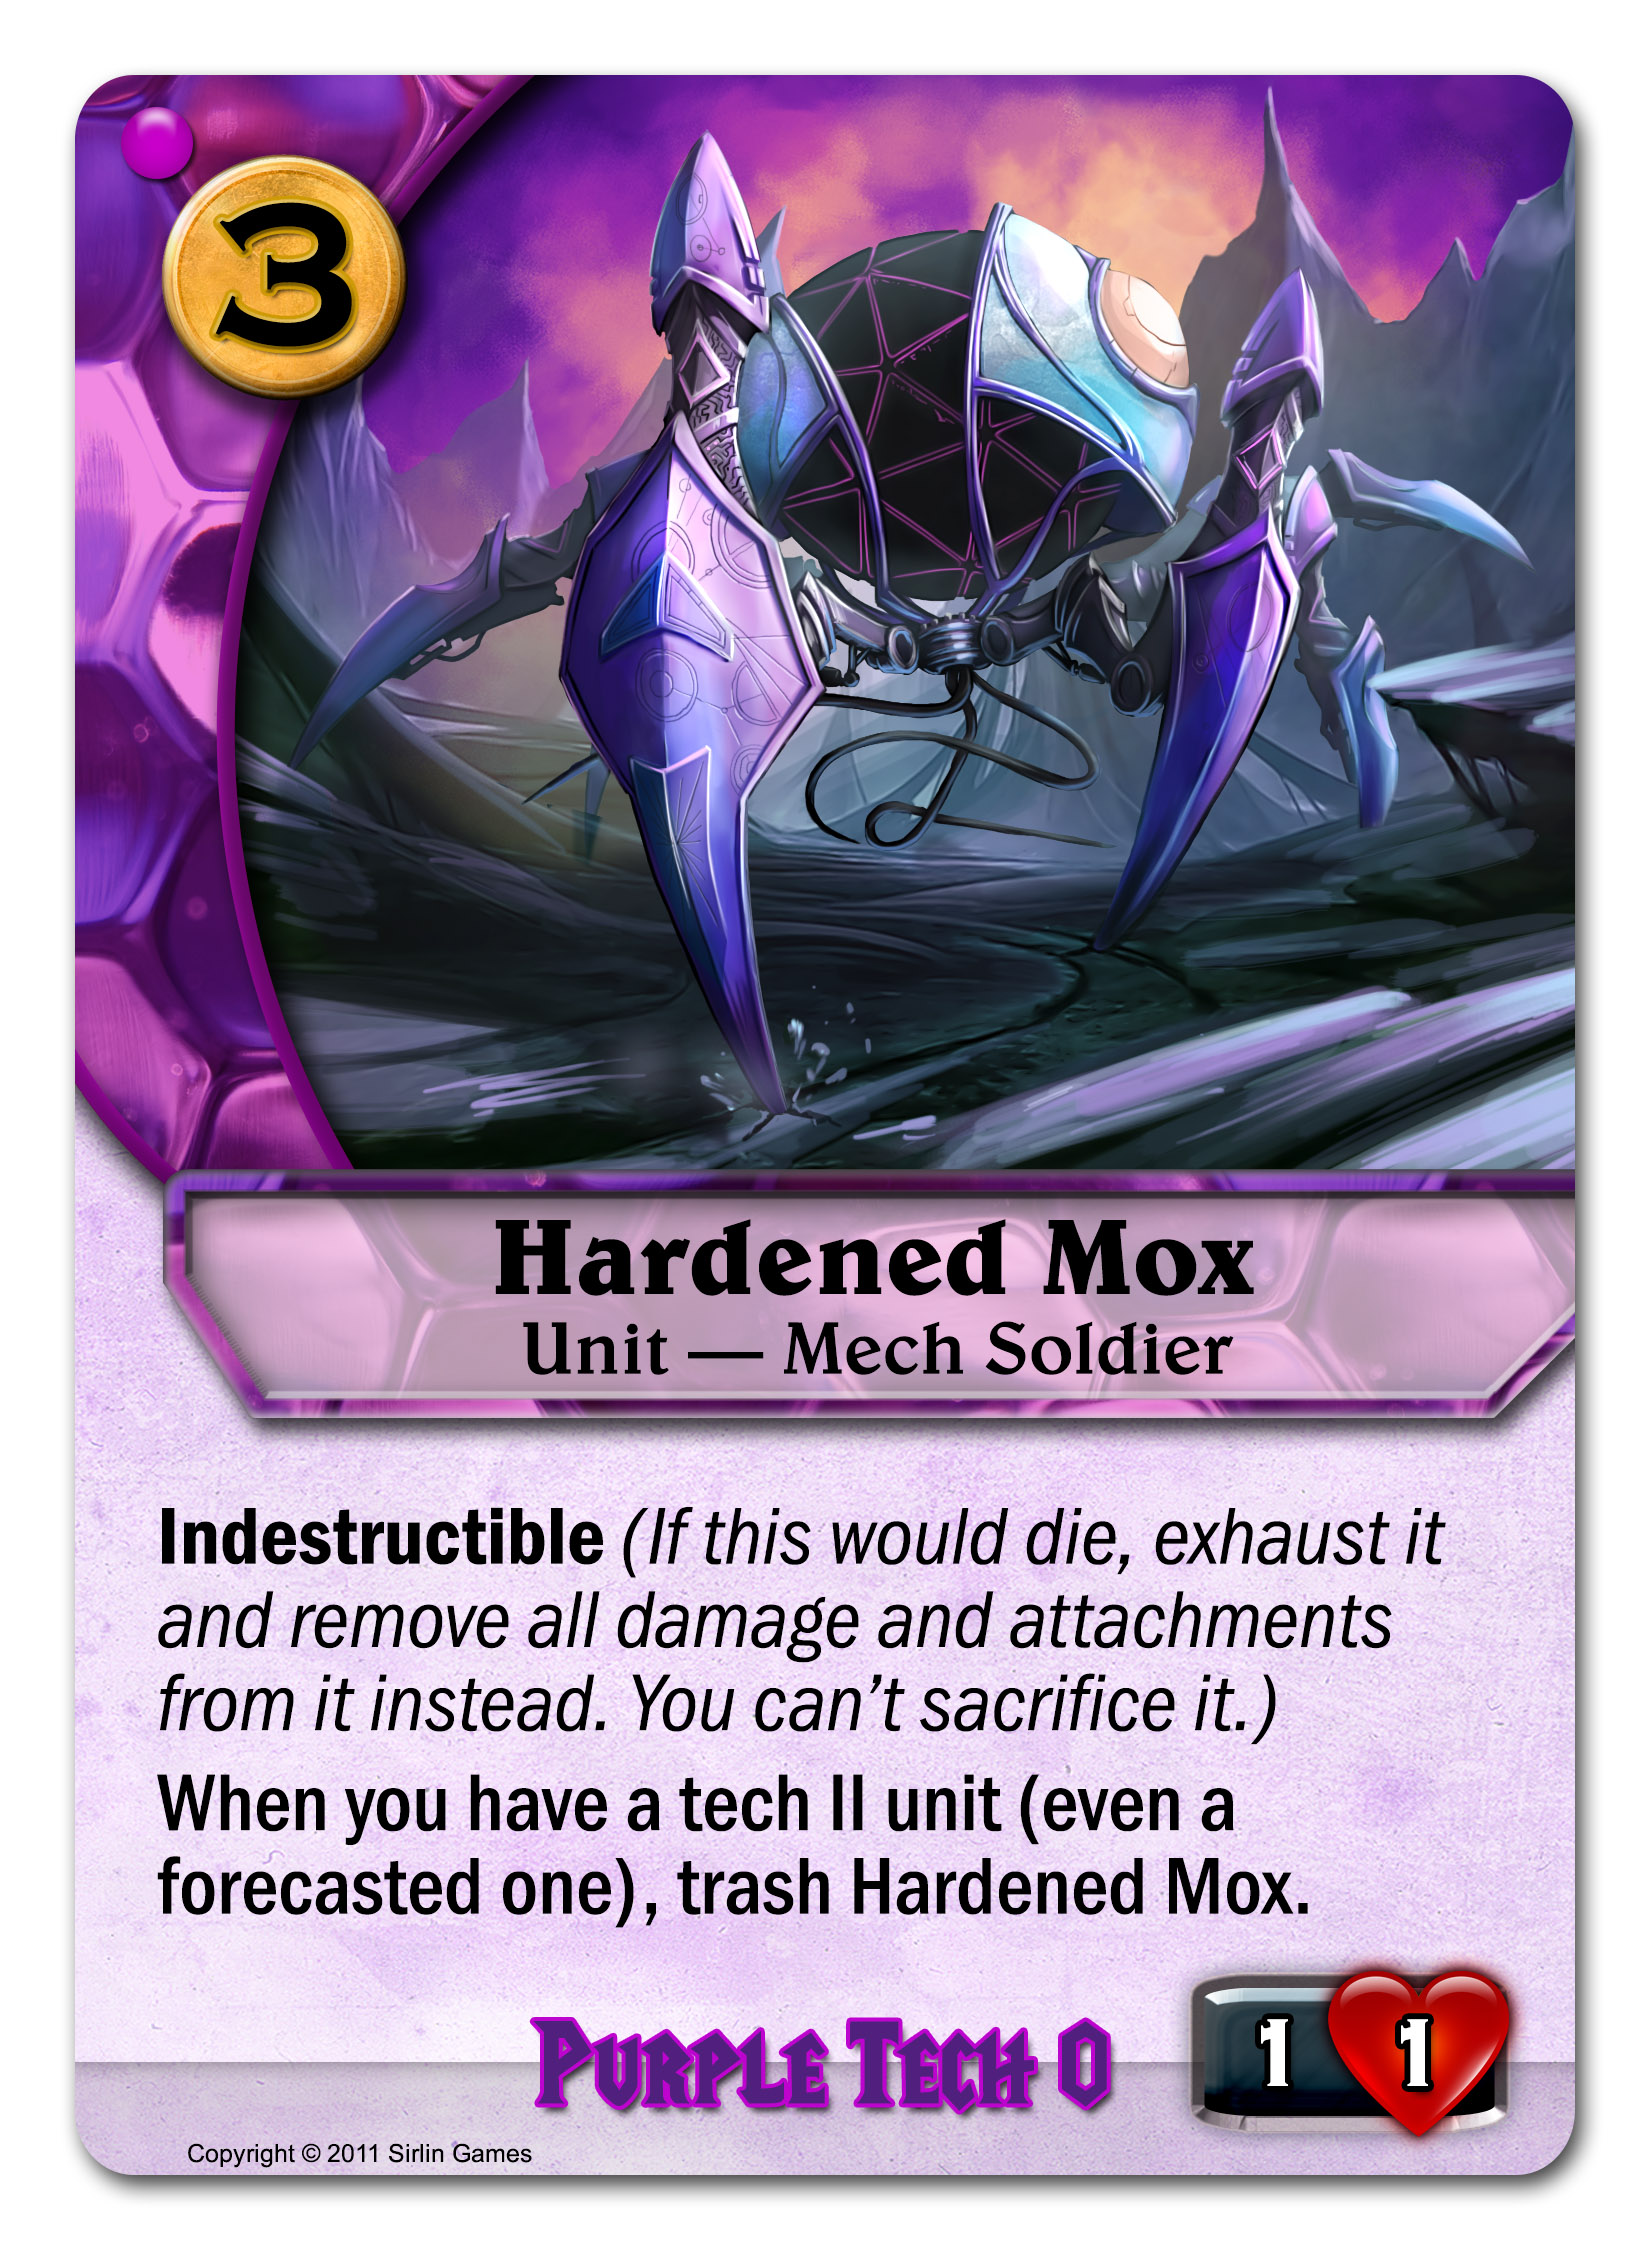
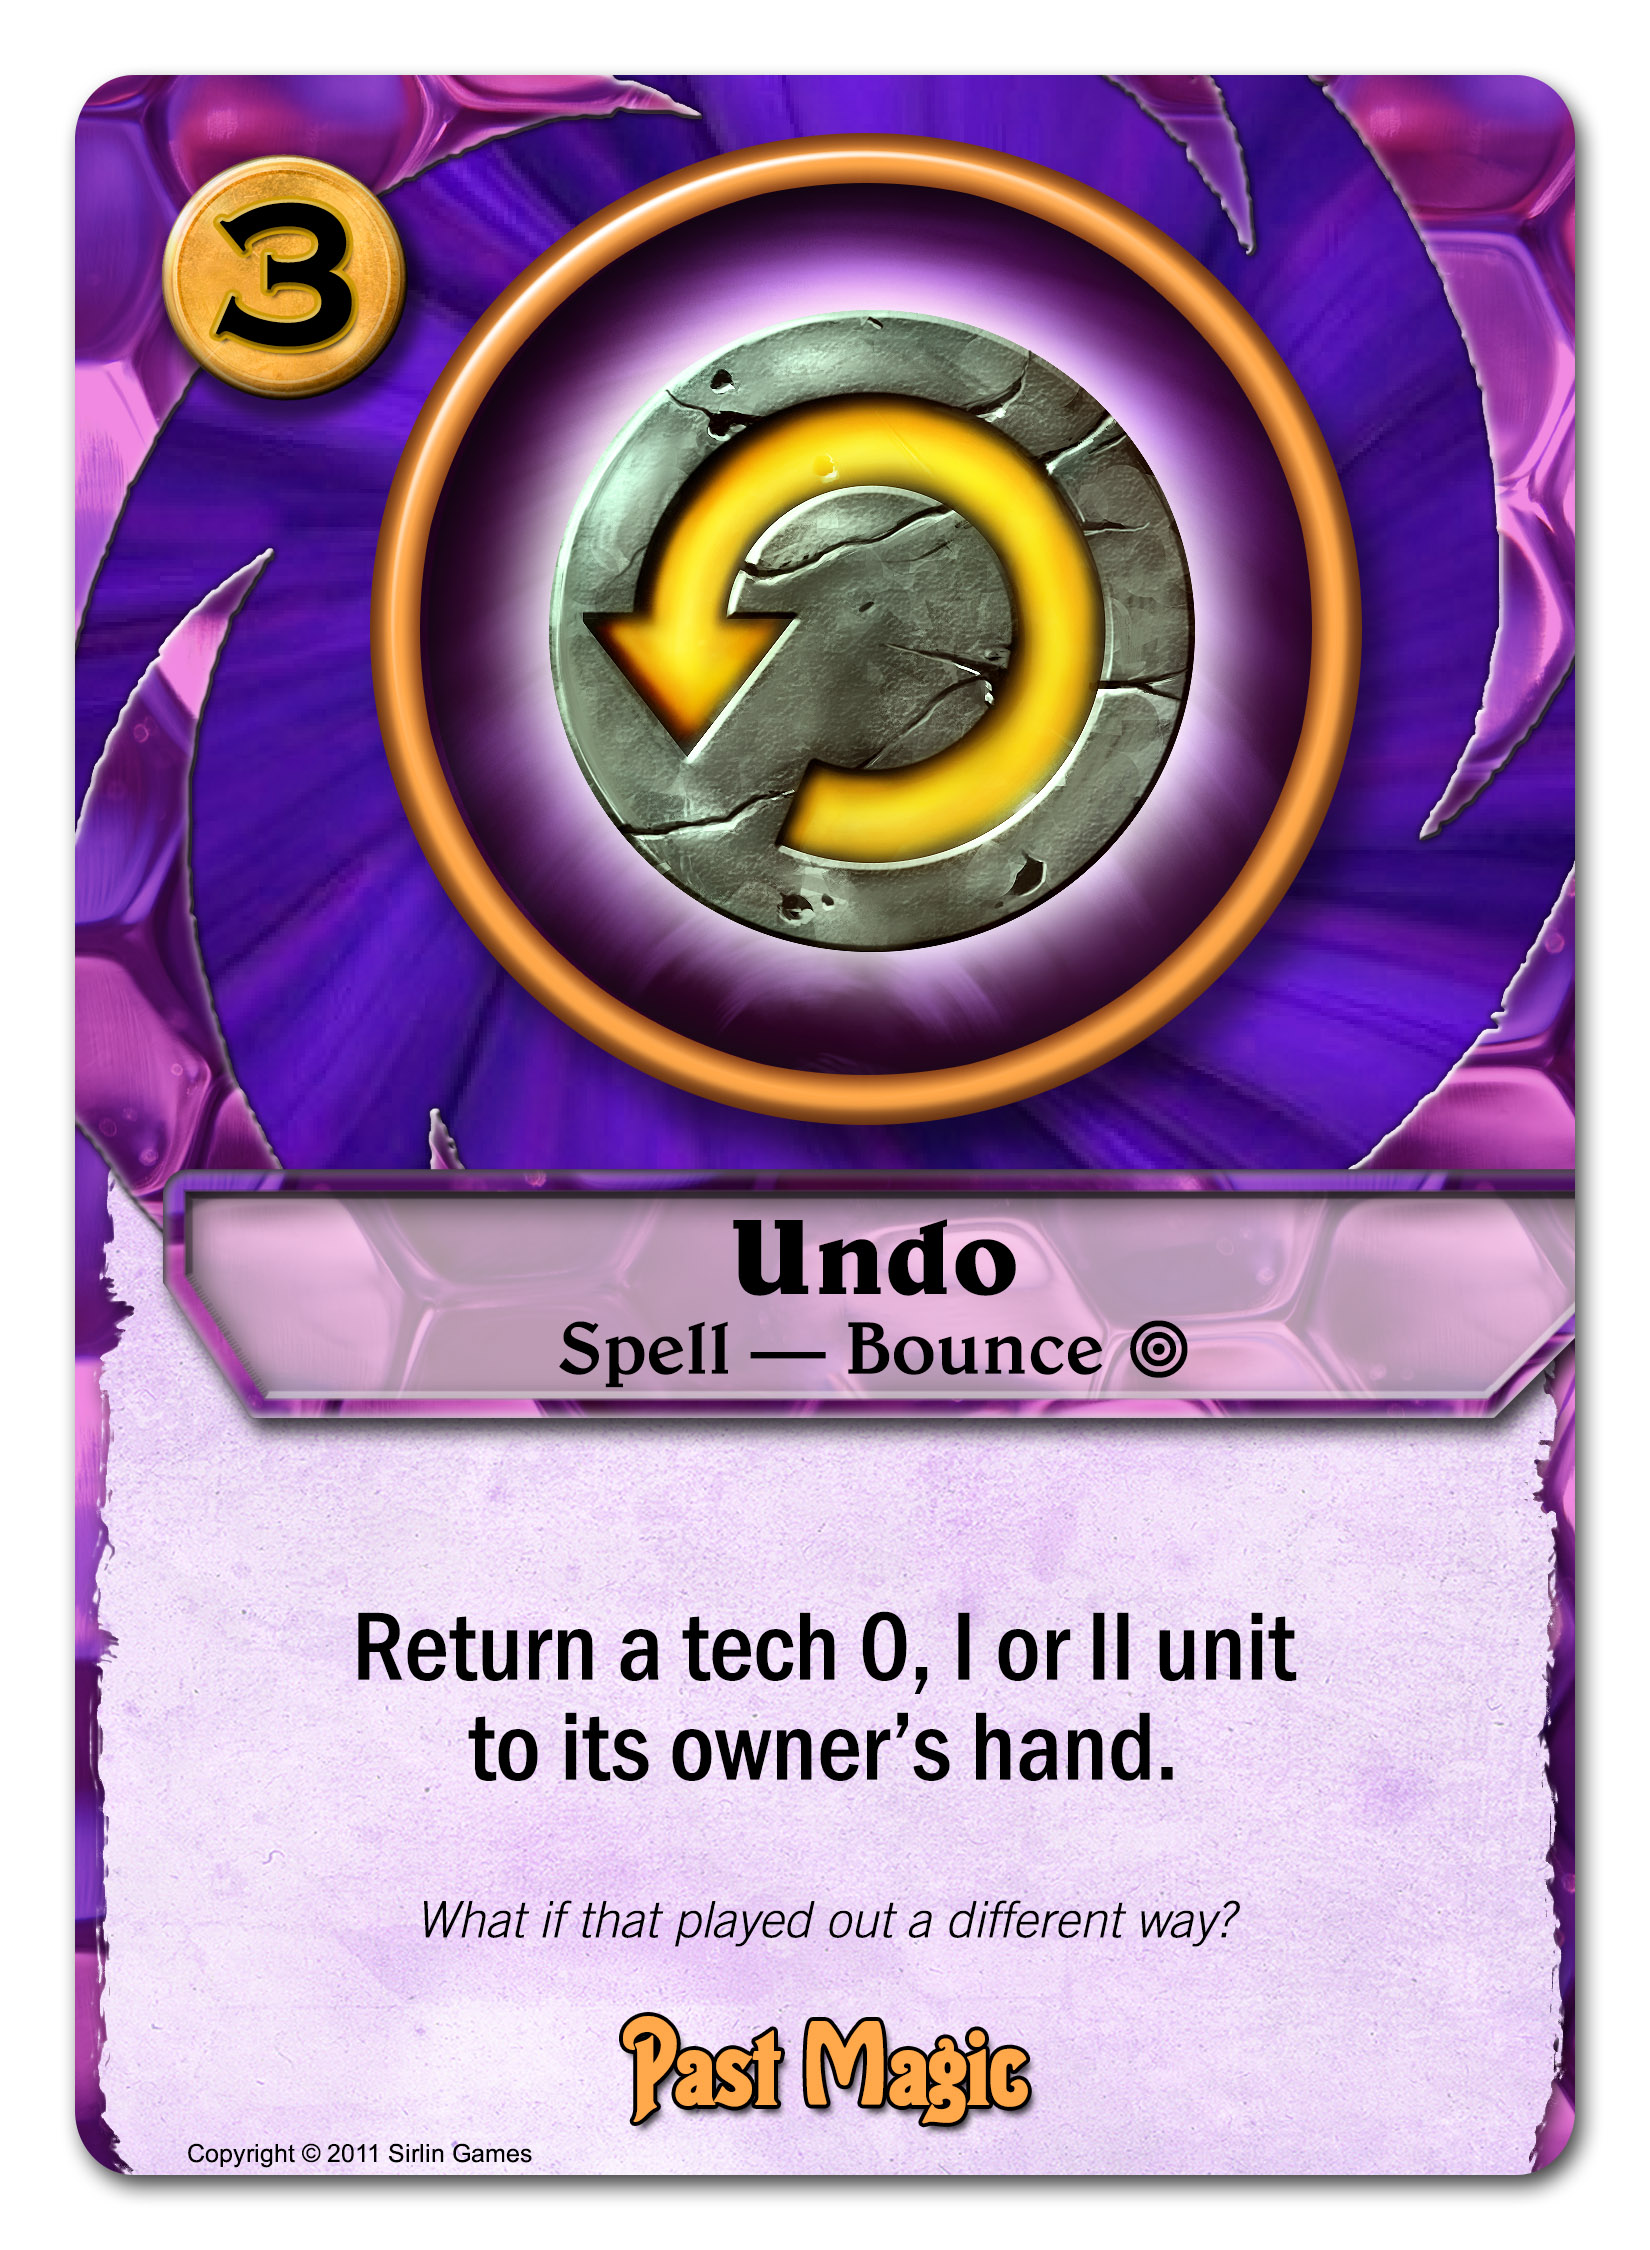
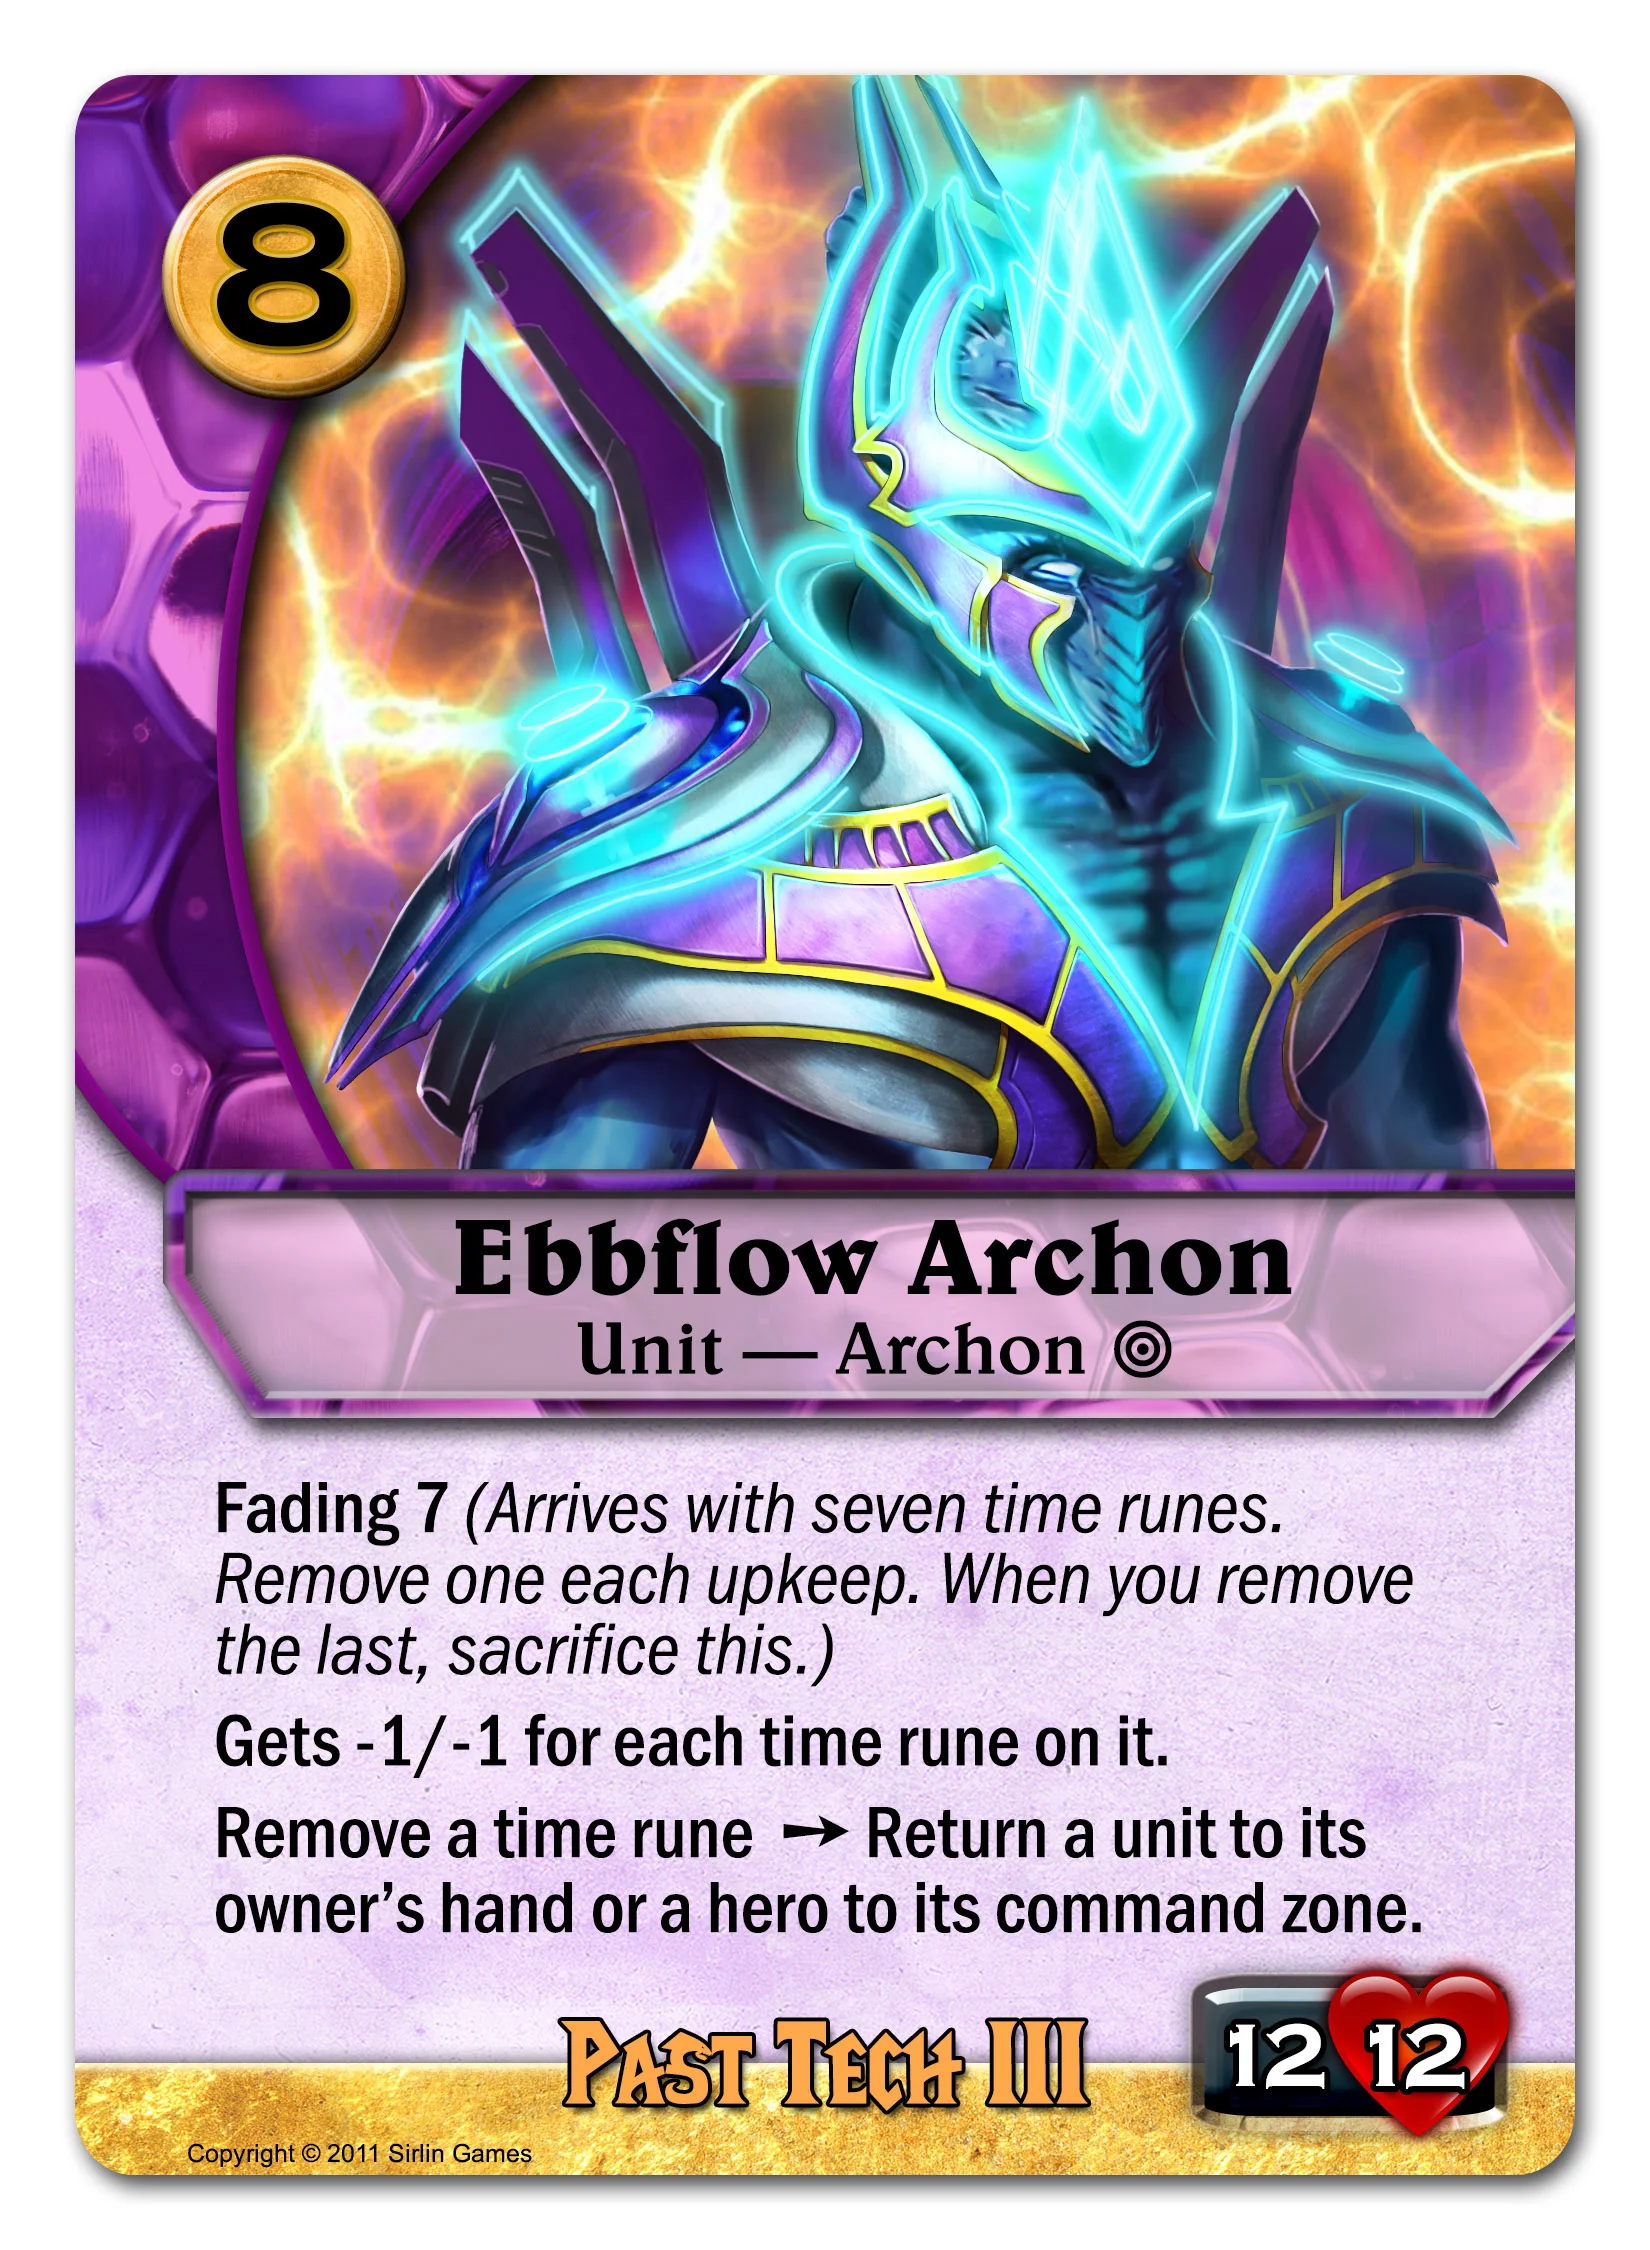
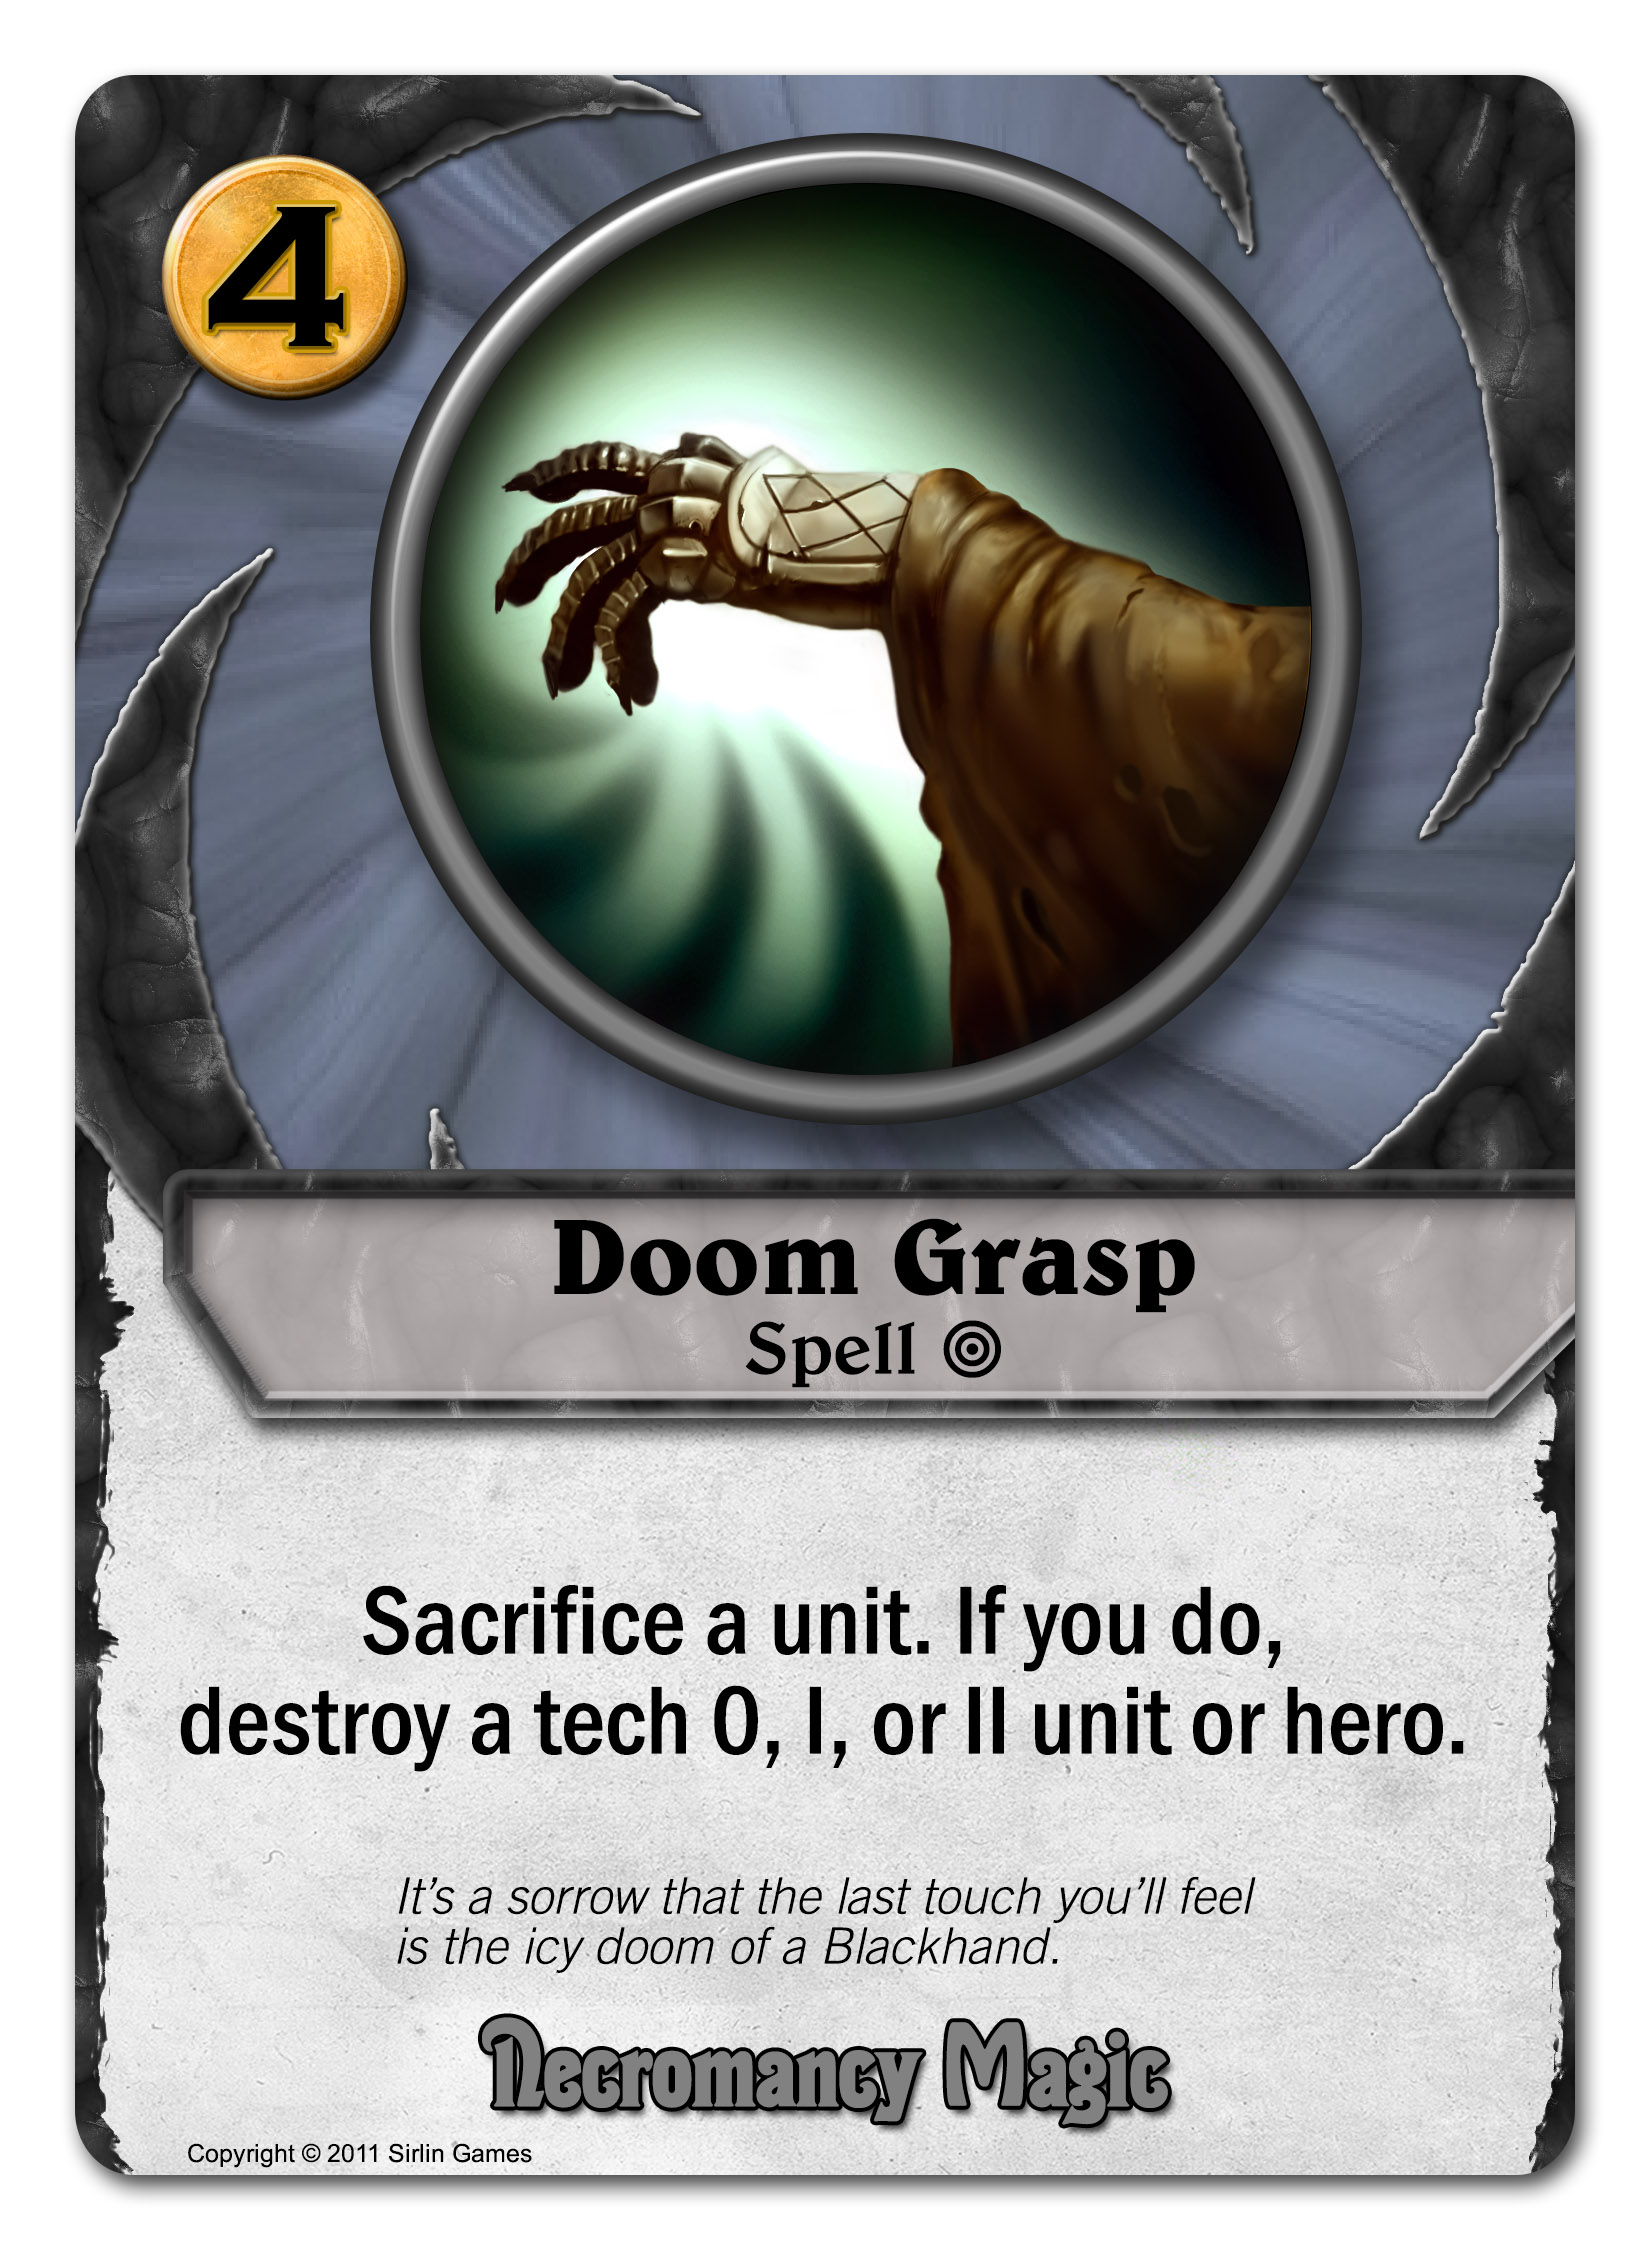
Gilded Glaxx is a much different unit. A 3/4 for 3 gold is generally very powerful at tech I in Codex. So if you’re willing to pay 3 in the early game (which can be a little tough), you get a really solid unit. His ability is unique in that it makes him immune to all sorts of stuff that works on other units. As long as you have any unspent gold, no one can kill him with red’s burn damage or white's Shurriken Hail or purple’s bounce effects like Undo or even Ebbflow Archon’s. Don’t forget Necromancy’s Doom Grasp spell, one of the best removal cards around, but it won’t work on Glided Glaxx if you have just one extra gold laying around.

Notice that these two tech I cards are the opposite ends of the gold cost spectrum for tech I cards. One is free, and the other is 3 gold, which is high for a tech I. This reflects Future’s theme of helping you choose your timings and shift your resources across time. If you don’t have much gold now, you can still be powerful later (forecasted units are inexpensive, but powerful). If you do have gold now, you can pay a lot and get something that’s unusually technologically advanced.

The tech II units follow that same pattern. Here’s an inexpensive one with forecast:


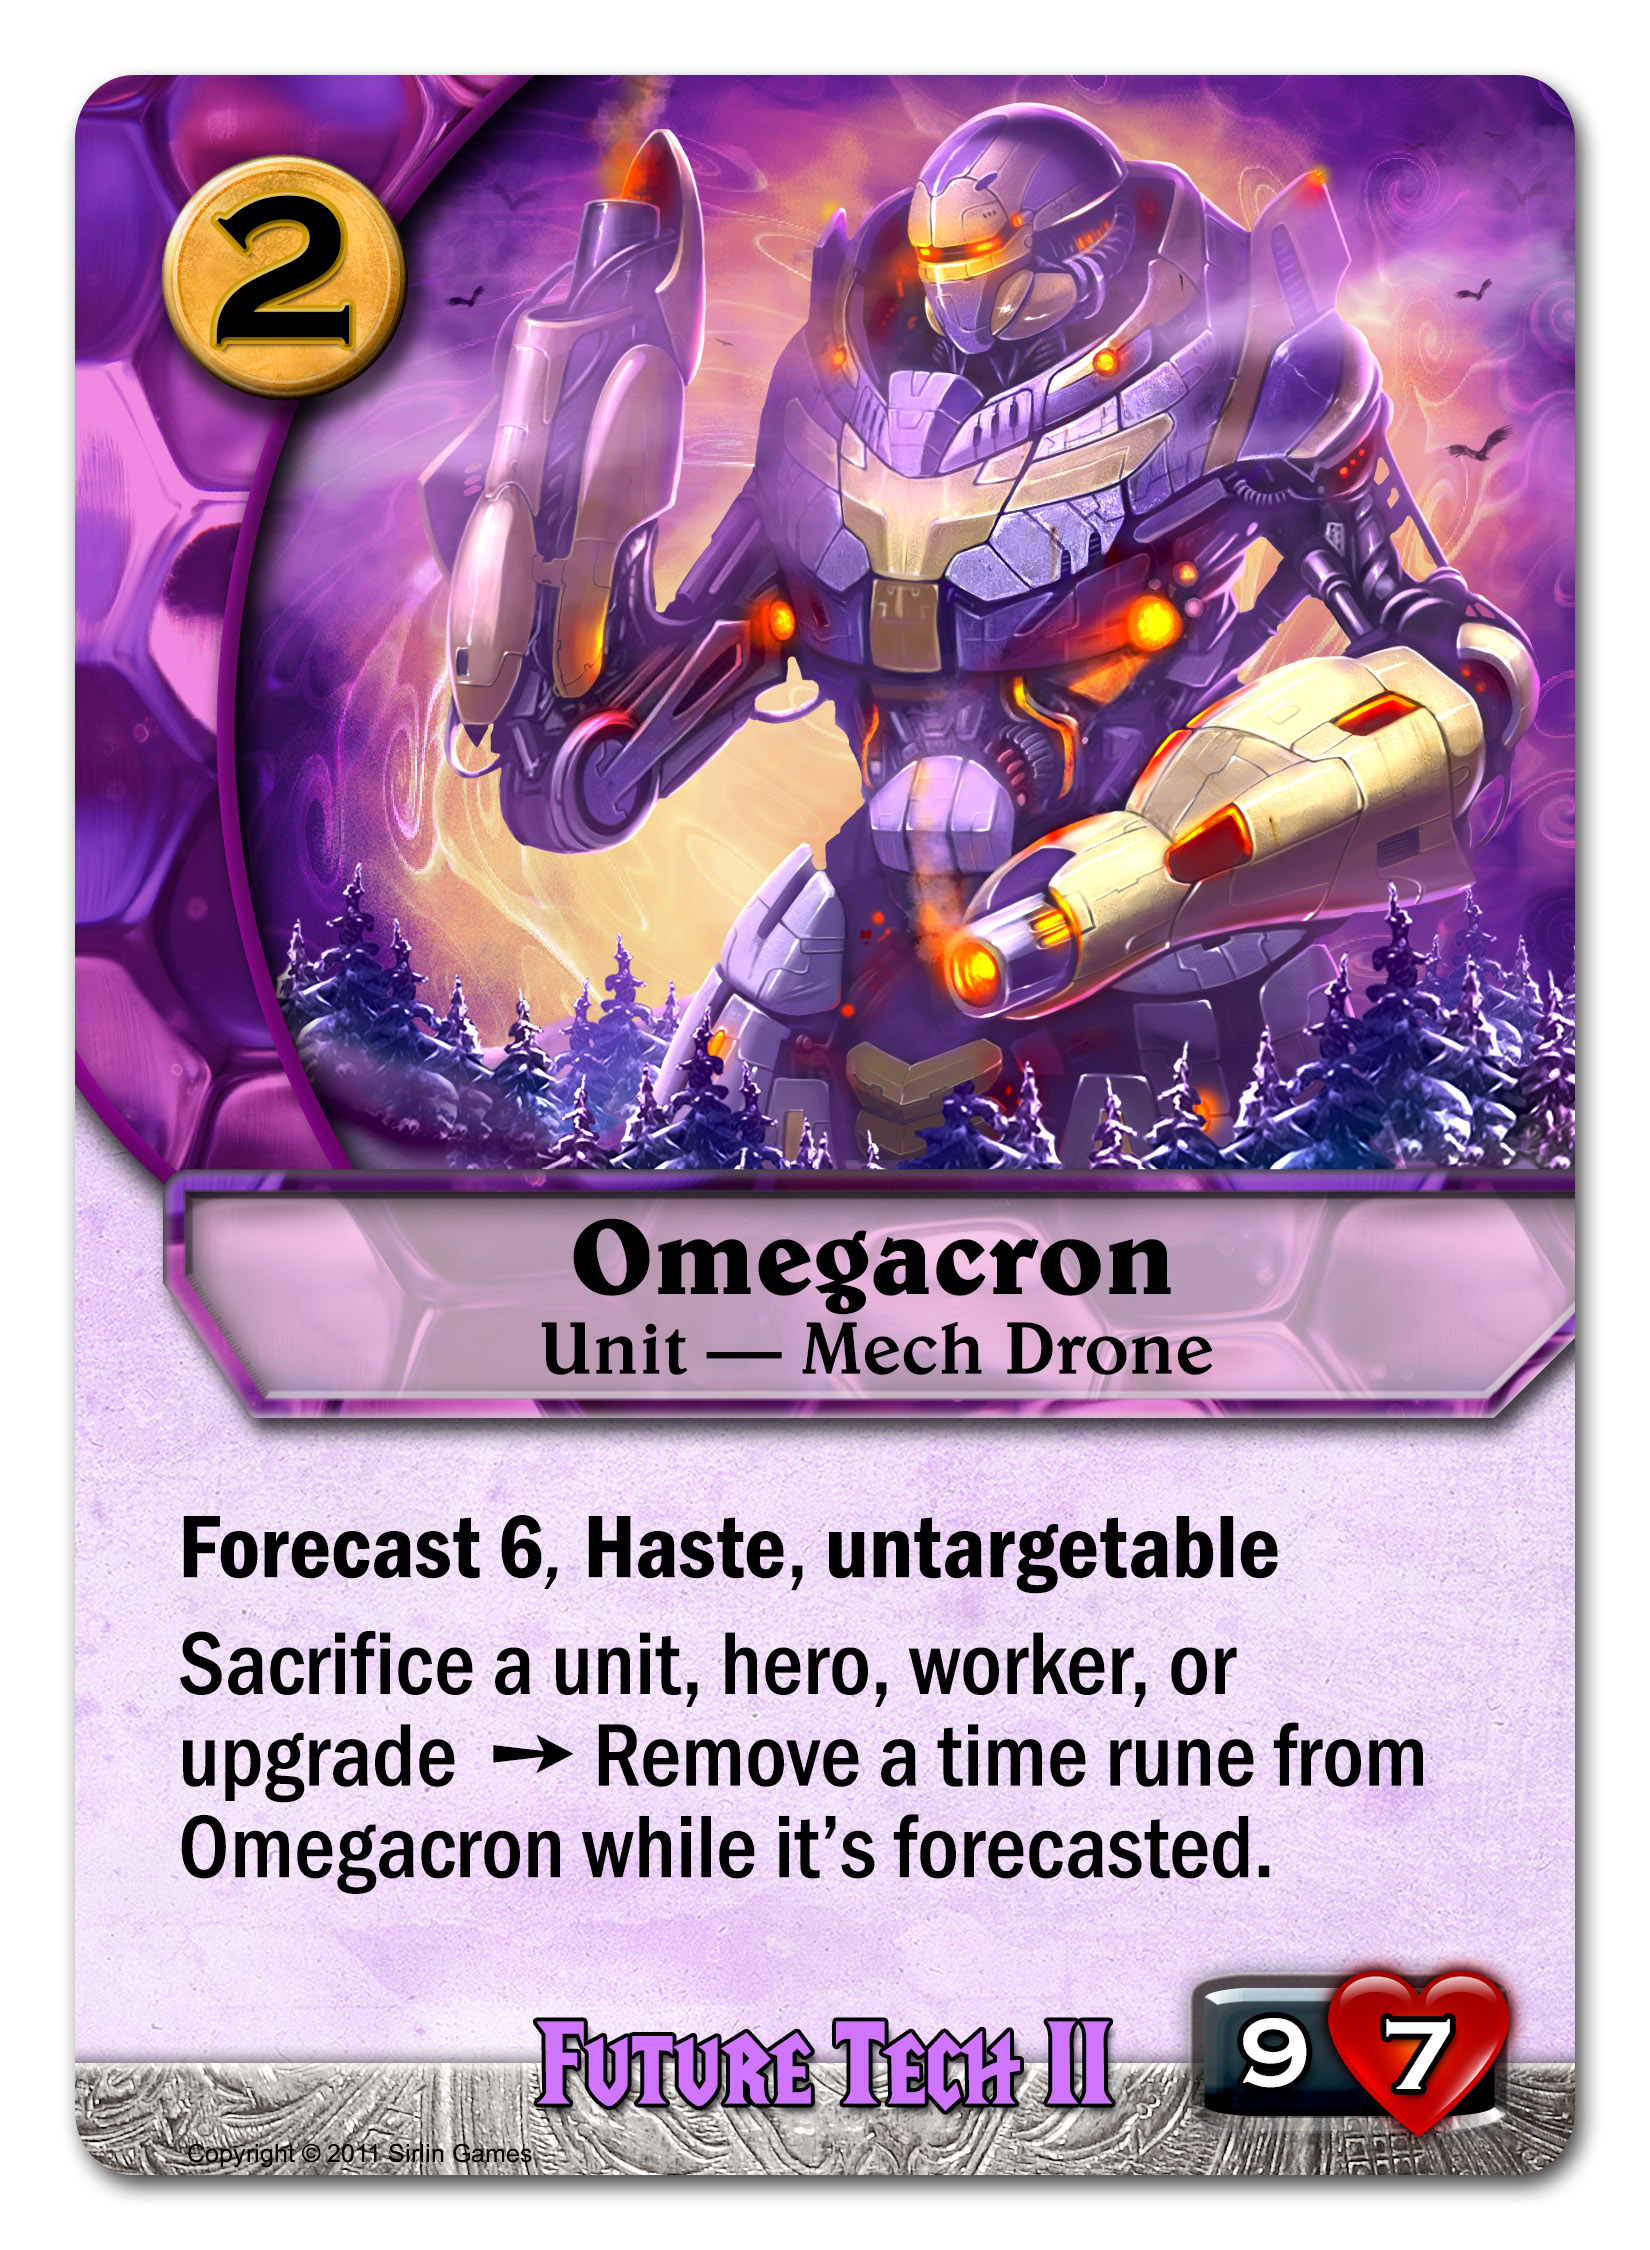
An untargetable 9/7 is totally crazy. And he costs 2 gold?? The catch is that forecast 6 means you either have to wait a really long time, or you have to spend a bunch of other resources to speed up the process. That gives you a ton of flexibility though. You do have to pay for this enormous unit one way or another, but it doesn’t have to be directly with gold.


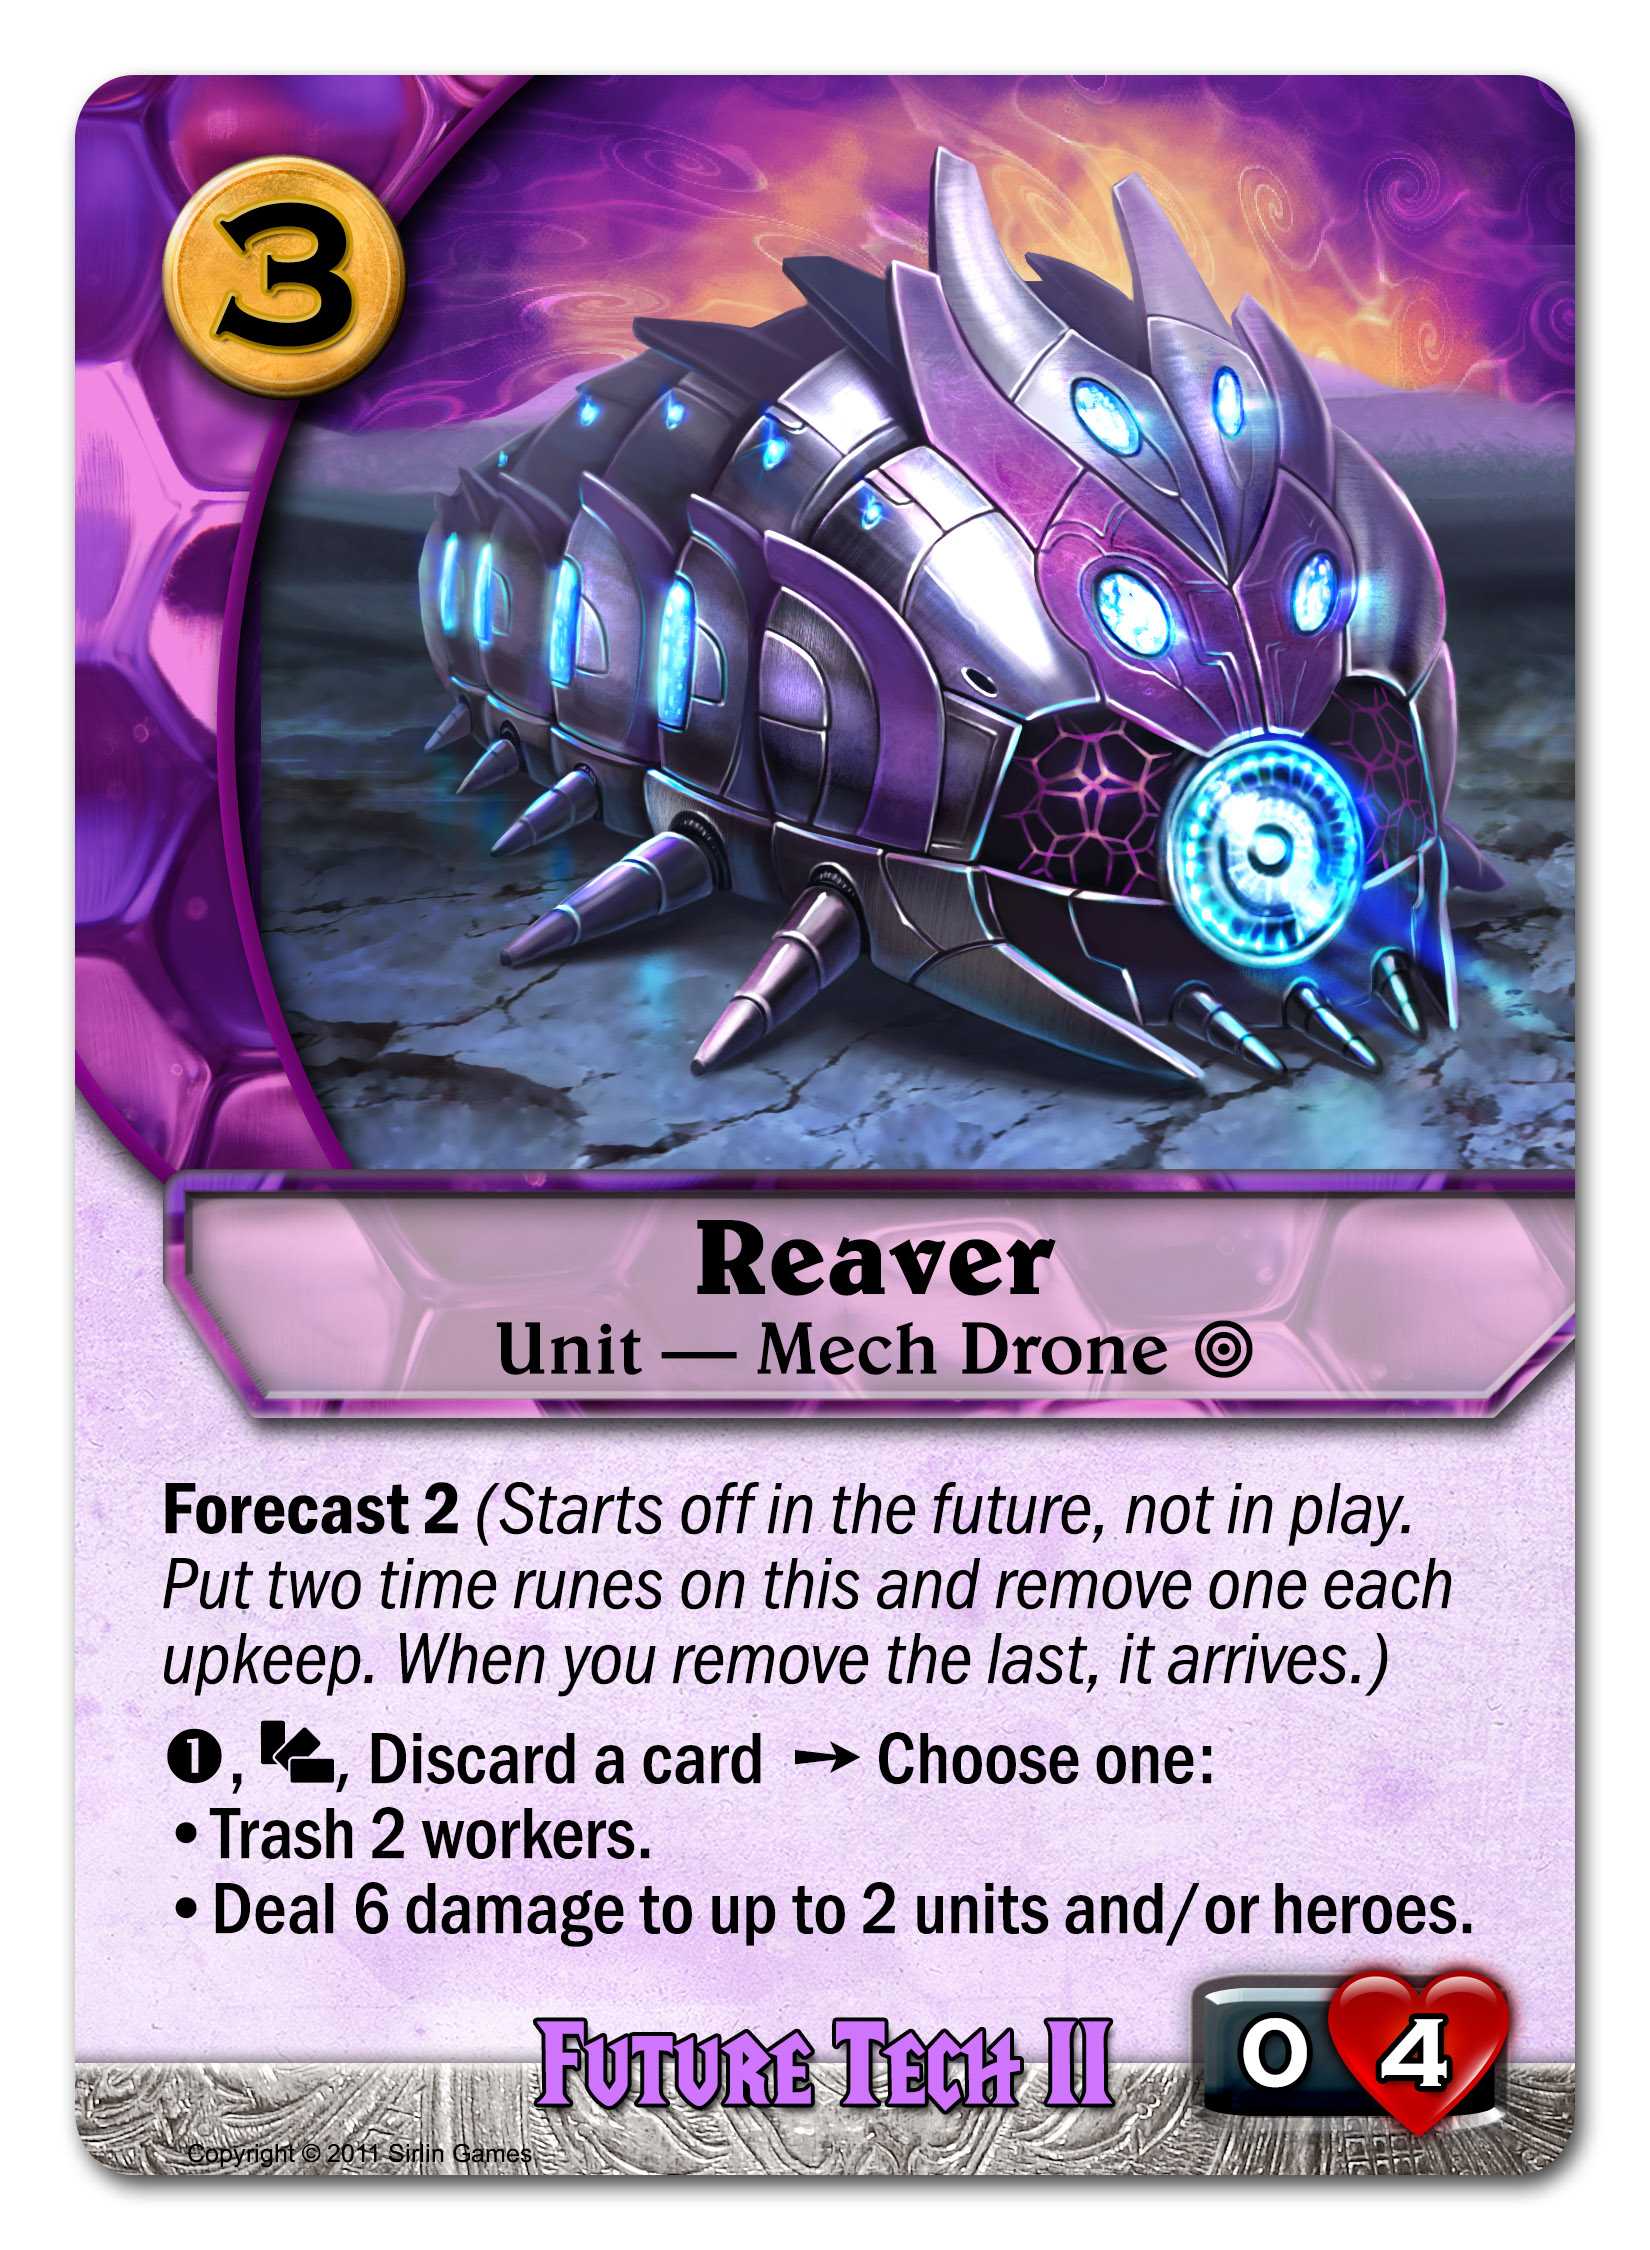
You won’t have to wait quite so long for a Reaver. Reavers are terrifying because of their splash damage. They may be slow moving, but they fire energy bombs with a big enough blast radius to kill TWO workers or even TWO units and/or heroes. Just to clarify, a single Reaver shot is capable of dealing 6 damage to a hero and 6 damage to a unit, all in one activation. Or 6 damage to two different units, etc. If you need to dominate the battlefield, Reavers will let you. If you already have a handle on that, the tempo gain from killing 2 workers per turn will become unbeatable really fast.

Future tech II also has really powerful units without forecast. One colossal unit can walk over anything that would get in its way and shoots lasers all over the place in the process. But I want to bring your attention to the Future’s airships.


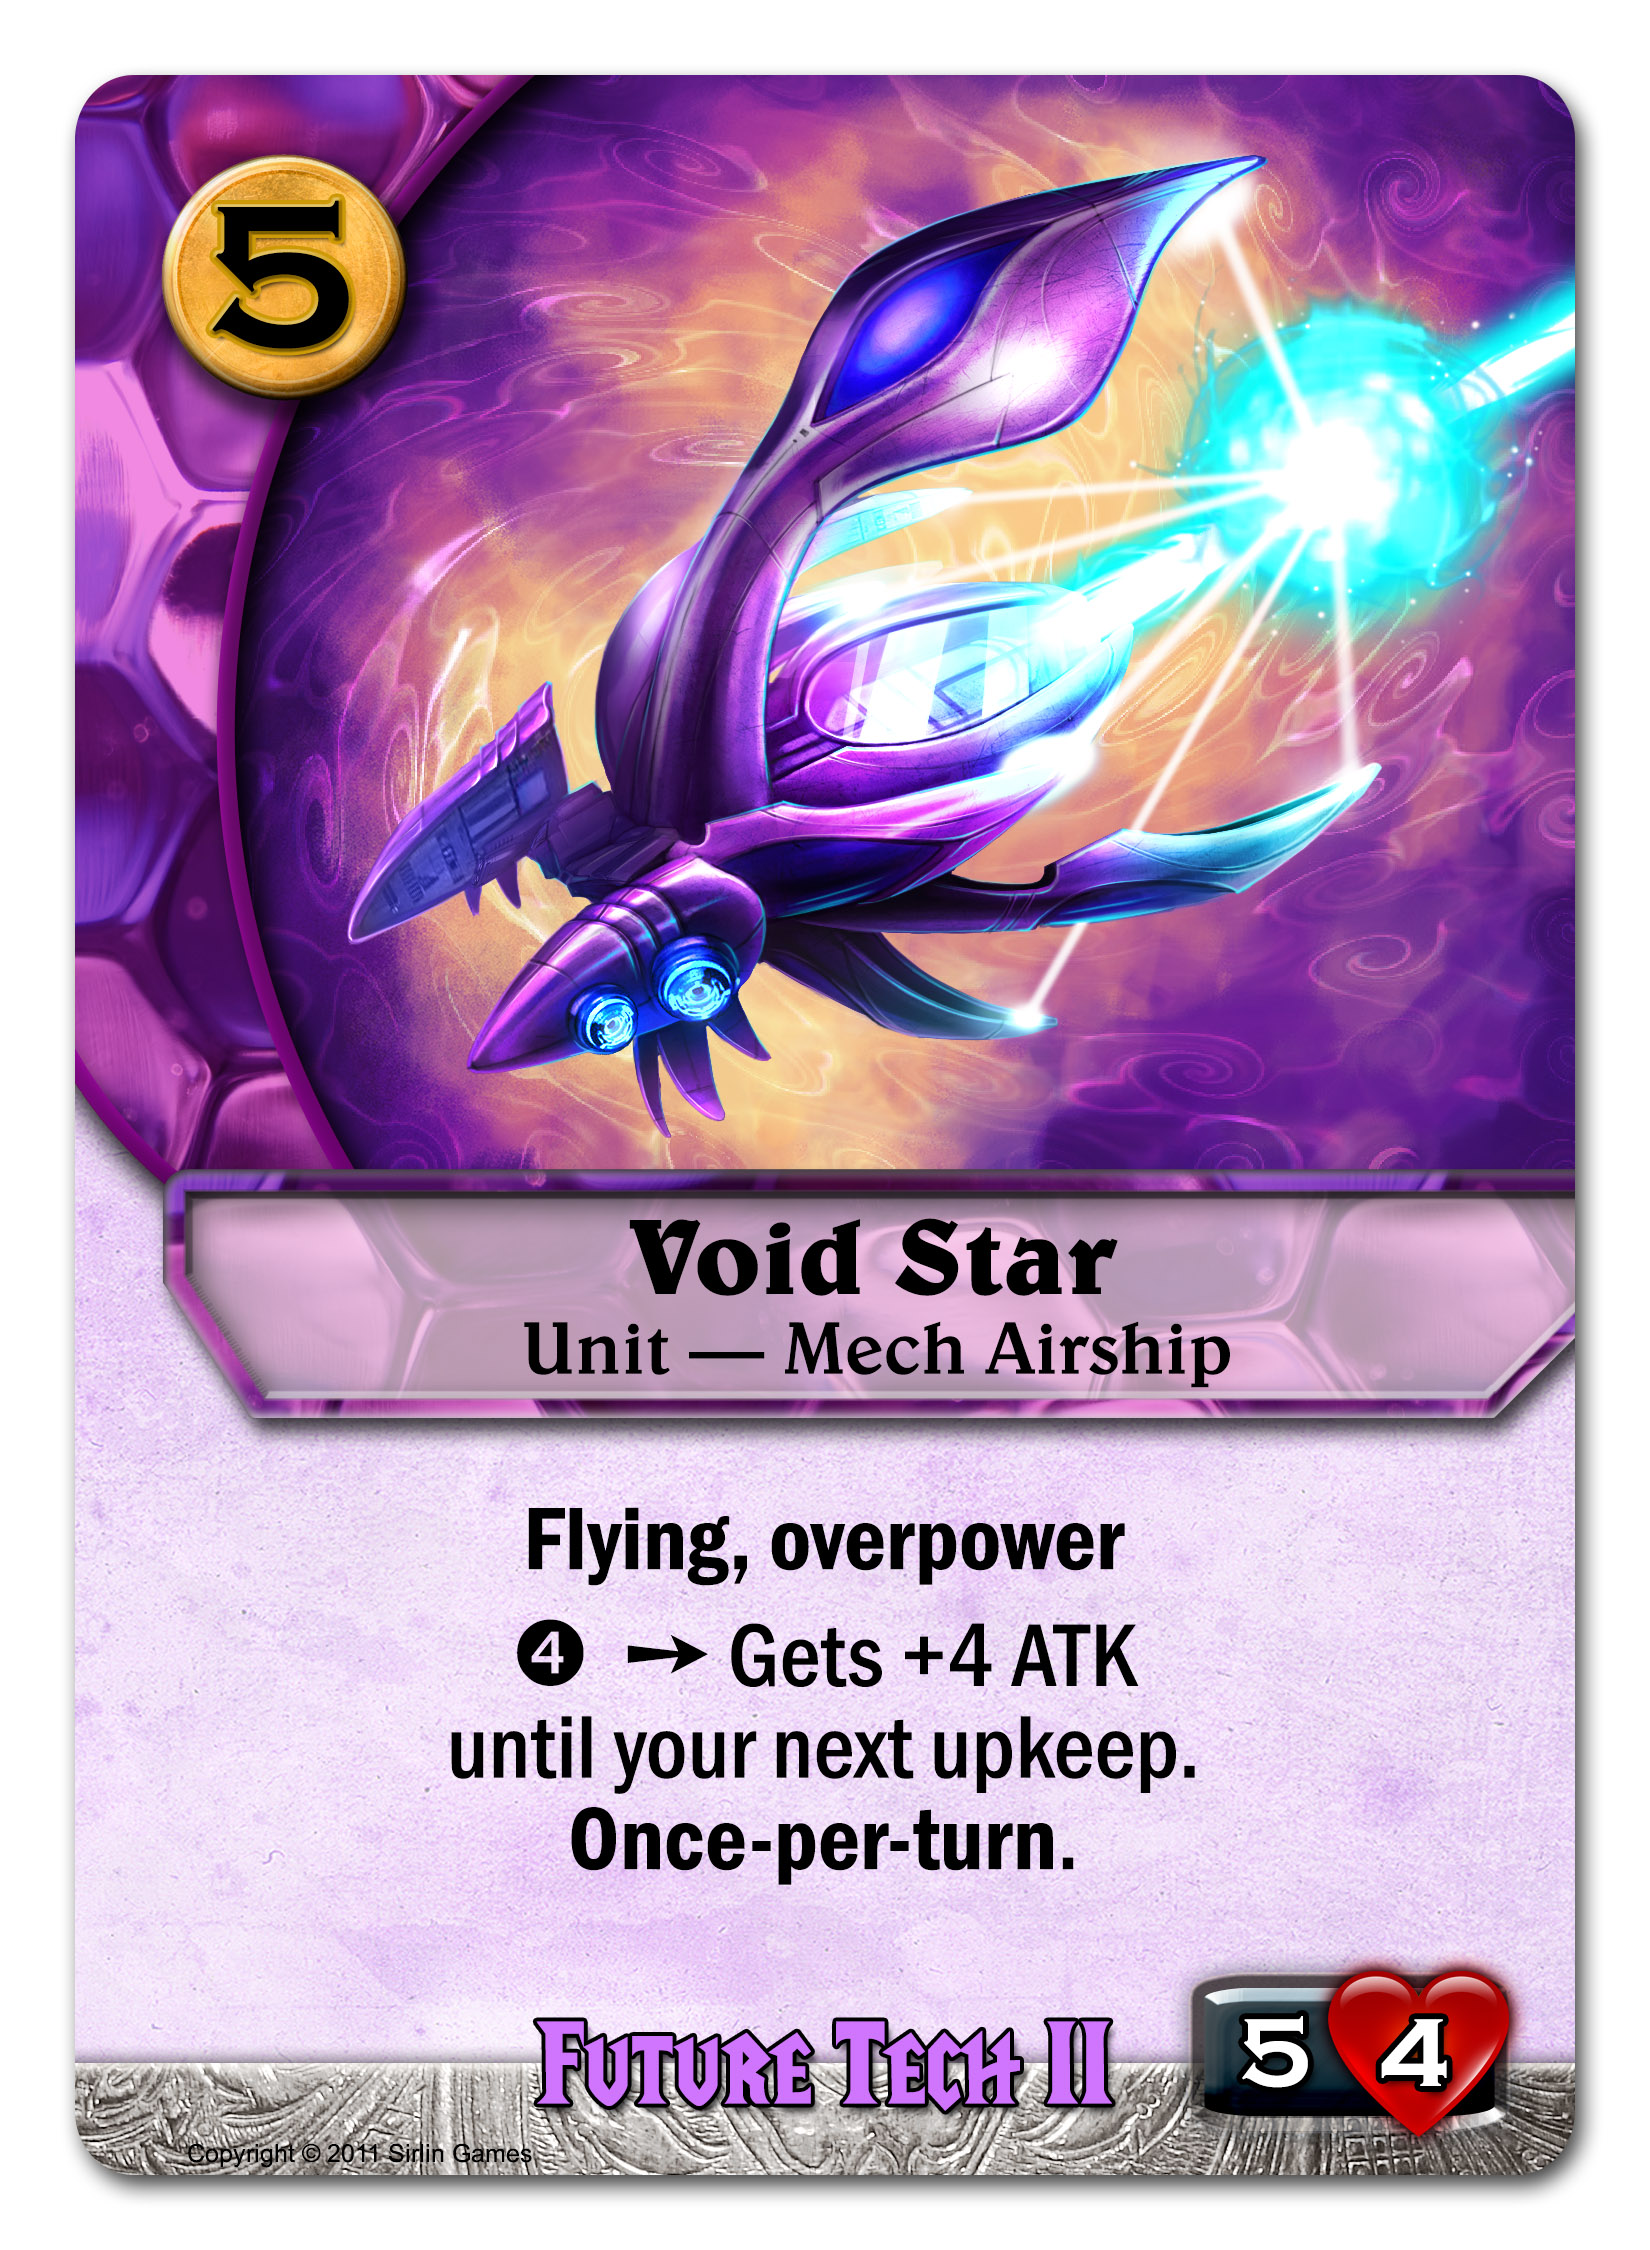
Void Stars deal so much damage that they can destroy a tech I, II, or III building in one attack. Remember that flying is very powerful in Codex, and that fliers can usually attack ground units and heroes without even getting hit back. Void Stars can also charge up their beam cannons to do a whopping 9 damage. That’s so much damage that you can use them as finishers to demolish your opponent’s base.

While Void Stars are amazing, they can only attack one thing at a time. Enter, Hive:


Hives are enormous airships that carry many smaller Stinger units inside. They deploy 5 of these 1/1 Stingers when they arrive. Spreading out your attack power can help a lot in some cases. You could kill 5 1/1 frogs or something in one turn and still have all your Stingers. You could patrol a bunch of Stingers to clog up the airways for opposing fliers. You could kill a hero with 4 hit points and not waste the 5th point of damage as overkill (have the 5th Stinger attack something else).

Hive is also a pretty durable threat. Losing individual Stingers isn’t a big deal, and you can replace them for just 1 gold each. Opponents really need to destroy your Hive itself, rather than the Stingers; Stingers can’t function without the coordination from the Hive command ship. A Hive has 6 hit points though, 2 more than a Void Star, so it's tough to kill. Hives also have resist 1, which makes them cost more to target.

Both of these airships are expensive to use. Hive’s effect stacks if you have a second one, so you might even want 2 Hives so you can have a whopping 10 Stingers, but that costs a total of 12 gold and 2 cards in addition to having to build your Future tech II building. That said, remember that your Future hero has the Promise of Payment spell. You can promise to pay for a Hive or two even a turn sooner than you can actually pay for it, then the opponent is faced with taking down an armada they probably aren’t prepared for.

With such air superiority, you might be wondering why you should bother going to tech III with Future. These tech IIs are certainly capable of winning the game, so you don’t have to reach to tech III. In general, the jump in power to tech III can help you break any stalemates that might have developed, and it can reduce the number of turns you need to win. In this specific case though, your tech III can help you cover what might be a weakness of your gameplan.

One potential problem with an air superiority strategy is that you’re basically engaging in a race. You have to be sure to actually win that race. You can fly over enemy patrollers, but they can also attack under your fliers. If your opponent has particularly strong ground units, or if they can easily kill some of your units, they might end up winning that race.

Here’s something that can change that math:


The moment a Nebula arrives, it can fire its powerful death beam (which costs 0!) to take out the opponent’s best tech II. That alone gives you some breathing room and might have bought you a turn. You’ll continue to destroy their best unit each turn too, so this really slows down their side of the race, while adding 7 flying damage per turn to your side. You also get Nebula’s awesome cloaking field. Though Nebula itself isn’t invisible, all your other units are. Opponents won’t be able to target or attack any of them unless they have a detector. A timely use of Nebula can shut off the opponent’s only hope for a comeback.

The Future is full of amazing new technology and untold power. The Future comes to those who wait, and also to those who cheat it into play with time rune antics.

Codex: Present spec

Through his temporal research, Max Geiger made contact with the Vortoss race and is now their emissary. Ever since he was a boy, Geiger loved fiddling with watches and other timepieces, so it was a natural field of study for him as he grew as a scientist. While the Vortoss race has become unstuck in time and is both in our future and our past, Geiger is in the here and now. He is the Present hero of purple’s faction.


Geiger helps you get to new technology faster by discarding the old, and drawing a new card. At max level, his ability is pretty tricky and has several non-obvious uses. That’s kind of a theme of the purple faction though: requires a lot of clever tricks to be able to play well.

One use of his max level ability is that you can attack with a unit, then trash it and return it to play so you can patrol with it. As a general game rule, when it comes back into play it’s treated as a totally new, fresh copy so it arrives ready (not exhausted!) and loses any extra baggage it might have had. That means it gets cleared of any damage on it and it clears off any -1/-1 runes it might have had too. If you have a unit with haste, you can attack with it, trash it with his ability, then return it to play and attack with it again. Or if you have a unit with runes on it (time runes for example), then you can trash it to immediately get it back with however many runes it starts with.

Geiger is very much about doing things now, in the Present, as opposed to the past or future. Because of this, the Present spec has more access to haste than any other non-red spec. Even the starting deck has this:


Nullcraft can be a headache for some opponents because it threatens to deal 1 damage to anything you want every turn and will rarely get hit back by what it attacks. Only ground forces with anti-air can hit it back, or other fliers. It’s even immune to lots of spells that opponents would like to use on it. The Tower add-on can hit it, but Nullcraft will still get to deal its 1 damage at the same time.

This spell of Geiger’s is also about being Present and ready:


Readying one of your units means you can attack with it, ready it, and then either attack AGAIN or patrol with it. That alone is very powerful, but this spell also catches opposing exhausted units in a time web that keeps them from attacking, patrolling, or using exhaust abilities for a turn.


This one requires a lot of thinking and planning to use well. You’re bouncing one of your units to your hand and playing another. There are a bunch of uses you can get out of that bounce, and a bunch of uses you can get from something else arriving. This is a great card for combo players who want to do ridiculous things. Also notice that the card you play here comes from your codex, not your hand, so a) you don’t even go down in cards overall from playing this and b) you can use your entire codex as a toolbox to get whatever you want instantly, without even waiting to draw it. Notice that you DON’T have to meet the tech requirements for the incoming card, it just has to be the right tech level and cost. So for example, you could return a Present tech II unit that costs 5 to your hand, and you’d be able to put a Future tech II unit that costs 5 or less into play, even if you can’t normally play any Future tech II units at all! I’ll leave it as an exercise for players to discover all the many uses of this card.

Geiger’s ultimate spell is another combo player’s dream:


Research & Development should get you all the cards you need to do whatever you want. You might need a certain combination of cards that have incredible synergy. You might just want a whole lot of cards that are cheap to cast. Either way R&D is a superstar.

Some rules notes about card drawing will help you understand what R&D does and doesn’t do. When you play a spell, you do what it says THEN that spell goes to the discard pile. So it can’t draw itself as part of its effect. Also, as a general game rule, when you reach the end of your deck, you reshuffle your discard pile into your draw deck and keep going BUT you can only do that once per main phase. The upshot of that is if you have 2 copies of R&D, it’s actually possible to play any card in your deck as many as 4 times; any given card can have 2 copies and you can potentially see each copy twice in a turn by drawing enough to cause one reshuffle.

Now moving on to tech I units:

Your starting deck has a Fading Argonaut, but at tech I you get the real deal. A 3/4 for 3 is the gold standard at tech I and this one gets to attack and patrol on the same turn. Sentry costs 1 less but has more specialized uses. It has anti-air to beat fliers and it protects your patrolling units and heroes by reducing spell and ability damage that would be dealt to them.

And now for some really cool effects at tech II. This one is unique in the game:


Chronofixer is a pre-emptive counter to your opponent leveling their heroes and casting ultimate spells. He’s also untargetable, so opponent’s can’t easily kill him with spells or abilities. He can really screw up your opponent’s gameplans if they’re relying on heroes. His art even looks like he’s trolling you.


This guy can summon just about anything through his warp gate. Amazingly, he can get any non-tech III unit from your codex and put it into play for just 1 gold. 1 gold! It’s even crazier that you don’t need to meet the tech requirements for it, so you’re not restricted to just tech II Present units. Warp Gate Disciple is a must-kill unit; if opponents let him live the one turn he needs to get going, they’re probably going to be sorry. If he lives two or three turns, you’ll get overwhelming advantage.


How about a 5/5 that can’t ever be killed? Opponents have to deal 5 damage to Immortal just to exhaust it and get it out of your patrol zone for one turn. Immortal is expensive, but well worth it considering you get one of the most durable units in the entire game.


Tricycloid is a tricky unit. The purple faction does not have any direct damage effects outside of Tricycloid, so the ability to deal 3 damage exactly where you want is pretty handy. Even after you do that, you still have a 3/3 left. The real value of Tricycloid is getting even more runes out of him. Try using up his runes, then getting him out of play and back in somehow. Geiger’s max level ability can do that, and Temporal Distortion allows you to bounce out one Tricycloid in order to get another. Also take note that Tricycloid’s runes are “time runes,” which are the same kind used by fading on Past’s units and forecast on Future's units. Anything that can add time runes to those things can add them to Tricycloid too.

And now for tech III:


Present’s mighty tech III is, of course, an enormous war octopus adorned with battle armor. In true octopus style, he costs 8, is an 8/8, and has an ability that costs 8. If you could afford Octavian, then the following turn you should be able to afford his ability. If you’re allowed to actually use that ability, that should be game over. Disabling 8 units and/or heroes is enough to lock down their entire side of the board, and it will remain locked down forever because you can do that every turn. Purple’s late game power does not disappoint!

Geiger is Present and he’s ready to beat you right now

Codex: Past spec

There’s a myth about an ancient race that had powerful magic as well as advanced technology beyond even our own, but then they disappeared from the realm. They are called the Vortoss. While some thought it was just a story, we now know that the story is true.

The Vortoss culture is fixated on time, what it means, how it flows, and how we are at its mercy. They sought to harness time and bend it to their will. One sect of Vortoss are mystic historians who were focused on looking back. Others are engineers and futurists, focused on looking forward.

The scientist Max Geiger accidentally made contact with the Vortoss during experiments he conducted on the nature of time. He was able to communicate with them, learn about them, and even develop some of his own technology based on theirs. Geiger is the link between our timeline and theirs, so the Vortoss call him their emissary. They are now able to exist in our time, which shifts the balance of power in the realm significantly.

Before we meet Geiger though, let’s start with Prynn Pasternaak, the Vortoss’s hero of the Past. Pasternaak is a historian who wants to record the Past as well as preserve it. The Past tends to slip away from memory, and it takes constant vigilance to keep it in view. Pasternaak herself is slipping away into the Past, as we can see from her hero card’s first ability:


The fading ability means that she arrives with 4 time runes, you remove one each upkeep, and if you remove the last then she dies. If she really does fade away this way, the ripples in time disrupt your enemies too. They will be stuck with the same cards across two turns, unable to draw more.

Pasternaak’s max level ability is a powerful way to gain tempo. It can get rid of ANY unit—even a tech III—but this effect is only temporary. When Prynn Pasternaak herself disappears, any units she sent to time-prison will return. The idea is that if you can temporarily get rid of one of the opponent’s most powerful units, that will help you gain control of the battlefield before it returns. Make sure to attack each turn with Pasternaak so that she gains a time rune each turn, and use other means to add time runes too. The more you add, the longer you can banish an enemy.

The purple faction’s starting deck has a unit with fading too:


Fading Argonaut is a 2/3 for only 2 gold, but his drawback is that he usually only gets to attack twice before he fades away. You can play around that drawback pretty easily and just make sure he dies for your cause in a helpful way.

While the purple faction has a variety of strategies, they excel at late game power. To help them survive to that late game, they have one of the best defenders in any starting deck:


Moxen are generally very valuable, and I think you’ll find no exception here. While Hardened Mox is expensive at a cost of 3 gold, it’s INDESTRUCTIBLE. It can patrol for you turn after turn after turn. If your opponents would kill it, all that really does is exhaust it and remove it from your patrol zone. They’ll have to deal with it again next turn. This helps you turtle up and get to the late game, though you won’t be able to keep your Mox once you have a tech II unit—it says so on the card that you can’t.

Another thing that goes hand-in-hand with late-game control decks is that they want card draw. Your starting deck provides that too:


At the very least, it draws 1 card, but it’s really not that difficult to draw 2 with it. Drawing 3 cards with it takes some setup, but it’s doable sometimes.

Pasternaak’s spells are geared towards control and they each help you answer different kinds of threats. She has one of the most reliable ways to get rid of a unit in the game:


For just 3 gold, she can bounce any non-tech III unit to its owner’s hand. Your opponents will be worried about this spell if they even see her on your team. Keep in mind that Undo is getting you behind on card advantage though. After you use it, you go down in cards by 1 (because you used the Undo card) but your opponent actually gains a card in hand (the one you returned). You can usually more than make up for that by setting up favorable combats, or putting the opponent behind in gold (Undo an expensive unit of theirs), or by using the tempo to generally get ahead of them in board position. Also, if you Undo a token card it will straight up kill it because tokens can’t actually be in a player’s hand.

Undo gets rid of units, but heroes aren’t classified as units. Pasternaak can take care of heroes too with this:


Ever wondered how a hero started out? It started out weak, without any buffs, and at level 1. When you tell the Origin Story, the hero returns to the command zone and goes back to that original state. (That’s a general rule about heroes in command zones; they can never have any levels or buffs, etc there.) Origin Story is especially great if you use it on an opposing max level hero. That means you made the opponent waste all the gold they put into leveling up a hero. The mere threat of this will make them wary relying on max level heroes or ultimate spells.


Vortoss Emblem might not seem as splashy as Undo or Origin Story, but I’ve said a lot of times to playtesters “You know, you wouldn’t have lost if you had Vortoss Emblem there.” The cost of 0 is pretty attractive, and the fading 3 part is hardly a relevant drawback (it even powers up your Temporal Research card draw!). The point of it is that it basically “pre-counters” anything that would target your stuff. For example, afraid of an opposing purple player’s Undo? Attach Vortoss Emblem to THEIR best unit and now that’s the only thing they can Undo for 3 turns (which might as well be forever). Afraid of the Necromancy hero's Doom Grasp that might kill your hero? Vortoss Emblem helps you there too. Even though Doom Grasp can target a hero, it can ALSO target a unit, which means it will have to target the unit with Vortoss Emblem on it rather than your hero.

Pasternaak’s ultimate spell is a powerful reset button:


If you’re behind, Rewind can get rid of all the units on the table, giving you a do-over. You can hopefully play a few units of your own afterwards that same turn. Rewind works especially well if you have any units “in the future,” but you’ll have to read the article about the Vortoss’s Future spec to understand that. Rewind is also one of the only ultimate spells that you can play without telegraphing it. It’s possible to summon Prynn Pasteraak from your command zone, level her to max, then play Rewind that very same turn. This helps you make a comeback if you’re getting overwhelmed—a thing not usually possible with ultimate spells. They usually require you have to have a max level hero that lives one turn before you can cast them.

At tech I, your Seer can manipulate time:


Adding or removing a time rune can come in handy, and you get a 2/1 unit as well for just 1 gold. This makes Seer a staple card that you’re often happy to replay, especially if you have any Future cards with forecast (again, see the article about the Future spec).


A 2/3 is a pretty solid unit, and that comes along with the effect of removing one of the opponent’s early game units. That’s a great overall gain in battlefield position. That said, you can use Stewardess of the Undone to return your own units too if that somehow helps.

Now let’s look at Past’s tech II options. First, you have a really efficient flier and a really efficient ground attacker too:

The drawback is that both of these fade away. You can probably get a lot of value out of a 1 cost 3/4 flier or a 3 cost 6/4 before that happens though. And both of these have a built-in way to add a time rune if you really want to keep them longer.

Are you still afraid they’ll fade away anyway though? Your fading units can get a Second Chance:


Second Chances will save the first unit per turn that would die to anything as long as it’s not combat damage. That includes fading as well as sacrificing or destroying units.

If you think fading is still a sad drawback to have, yeah it really is sad when things fade into the past, forgotten completely. But Rememberer flips that around. As careful historians, Rememberers remember those in danger of fading away:


That’s a ton of value right there. Every turn, you get a FREE unit with fading from your discard pile. You do have to meet the tech requirements for that unit, but it can be anything from tech 0 to tech III! A Rememberer can even remember another Rememberer!

Here’s a completely different way to get ahead on tempo:


This affects you as well as your opponents, but the effect is actually way in your favor. This is partly because it affects your opponents before it affects you, but also because Past is geared to have cheap units. Your 1 cost 3/4 flier is looking pretty hot right now compared to some 8 cost thing that your opponent can’t even play at all under Slow-Time Generator. If you’re already a little ahead on tempo, this card lets you “cash in” and pull way ahead.

Finally, here’s Past’s tech III unit:


Ebbflow Archon is a mind-bender. He has fading, but he actually gets BIGGER as he fades, not smaller. He can clear out the entire board instantly, which also makes him BIGGER, but he’ll die sooner as well. Time is a mind-bending thing to deal with, so make sure you have the brain for it before using Ebbflow Archon. When you use him right, he should be able to clear away just enough stuff so that he’ll still live long enough to take advantage of the mostly-empty board state he creates.

Those who don’t remember Past’s tricks are doomed to lose to them repeatedly.

Codex: Strength spec

Garus Rook, the stone golem, is a long-time friend of the lawyer Jefferson DeGrey. A VERY long-time friend, in fact, because both of them are unnaturally long-lived. They lived through an earlier history where a totalitarian government ruled, and they see the seeds of it growing again. This time around, DeGrey urged Rook to help unite the people by inspiring them through an Olympic-style competition that we now know as Fantasy Strike.

Rook also heads up the Morningstar Sanctuary, the seat of power for the Whitestar Order. This sanctuary is a land of do-as-you-please, in that personal freedoms and creative expression are at a maximum. Rook’s strength of character is notable, and so is his physical strength in combat. Rook is the Whitestar Order’s Strength hero:


Rook’s first level ability, though blank, is still one of the most powerful in the game. It’s actually that he’s a 2/4 at level 1—the only hero in the game with those stats. At mid-level he bowls over a lone patroller, and max level he gets a second life. You have to kill him once just to give him a crumbling rune, then kill him again for real. This makes Rook a tank, and helps you dominate the board right from the start of the game.

Rook’s Thunderclap can also help in the early game:


Your opponent probably only has units that cost 2 or less, so you can potentially clear out their entire patrol zone with this then attack whatever you want. Token units count as cost 0, by the way, so you can Thunderclap them too. 


While Rook himself is a great patroller to protect your forces, it’s dangerous for opponents to patrol powerful things of their own. For 3 gold, you basically neutralize their patroller forever. That’s even more powerful than actually killing it, usually, because it means they can’t draw it and play it again later. This also thins your own deck because Entangling Vines stays on table when played (it’s an ongoing spell).


Rook loves nature and nature loves him. He’s a gentle giant. Meanwhile his two cute birds can rush you down. Flying is very powerful in Codex, and it means these birds can attack ground units and heroes and not even get hit back, unless they have anti-air. They can be really annoying for your opponents to deal with, and they keep coming back, too. Bird's Nest stays out indefinitely (it’s an ongoing spell), and it will replace any lost birds.


Rook’s ultimate is actually weaker than most other ultimates overall, but that’s because Rook himself is such a powerhouse. If you’re willing to do a little work, it’s still devastating though. If you sneak in 1 damage to a tech I, II, or III building first (perhaps with a Bird or a stealth Ninja such as Smoker), then this spell will DESTROY that building immediately.

Casting two earthquakes is very costly at 10 gold, but look at the effect you get. If your opponent has, for example, undamaged tech I and tech II buildings and an undamaged base, two earthquakes will destroy BOTH their tech I and II buildings. That will take them 3 turns to rebuild. Also their base will take 9 damage (1 + 4 from the Earthquakes + 2 + 2 from the two tech buildings being destroyed). This is setting you up for a win by crippling them so much, and even though it costs a lot to do, it’s not so easy to stop. Rook having two lives makes him very durable.

Strength is tanky; it’s very good at stalling. At tech I you can play this annoying rock:


You’re trying to attack something and a giant boulder gets in your way. We’ve all had that happen. In this case it’s a 0/6 legendary boulder. You can’t have two of them in play, but it’s a good thing it’s legendary because of this:


This upgrade improves the stories and myths, making them even more memorable. Remember that boulder? It was actually a 2/8 boulder as the story goes! It rolled out into battle and crushed its foes. It was even a 3/8 sometimes when it patrolled in the Elite slot.

Tech II Strength gives you access to some powerful tools. For a mind-blowing start, look at this guy:


The Doubling Barbarbarian has pretty good stats to start with, but he gets DOUBLE the bonuses as usual. A +1/+1 rune gives him +2/+2. The white starting deck can also give him +1/+1 (really +2/+2) from Aged Sensei and Sensei’s Advice. Discipline’s tech I Sparring Partner buffs him twice as much as usual too. He can be the center of quite a crazy combo if you work hard enough for it.

I mentioned Jefferson DeGrey earlier as Rook’s friend and long-time ally. He makes an appearance as a legendary unit in Rook’s spec, too.


DeGrey is a answer to many questions. How will you deal with lots of Ninja tokens? Lots of Frog tokens? It’s great flavor that he is also the answer to Quince’s lies (his Mirror Illusion tokens). DeGrey shines a light on the real Truth, and he smashes all tokens with his mighty fists. DeGrey is also legendary, which means he’s actually a 6/5 for 3 if you have the Mythmaking upgrade.


Now there’s some Strength for you. A 6/7 that’s unstoppable when attacking a base. That’s puts your opponent on a 4 turn clock. Simple and effective.

Earlier I mentioned that Strength is good at defense. Rook had defense in mind when he built the Morningstar Sanctuary. It’s only accessible through a narrow mountain pass, which means enemy armies' numbers count for nothing as they traverse it.


In Codex, it’s great for stalling. At first glance, it looks similar to if your base had 4 more hit points. Usually your opponent has to spend a lot more effort than just 4 damage to kill it though. For example, if they attack it with a 6/6 then it actually saved you 6 damage it made them spend 1 gold to even do that. Also factor in that Morningstar Pass actually has 6 HP, not 4 HP, if you have Mythmaking out.

Because Ardra’s Boulder, Morningstar Pass, and Rook himself give you so much defense, it makes Strength’s tech III one of the most practical to use. Tech up to this from behind your wall of defense:


You must keep your word as the Oathkeeper. That’s a drawback and all, but he’s so incredibly powerful that he can win even with his oath in place. You can sideline an opponent’s entire patrol zone with him and smash their base. The Oathkeeper himself has 7 ATK (or 9 ATK if you have the Mythmaking upgrade) PLUS swift strike. Attacking with him and whatever else you have right past an empty patrol zone should give you an easy victory.

Turtle up with Strength then smash your opponents with overwhelming force!

Codex: Ninjutsu spec

Setsuki is a fast learner and she’s fast in general. She’s the hero of the Whitestar Order’s Ninjutsu spec:


Her first ability reflects how nimble she is. She can jump out of the way of an attack unless the attacker is extra careful. Her middle ability can make up for her low stats. She’s fast enough to strike an enemy before it strikes her, letting her avoid taking damage. But it’s her max level ability that is truly powerful: drawing 2 extra cards per turn is A LOT.

You’ll normally play 1 worker per turn and 1 other card if you want to maintain your handsize of 5 cards. With a max level setsuki, you can play 1 worker and 3 other things without going down in hand size, so you’ll want a lot of really low-cost cards. That’s similar to how she works in Yomi too: you get to play a lot of cards, though each one is probably not that strong on its own. That said, killing a max level Setsuki should be a top priority for your opponents. They might get buried under all that card advantage if you keep it up.


Setsuki has some early game Ninjas she can fight alongside. Here’s a simple one from the white starting deck:


A 2/1 for 2 isn’t bad, and the sparkshot can sometimes deal an extra 1, or at the very least it can make your opponent not patrol in the slots they really want to in order to avoid your sparkshot. More relevant than that, you can buff your white units so this 2/1 becomes a 3/2 with Aged Sensei’s help (I showed him in the Discipline spec article). Or use Sensei’s Advice:


There is one Ninja who you won’t want to buff though:


If you try to target him, he’ll disappear in a puff of smoke. He can be really annoying because he slips past patrollers. Opponents often don’t want to even bother killing him, but if they don’t he can get away with doing 5 damage over 5 turns or something. 

Here’s another Ninja-like trick for you:


Don’t like an opposing Squad Leader? No problem, drag it somewhere else so you can attack a different thing. You might also pull their Technician patroller to a different slot, then kill it, so that it won’t give your opponent a card when it dies. That cost you a card, yes, but Setsuki hardly cares about that if you’re max level and drawing 2 cards per turn. 0 is the right price!

Moving on to Setsuki’s spells, one can power her up:


She already gets swift strike at level 4, and this spell gives her a slew of other combat-related buffs. You can use this to play a control style where you threaten to dominate the board and kill anything your opponent plays.


Throw down a rain of shurikens, dealing 1 damage to each patroller. Some strategies involve a bunch of 1/1 tokens, so Shuriken Hail can threaten to kill several of those at once, or to soften up some bigger patrollers so that the rest of your forces can do cleanup.

Speaking of strategies that involve a bunch of 1/1 tokens, that’s you. That’s your strategy:


Setsuki calls her friends for backup, and they arrive ready to strike immediately, thanks to haste. The stealth part lets them ignore patrollers and attack whatever you want. Setsuki is already dangerous at max level just due to her card draw, but now factor in that at max level she can also cast this spell over and over. That’s a lot of Ninja friends.


Switching over to Ninjutsu units now, at tech I you can get Fuzz Cuddles. And who wouldn’t want such a ridiculously cute dog? Gameplay-wise, Fuzz Cuddles can be tricky to use. He has to survive a turn for his healing to trigger, and you have to have things that are damaged but not dead so that he can heal them. Sometimes you won’t manage to make those stars align. If you do though, it’s a huge swing. Healing two damage on EVERYTHING you have that’s damaged is pretty amazing when it works. Try using Fuzz Cuddles with things that are already hard to kill, such as this:


When you fight 1,000 Ninjas, they tend to be pretty weak. But when you fight just ONE Ninja, it’s usually epically strong. That’s why Inverse Power Ninja is at her best when she’s alone. You get an absurd 6/6 for just 3 gold if you’re willing to go it alone with her. You might want at least one other unit or hero on the table, but she’ll shrink in power for each one of those. She’s pretty different than most tech Is in the game, so this opens the door for some unique rushdown strategies for Ninjutsu.

Let’s see what tech II Ninjutsu can do. First, a ridiculous Ninja:


Glorious Ninja is one of the reasons to use the Ninjutsu tree at all. Haste and swift strike together have an incredible synergy. For 5 gold, he’s basically a kill spell AND a unit. As soon as you play him, you can attack with him and kill anything with 4 HP or less and you still get to keep your Glorious Ninja. Are you worried about him getting attacked back on your opponent’s turn? Glorious Ninja will STILL deal his combat damage first (due to swift strike), even when he’s attacked, so they better attack him with something that has more than 4 HP or that has swift strike also. That is why he’s so glorious.

Ninjutsu is also partial to Cute Animals:


While most of Ninjutsu is aggressive, this little guy gives you a defensive option too. Who wants to attack into a 6 HP patroller with deathtouch? Ouch!

Ninjas and Cute Animals, you say? What if we combined both of those into one?


The Masked Raccoon is both a Ninja and a Cute Animal. That works really well with his abilities, which rely on both Ninjas and Cute Animals. So if you have two Masked Raccoons in play, they can both slip by patrolling units and on opponents’ turns, nothing can attack your Masked Raccoons either. Notice that a pair of these give you a total of 6 ATK and that’s enough to destroy a tech I, II, or III building in one turn if the opponent isn't patrolling any heroes. You're threatening to do that EVERY turn because a pair of Masked Raccoons is hard to kill.

Here’s another card that interacts with Ninjas and Cute Animals:


This is the school Setsuki trains at. It’s an all-girls school of Ninjas, taught by an old master named Jade Fox. The Fox’s Den School is hidden in the forest, and is invisible to those without detection. That makes it very hard to attack. It makes all your Ninjas and Cute animals invisible, which means they are untargetable, unattackable, and they can ignore patrollers. The School can even train other units to become Ninjas!

Look back at some of the earlier cards to see how Fox's Den School affects them. Fox Viper and Smoker from your starting deck both become invisible. Even those early units are not bad when they get to ignore patrollers AND become unattackable themselves AND become untargetable by opponents. Same goes for your Inverse Power Ninja at tech I. And an invisible Glorious Ninja now gets to ignore patrollers and go for the kill, too. You're putting an opponent on a clock here, and they are unlikely to be able to kill any of your Ninjas OR the building that is making all your Ninjas invisible. Remember, the Fox's Den School itself is invisible! 

Now let’s meet the school’s headmistress:


The venerable Jade Fox is a Ninja herself, so that means she also has flying and swift strike. Between her and the Ninjas she arrives with, your opponent only gets 3 more turns to live. You can make it even faster by using other Ninja units you have laying around.

The Ninjutsu spec is stealthy, fast, and formidable in combat. The Fox’s Den School has taught them well.

Codex: Discipline spec

Many of the strongest, most disciplined warriors of the realm have banded together to form the Whitestar Order, based at Morningstar and led by stone golem Garus Rook. Their training grounds are home to enlightened monks, mighty barbarians, and agile ninjas with their cute animal friends. Their strength comes from both their teamwork and skill in combat. The Whitestar Order holds a series of fighting tournaments called Fantasy Strike, intended to bring together the many different peoples of the realm in hopes they learn to question Flagstone’s rule.

Grave Stormborne is one of the most dedicated and skilled martial artists in the land. He’s the embodiment of Discipline, which is his spec. Grave is entirely focused on increasing his own skills, even to the point that some would say it’s a selfish neglect of what he could be doing to help others. When you need a champion though, you’ll be happy to have Grave on your side:


Grave only needs to reach level 3 to become a 3/4 with readiness, which lets him attack and still be able to patrol afterwards—fitting for such an adept fighter. As for his sword, he doesn’t use it often. As a child, the Nox Oracle told him to only use it when necessary. At max level, he will agree to use it ONCE. It will slice through ANY unit or hero—even a tech III unit is not safe.

Heroes are especially not safe against the white faction. The white starting deck contains this monster of a spell:


Snapback works the same way it does in the Marvel vs. Capcom fighting games: you knock a character out of play and force a different character into play. Heroes lose all their levels and any other runes or attachments or whatever when they go back to the command zone. Snapback is a very powerful late-game spell, and you’ll often be tempted to play it as a worker early because it might not help you much then. Here’s my advice though. I’ve said this phrase a lot, “You know, you wouldn’t have lost the game right there if you had kept Snapback.”

Back to the early game though, the Whitestar Order is good at working together in combat. Both these Monks from the white starting deck help your early combats:

I like the contrast in their personalities. Savior Monk is peaceful and heals you, while you can already tell that Aged Sensei is disappointed that you’re not good enough.

This starting deck upgrade card also helps your early game combats:


At just 1 gold, you’re potentially preventing a lot of damage if you can attack enough. The more you attack, the better a deal this becomes. White’s teamwork here makes them quite a threat right from the start.

At the tech I level, Rambasa Twin works in an unusual way:


The 4 gold cost is high for a tech I, but you actually get TWO of this guy. That’s a lot of presence on the battlefield! And another perk is that he only occupies one slot in your deck. Later in the game when you have better cards, you won’t be drawing past 2 copies of him to get to your really great cards; you’ll have 1 of him in your deck and another in your codex.

Continuing the theme of white (and especially Discipline) units working well together in combat:


Make sure to train up with Sparring Partner before going into battle. If your opponent lets you keep him, he’ll eventually give all your guys a +1/+1 rune. And if you’re willing to pay some gold, you can speed up that training process and spar with all your units in a single turn.

At tech II, the power level is even higher.


Focus Master’s ability is a little stronger than I think it first appears. He’ll save one of your units or heroes from dying, and he’ll do it three times, but he’ll only do it if they would EXACTLY die. So that’s like if a 3/3 takes 3 damage (not 4 damage). You can set up those exact situations though. In Codex, you do combats one at a time so you can make sure your 2/2 goes up against their 2/2 and so on. Once you realize that, Focus Master is basically saying “do 3 even trades, then keep all your guys instead of them dying.”


Now that’s a powerful Monk. He parries your moves before you even do them. When he’s on the table, your units and heroes can’t be hit by any spells or abilities that use the target icon. This can throw a wrench in a bunch of strategies your opponents might be using, and it will force them to try to kill the Mind-Parry Monk another way, probably in combat, but he’s a fearsome 5/4 in combat.

Going back to the starting deck for a moment, there’s another Monk who helps protect you from being unfairly targeted:


Morningstar Flagbearer is right at home in the white faction, because Rook’s Morningstar Sanctuary is a place where several people who were oppressed for being different have fled to. In gameplay, both Flagbearer and Mind-Parry Monk let you say “hands off my guys!”

Do you like having awesome heroes? Discipline tech II can train up your heroes to their full potential:


Yes this somehow only costs 1 gold. It’s nice to get +1 ATK on all your heroes (an effect you’re happy to pay 1 for by itself), but if your Training Grounds can survive just one turn, you can exhaust it to instantly max out any of your heroes. Remember that at max level, Grave can use his sword rune to kill just about anything. Training Grounds is ridiculously efficient at leveling up your heroes and frees up a lot of gold for you to put into other things. The main drawback is just that it’s a building, meaning it can’t attack or patrol and you have to protect it.

Now let’s look at some of Grave’s spells. Grave is adaptable and versatile, so this spell expresses that:


It’s a toolbox all on one card. You can beat flying stuff, invisible stuff, upgrades, or just repair some damage from one of your buildings if none of that happens to matter by the time you draw Versatile Style.


If you want something more straightforward, Reversal lets you dragon punch a patroller. That will probably kill it, but even if it doesn’t, it will still knock them out of the patrol zone!

Now it’s time for some True Power:


True Power of Storms is one of the strongest supers in Yomi. In that game, it costs 3 Ace cards to use. In this game, it costs 3 cards with a 3-gold cost (neat!). If you can line up your card draws just right, True Power of Storms becomes an absurdly powerful finisher. You can win the game by casting two of them, or you can point it at any unit or hero to kill it. It even hits tech IIIs, which not many things do.

And finally, the Discipline tech III has some sentimental value:


Grave Stormborne’s father was a mighty warrior and a beast in battle. He was killed in battle when Grave was young. This statue memorializes him. Even being near it inspires other heroes with a +1/+1 bonus. Hero’s Monument summons the ghost of Grave’s father who is an indestructible, untargetable, and unstoppable 8/8. Grave can at least fight alongside the spirit of his father in glorious battle.

Codex: Necromancy spec

Garth Torken’s tinkering with anatomy led him to discover some disturbingly dark powers. He is now the Necromancy hero of the Blackhand Scourge.

Torken’s experiments with human cadavers are where a lot of his skill comes from. Although he later moved on to raise the dead of other species, he’s most at home with an army of human skeletons. Here is his hero card:


Without even spending a card, he can create a new Skeleton token every turn. These Skeletons have lots of uses. They can protect Torken if he wants to turtle up and go for a late-game plan. They can patrol in the Scavenger slot to give him 1 gold when they die (making them cost a total of 0 gold overall), or they can patrol in the Technician slot to give him a card (letting him basically buy a card for 1 gold AND stop an attack in the process).

When he reaches level 4, he can sacrifice Skeletons to draw cards. That’s usually a desperate measure, but later in the game if you desperately need a certain card, that helps you get it.

His max level ability lets him resurrect a free unit. That can really turn the tides of battle! And just so you understand how the timing works, this ability requires very little setup. Before your turn begins, you can know that you’ll want to max his levels, so when you “tech” for new cards just before your turn (as in put 2 cards from your codex into your discard pile), you can make sure one of them is the best thing for him to resurrect.

To understand how to use Torken, we have to look at the black starting deck. Here is his bread and butter:


Two Skeletons at a time is good for building your army. Remember that you’ll see this card several times over the course of the game. So what will you do with all these Skeletons?


This is one option. Because of the patrol zone bonuses, your Skeletons are inherently good on defense. But with this starting deck upgrade, you have the option to use them on offense too. The long-range ability they get means they can attack without getting hit back (unless they attack something with long-range, which they probably won’t). And while you're at it, have some anti-air too.

Another way to go is to use your Skeletons as a resource. They are probably weaker than whatever your opponent has, so this becomes a great trade:


As a rules note, you can cast this when you don’t have any units (you’ll have to have a hero though—you need a hero to cast a spell) and then you won’t actually sacrifice anything. There is a general rule to “do as much as you can” for all effects, so even though you might not have any units to sacrifice, your opponent still has to. And if you do have some Skeletons laying around, that’s not a big deal to trade one of those for a good unit the opponent has. Try to kill their weakest unit in combat, THEN sacrifice the weak so it kills an even better unit of theirs.

There’s one Necromancy spell you will come to know very well:


It’s one of the most reliable ways to suck the life out of something in the entire game. This spell alone is a big reason to use Garth Torken. Sacrificing a 1/1 Skeleton or something hardly matters when it’s killing their best tech II unit or their hero who was threatening to cast an ultimate spell at you.

This next one I personally find really fun:


Be careful when bargaining with a Lich! You lose a worker and 20% of your base’s max HP, but you get THREE units from it. That's a total of 6 ATK, too. The 2 gold cost is minimal, so you’re tempted to play this spell over and over. Can you get away with casting it 3 times? 4?? You’re killing yourself in the process, and becoming vulnerable to more and more trickshot ways to die, but oh that power is so sweet. A whole army can be yours. Idea: reality tv show based on how players use this card.

If you want a tricky spell, look into Nether Drain.


It costs 1 and you can add 2 levels to one your heroes. That normally costs 2 to do, so you're getting 1 gold ahead (and one card behind) on that part of Nether Drain. But you ALSO get to lower another hero's level by 2. By leveling down enemy heroes, you make them smaller and sometimes can take away key abilities they have. Ideally, you can level down an enemy hero, make it small enough to kill it in combat, then that will give you the usual 2 free levels you get for killing an enemy hero. That's good value if you make that happen.

If you want to be tricky, you can also level down your OWN hero on purpose with Nether Drain. You might want to do this if your hero has some effect that triggers when they reach max level, such as your Necromancy hero himself! The overall calculation here is that if your Necromancy hero is at max level, you can level him down then back up to max for a total of 3 gold and 1 card. That will give you another free 5 cost unit from his max level ability. Or you could count it as just 1 gold total if you factor in the 2 free levels you gave your second hero from Nether Drain. You can’t do all that in one turn because it says right on the card that the hero that leveled down can’t level up this turn, but across two turns you can pull off the trick of triggering Torken's max level ability twice.

Let’s turn our attention to Necromancy’s tech I units.


If you just play Hooded Executioner as a 3/3 for 2 gold, you’re doing fine. What’s so great about him is the flexibility to also get what’s basically a kill spell from him that doesn’t cost any extra cards. You might think paying 3 is a lot to kill their weakest unit, but it really isn’t. You can make sure their weakest unit isn’t some 1/1. Do some combats, kill some things, use the Sacrifice the Weak spell, then play a boosted Hooded Executioner. He’ll hit something worthwhile.


Bone Collector is a totally different kind of threat. He’s a guy your opponent will really need to answer somehow. They can’t let you attack with Bone Collector every turn forever and keep piling up more and more Skeletons. It’s just too good, so you’re forcing them to act.

Moving on to tech II, you have a nice assortment to choose from. Most simply, how about getting even more Skeletons?


When your units die, they come back as Skeletons. If you have two Necromancers, then one of your units dying will produce TWO Skeletons (how does that work??). Anyway, you can get more Skeletons this way.


Skeletal Lord isn’t a real Skeleton, he just plays one on tv. But he buffs your Skeletons. Now you have an army of 2/2s instead of 1/1s (or 3/3s if you have two Skeletal Lords). If you also have the Skeletal Archery upgrade in play, that’s getting pretty ridiculous. You also have some nice flexibility here in how you want to use your Skeletons. One way is as a rushdown tool if they can attack with long-range. Another is to exhaust 5 of them and then put ANY unit from your hand into play. Yes ANY. As in even a tech III from some completely different spec!

Or a totally different gameplan is to use your skeletons as a way to stall. Fill up your patrol zone with annoying skeletons and it will take a while for your opponent to actually kill enough of them to do any real damage to you. If this is your plan, there’s two questions you should think about: 1) how will you actually win? and 2) how will you not die to some ultimate spell or something while you’re stalling?


This is how you can win. From the safety behind your wall of skeletons, you can fling corpses at the opponent’s base. The Corpse Catapult gets corpse runes even when one of your Skeleton tokens dies, so it’s not hard to load up. You’re threatening to deal 18 damage in 3 turns, and you can probably eke out the remaining 2 damage some other way. You might be wondering, “Why is the Corpse Catapult so unnecessarily spiky? What do some of those spikes even do?” It’s best if you figure out some things on your own.

Having a bunch of Skeletons in your patrol zone protects you from most attacks, but you don’t want to let your opponent have free reign on their side of the board. Put a stop to their plans with a Wight:


Wights kill heroes dead. Between Wights and Doom Grasps, your opponent will struggle to put together any kind of spell-based or hero-based strategy.

And now for the tech III:


The Lord of Shadows himself is a black unit, so he is invisible. That means unless your opponent has a detector or a Tower, your Lord of Shadows is untargetable, unattackable, and unstoppable. That’s 8 damage PLUS he makes all your other black units invisible too. Opponents might think they are well defended, but when terrors step out from the shadows, they won’t be prepared.

While the Demonology spec gives the black faction large, powerful units, the Necromancy spec gives them a Skeleton army that must be answered in a totally different way. Make your deals with Demons and Liches, but try to make different deals each time, to keep your opponents on their toes.

Codex: Disease spec

The Disease spec of the Blackhand Scourge faction belongs to Orpal Gloor. He’s surrounded by a creeping death, and even being near him makes most beings uneasy. The Shadow Plague in the Dreadlands is his invention.

The power of Disease is to wear down your enemies. Battles against the Disease spec often involve fewer units than usual, because it’s hard to even keep things alive around the Plague Lord. Here’s his hero card:


His level 1 ability is unique amongst all heroes: Orpal Gloor puts -1/-1 runes onto units and heroes instead of regular damage. Any time he hits a unit or hero, he’s not only reducing their HP, but also reducing their ability to fight back by lowering their ATK as well.

There’s another powerful aspect to those -1/-1 runes as well. If an enemy 3/3 takes 1 damage, it’s possible that some with the “healing” ability could remove that damage and get it back to full health. If it’s a hero, you don’t even need an extra card to heal: all heroes remove all damage on themselves whenever they reach their next level band (so they’ll always heal twice between level 1 and max level). They will NOT remove -1/-1 runes this way though. So when Orpal Gloor weakens a hero, it’s serious. The only realistic way to get rid of -1/-1 runes is to put +1/+1 runes on the same thing. If you do, they cancel out and both disappear.

His middle ability is also really powerful; by sacrificing a unit he can put a -1/-1 rune anywhere. (Everything dies to Disease, even your own units!) And then his final ability lets you SPREAD the -1/-1 runes if you can kill something that has any -1/-1 runes. This spread of Disease is key to his gameplan. Make sure to orchestrate your grand plague just right.

This starting deck card can help you get more -1/-1 runes into the mix:


A 2 cost unit that can attack for 2 is already good for a starting deck card, but she can do better! Not only does she give -2/-2 to what she attacks, but she also ignores armor. A 2/2 with 1 armor from the Squad Leader patrol slot would normally survive getting attacked for 2, but not against Poisonblade Rogue because of her armor piercing. So she can get in sneaky kills like that, or you can use her as a way to put -1/-1 runes on things to combo with Orpal’s max level ability that spreads -1/-1 runes.

Orpal can also use spells to put -1/-1 runes on things, but that won’t drop your jaw as much as this:


The operative word there is “ALL”, as in maybe destroy a lot of things. It takes some work to set up, but you can threaten to clear their board out with Spreading Plague. If you feel yourself coming down with a slight case of -1/-1 runes, consult a doctor because it could become serious really fast.

Disease isn’t totally one dimensional about just killing though. This spell attacks opponents' hand cards:


It can’t get rid of unit cards, but the rest of Disease is geared toward doing that anyway. Carrion Curse is your chance to get rid of the cards you’ll have more trouble dealing with—before they even hit the table. That includes spells, upgrades, and building cards.

Orpal Gloor also has one of the most terrifying ultimate spells in the game, Death and Decay:


It’s expensive at 8 gold, and remember that it requires Orpal to be max level at the start of the turn he would cast it, but the effect is potentially game-winning. You can wipe out most of an opponent’s forces, then clean up the rest by attacking with yours. If you cast two copies of this in one turn (very, very expensive) it actually does pretty much win. It will literally destroy all their tech buildings other than their base. Opponents can’t really let your max level Disease hero go unchallenged. They also have to pressure you enough that you can't afford this plan.

Before we get to the tech I units, there's a black starting deck card you should probably know about too. Orpal Gloor's middle ability makes you sacrifice a unit. The black starting deck spell Sacrifice the Weak does that too. And of course lots of your units die in combat. Here's just the thing for all those dead units:


Graveyard helps you in multiple ways. First, you might be able to play a good unit twice in quick succession with it (play it once, then it dies somehow, then play it again). Next, it doesn't cost a card to play units from your Graveyard. If you have 5 cards in hand, then you play a unit from your Graveyard, you still have 5 cards in hand. This lets you play more threats without reducing your card draw. And finally, Graveyard helps you thin your deck. Even if you have 3 bad units in there, that's 3 fewer cards getting in the way of you trying to draw your best cards.

You can build whole strategies around Graveyard, and not just with the Disease spec, but I mention it here because you'll have an extra easy time filling it up with the Disease hero. 

Moving on to units, starting with tech I.

Plague Spitter is amazing, because dealing THREE -1/-1 runes with him is just nuts. He’s a solid, all-around choice. Crypt Crawler is for trying to eke out more efficiency. If you’re just trading with other 3/3s, you might as well pay 1 less and use him. If you’re facing a patrol zone full of 1/1 tokens or something, the sparkshot will kill an extra thing for free. Both Crypt Crawler and Plague Spitter can beat fliers, so they’re actually both important counters in your toolbox.

Moving on to tech II, behold this beauty:


Besides being one of my favorite pieces of art in the game, she’s also a superstar of efficiency. For only 3 gold, you get a unit who kills anything she touches AND doesn’t even really cost a card. Your goal here is to “trade up” by making sure she kills something big and expensive.

Disease loves their -1/-1 runes, so here’s another tool related to that:


He comes with a free -1/-1 rune, and he can also sneak by any patrollers weakened by those runes. His stats are big enough that he can probably kill a hero if he can get to them. Probably by stabbing them with his cursed fingernails.


Abomination is an important unit because even his existence affects the game. Just knowing that you might play him makes opponents scared to play a bunch of 1/1 tokens of any sort. He’s a big play, but I’ll leave it to you to discover strategies with him.

When it’s time to end the game, you can count on tech III units.


He spews -1/-1 runes everywhere, every turn, and then players who have -1/-1 runes take damage to their base too. In other words, everything dies and crumbles, in true Disease style.

If you want to avoid complicated board positions with a lot of units, try killing pretty much everything with the Disease spec.